Modern Audio Player
WordPress
Thank you for purchase. If you have any questions that are beyond the scope of this help file, please feel free to send a message on the link. Thanks so much!
Installation
How to install
Make sure you extract downloaded file from codecanyon, inside you will find file named: 'apmap.zip'. This is the plugin file you upload in wordpress panel!
Activate plugin
After you install plugin you will have to activate your license to start using the plugin.
To activate license you need to create account on the following link, where you will provide your PURCHASE CODE, and get TOKEN in return which you will then enter in plugin section to activate the plugin.
This is made to make sure customers use the license on a single project (as per Envato rules) and to help customers owning many licenses to easily track on which server licenses are being used.
How to update
1. Before update, its recommened (but not required) to export all tables starting with wp_map_ in php my admin for backup (in case update process goes wrong).2. Using FTP client, delete old plugin files and upload new ones. Clear browser cache.
3. Your previously created playlists and other data is going to be saved.
Player skins
There are several diferent types of skins.
Standars skins are regular players, minimal skins are small players, usually without visible playlist, and reduced features. Both standard and minimal skins can be used anywhere in the page and you can place multiple players in the page at the same time. Also when you use standard and minimal skins, they can be used in combination with sticky player which is one main player located on page bottom (if enabled) and plays audio from the current active player on the page (if there are multiple players).
Fixed skins are placed on page bottom. There can only be one fixed player skin in the page for that reason. When fixed skin is used, sticky player will be disabled!
There is also a grid skin which is a thumbnail grid and can be used on its own or in combination with sticky player just like standard and minimal players.
CSS Styling
Each player comes with its own CSS file. You can choose which CSS files to include in the page in General settings:
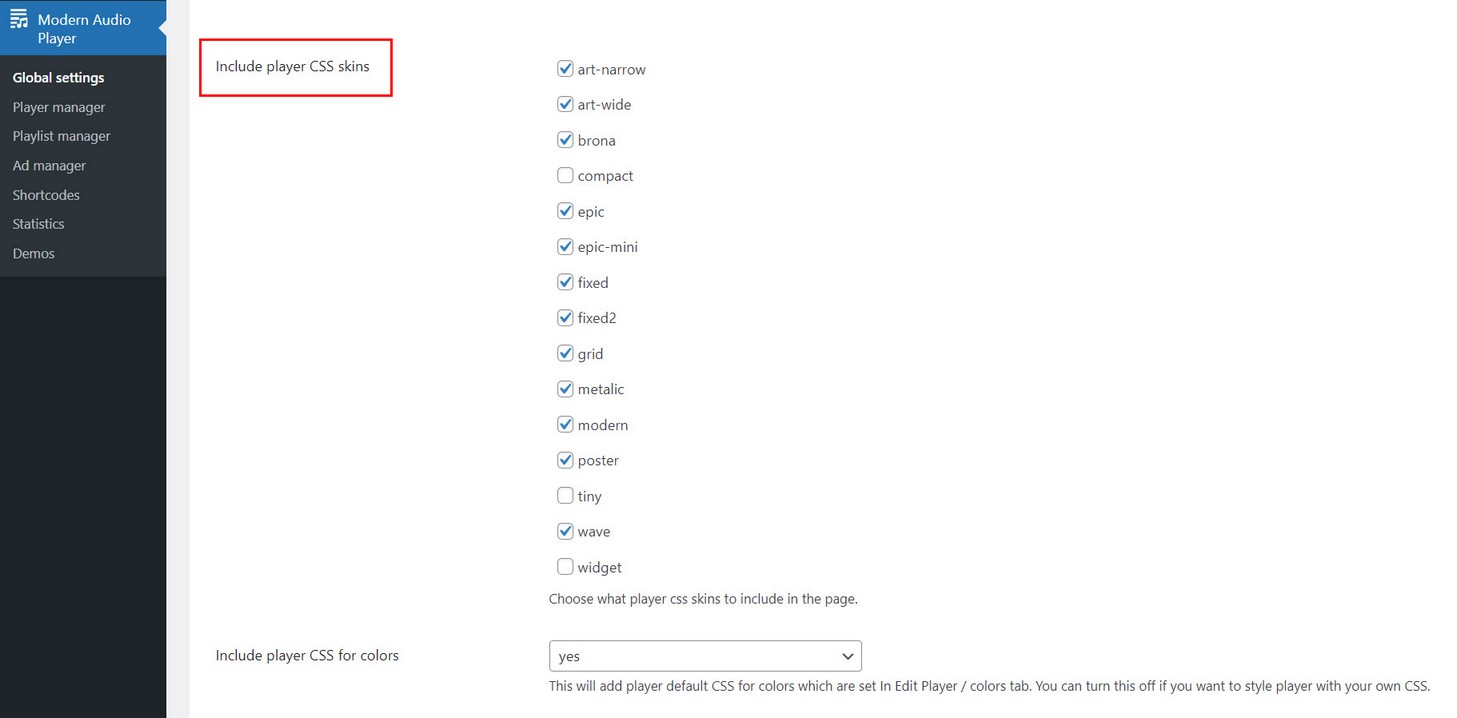
This way, if you only use skin brona for example, you can only choose to include brona skin CSS file.
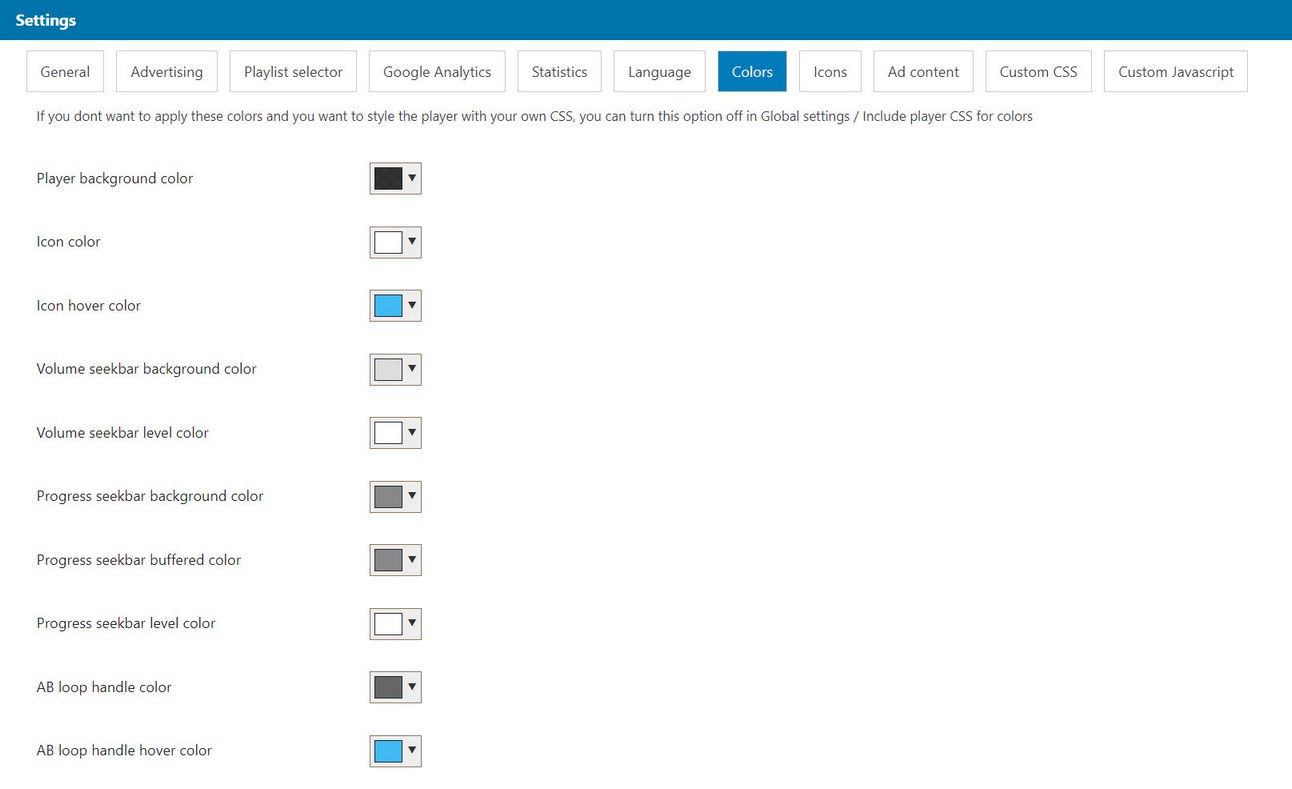
Change player colors
You can change player colors in Edit Player / colors tab. This will include dynamic css for player colors.
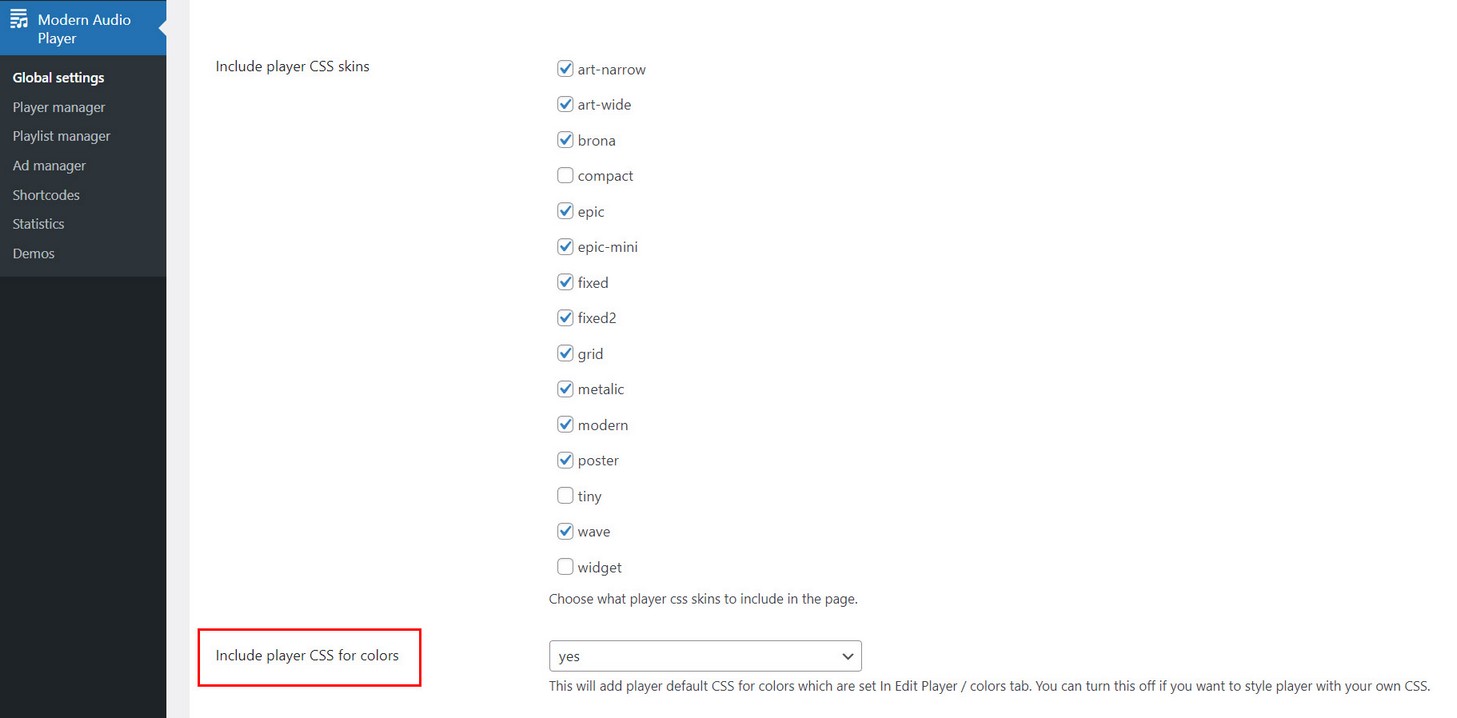
If you dont want to include dynamic css for player colors (and you want to style player with your own CSS) you can turn this option off in General settings:
Working with media
Self hosted audio files
Provide audio url (mp3, wav, aac, flac...) Mp3 format is supported on all browsers and its recommended cross-browser format.
When you add songs to playlist, its best to have ID3 metadata tags set (title, artist, thumbnail, description, duration), and use Add songs, or Upload multiple songs. In that case, ID3 metadata tags will automatically be fetched when you upload songs in Wordpress.
You can quickly add audio files with this shortcode:
Podcast
Player can play podcasts (rss).
Example of podcast rss url:
http://www.kingola.com/feed/podcast/
Example itunes podcast:
https://podcasts.apple.com/us/podcast/funny-cuz-its-true-with-elyse-myers/id1645926587
Foreign characters in podcast
If your podcast contains foreign characters (for example German, Chinese etc) and they are not displaying correctly inside the player, you can try to use following option in Edit Player / General / Advanced tab:

Reading audio files from directories
You can upload folder of songs located in WordPress uploads directory or folder on some custom location your server.
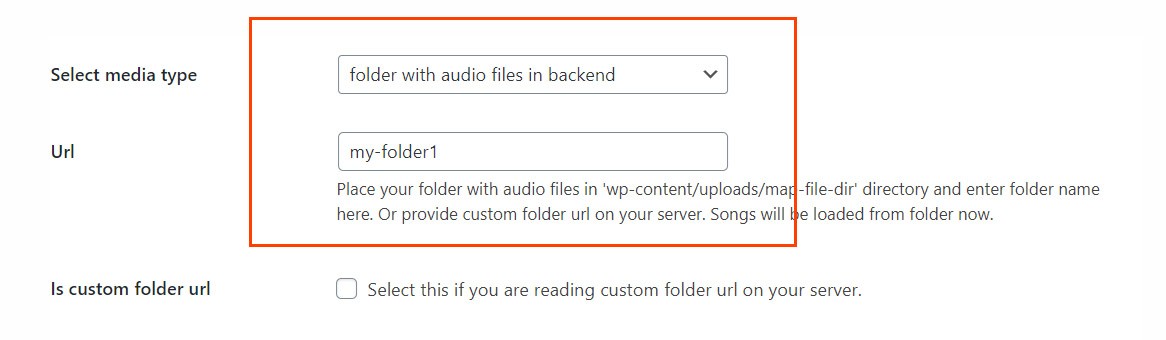
1. Read folder in WordPress uploads directory
Plugin creates map-file-dir folder inside wordpress uploads directory which will be used for reading audio files.
Place folder in wp-content/uploads/map-file-dir directory and enter folder name in field:

2. Read folder in custom directory on server
Place folder on some custom location your server and enter full url to your folder:
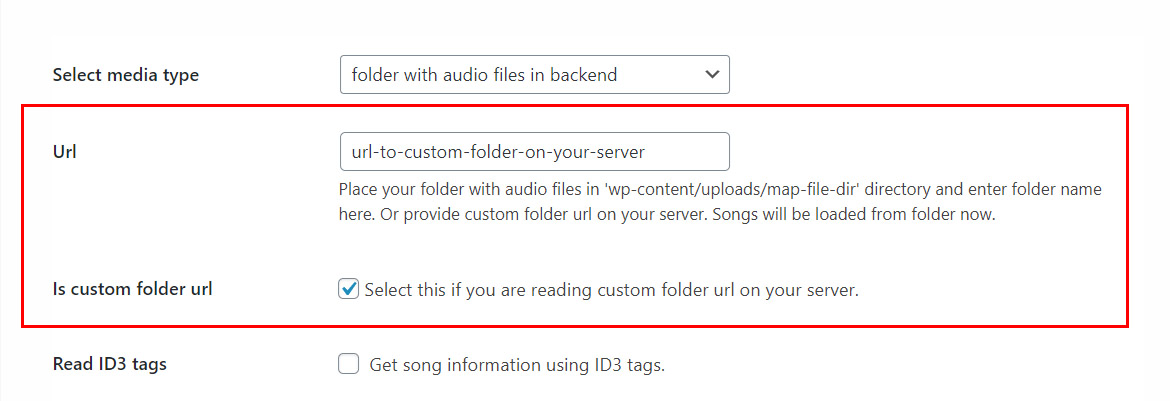
To get full url to your folder use locate_directory.php file located in (documentation / misc directory in plugin package). Copy this file to your custom directory, and open it in browser. You will get full url which you then enter in field.
If your folder contains a lot of audio files?
If you have a lots of audio files in folder and you use ID3 tags, this will take longer to load because getting ID3 tags from audio files takes time.
There are several ways to improve loading speed:
1. Reduce size of image artwork in your ID3 tags.
Image artwork in ID3 tags will affect loading speed the most. Since you only need artwork for player cover or thumbnails in playlist (if you use any of this), the size of images doesnt need to be big. If artwork size is too large, you may need to reduce size of your album artwork in ID3 tags. You can also turn off loading of image in ID3 tags in Edit Player / General / Advanced tab / Get image when reading ID3 tags.
2. You can use Load more option on total scroll in playlist.
Add one folder to playlist and set load more option:

In this example we have 1 folder in playlist and Results limit is set to 50, this means on total scroll in playlist it will load 50 songs from this folder.
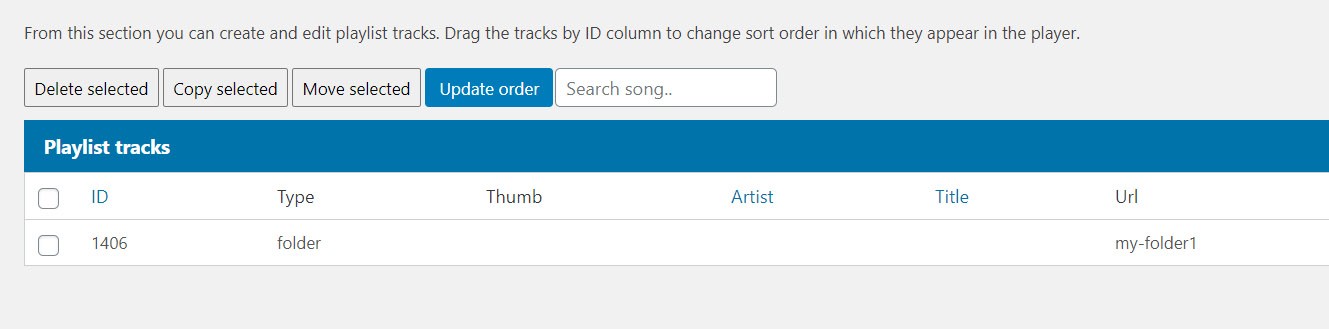
3. You can separate your audio files in multiple folders on the root level (not subdirectories), and use Retrieve more option in Edit playlist - Playlist options:
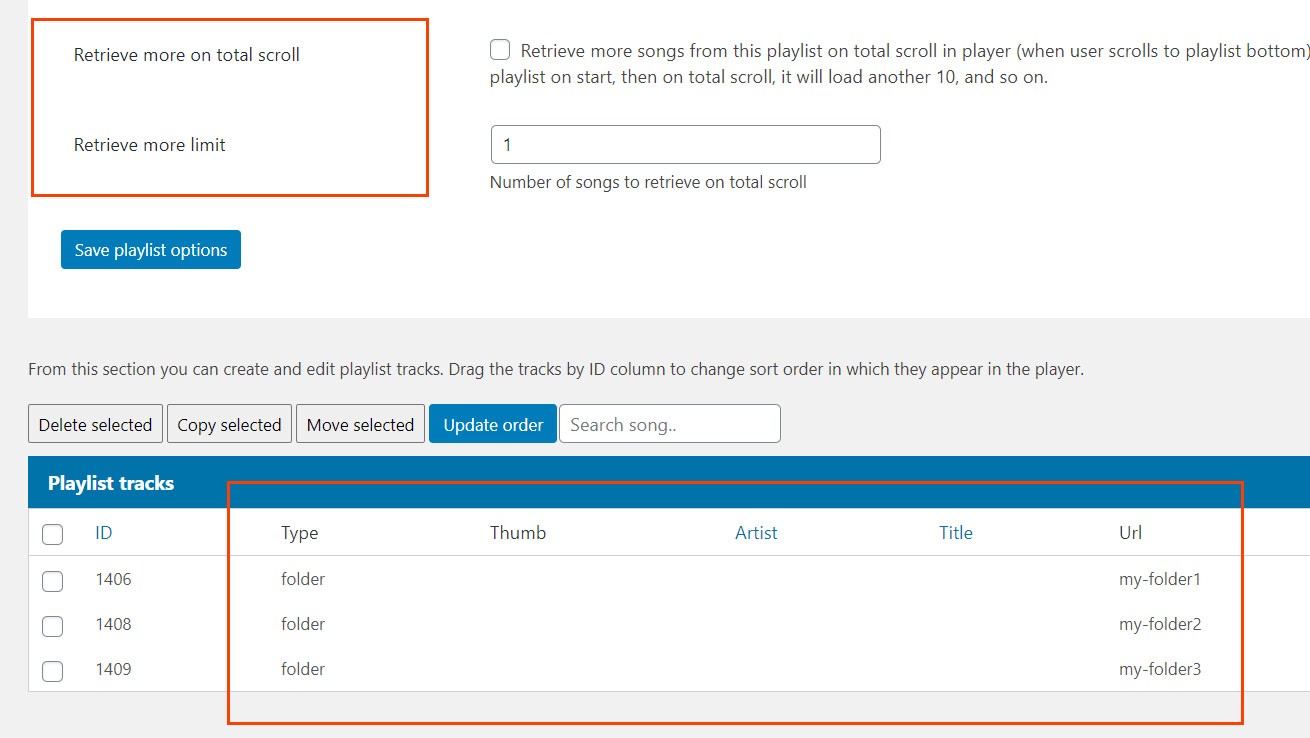
In this example we have 3 folders in playlist and Retrieve more limit is set to 1, this means on total scroll in playlist (when scroll reaches end of playlist) each folder will be loaded at once.
4. You can use option to process folder in backend (which will read audio files and ID3 tags in backend) and then they will be ready inside the player immediatelly.
The downside of this method it that when you change the content of your folders (add or remove audio files) you will have to recreate this process again (delete old playlist and create new one so audio files from folder are processed again).
So this method is only useful if you dont really change the content of your audio folders very often.
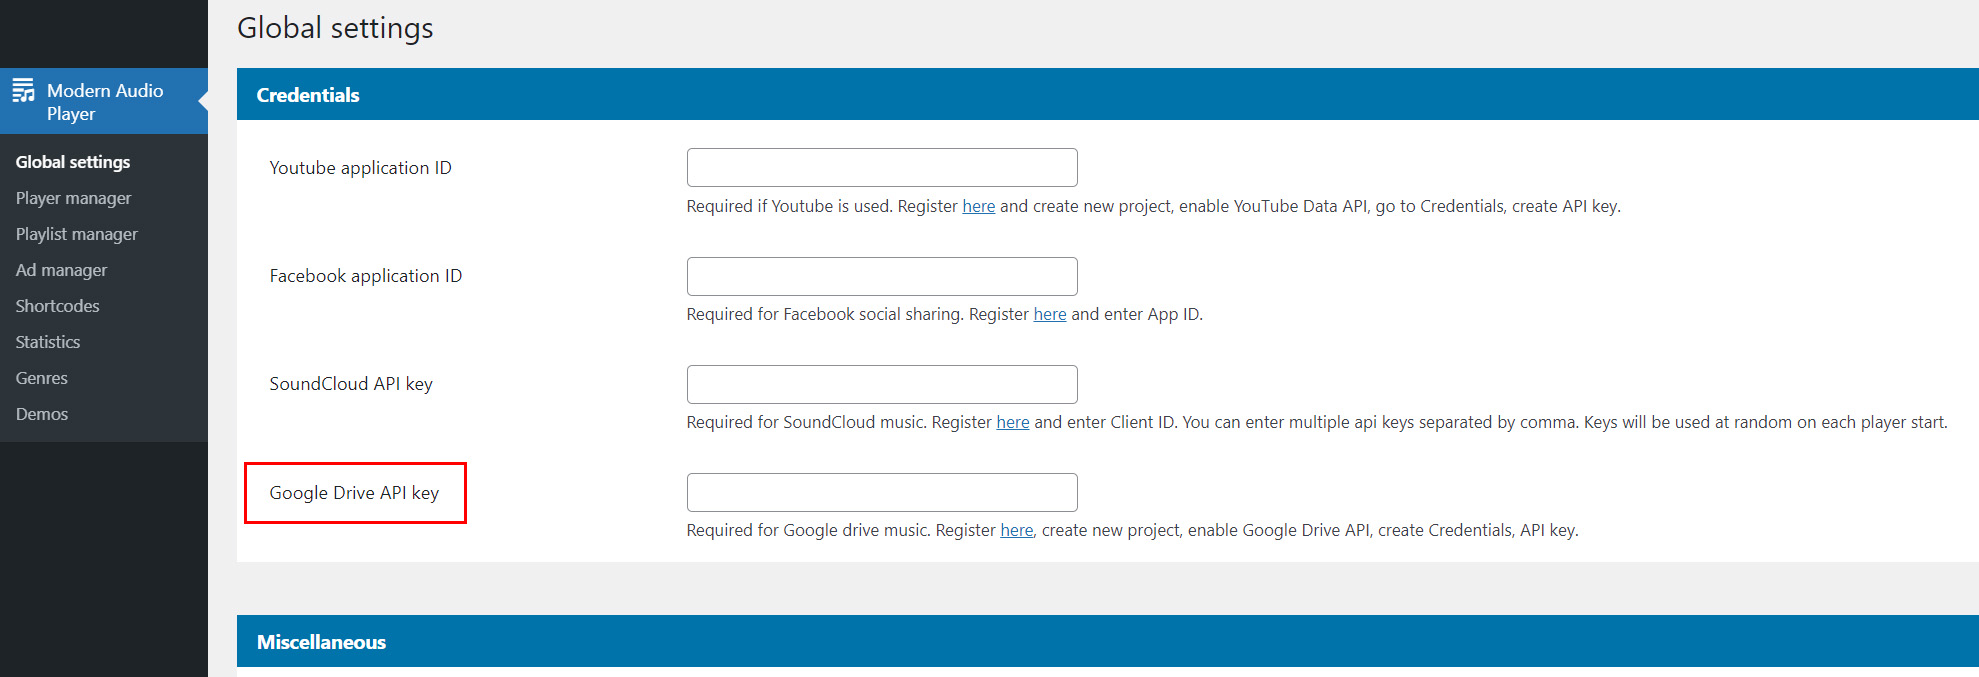
Reading google drive folders
Google Drive requires API key, go to: https://console.developers.google.com and create New project.
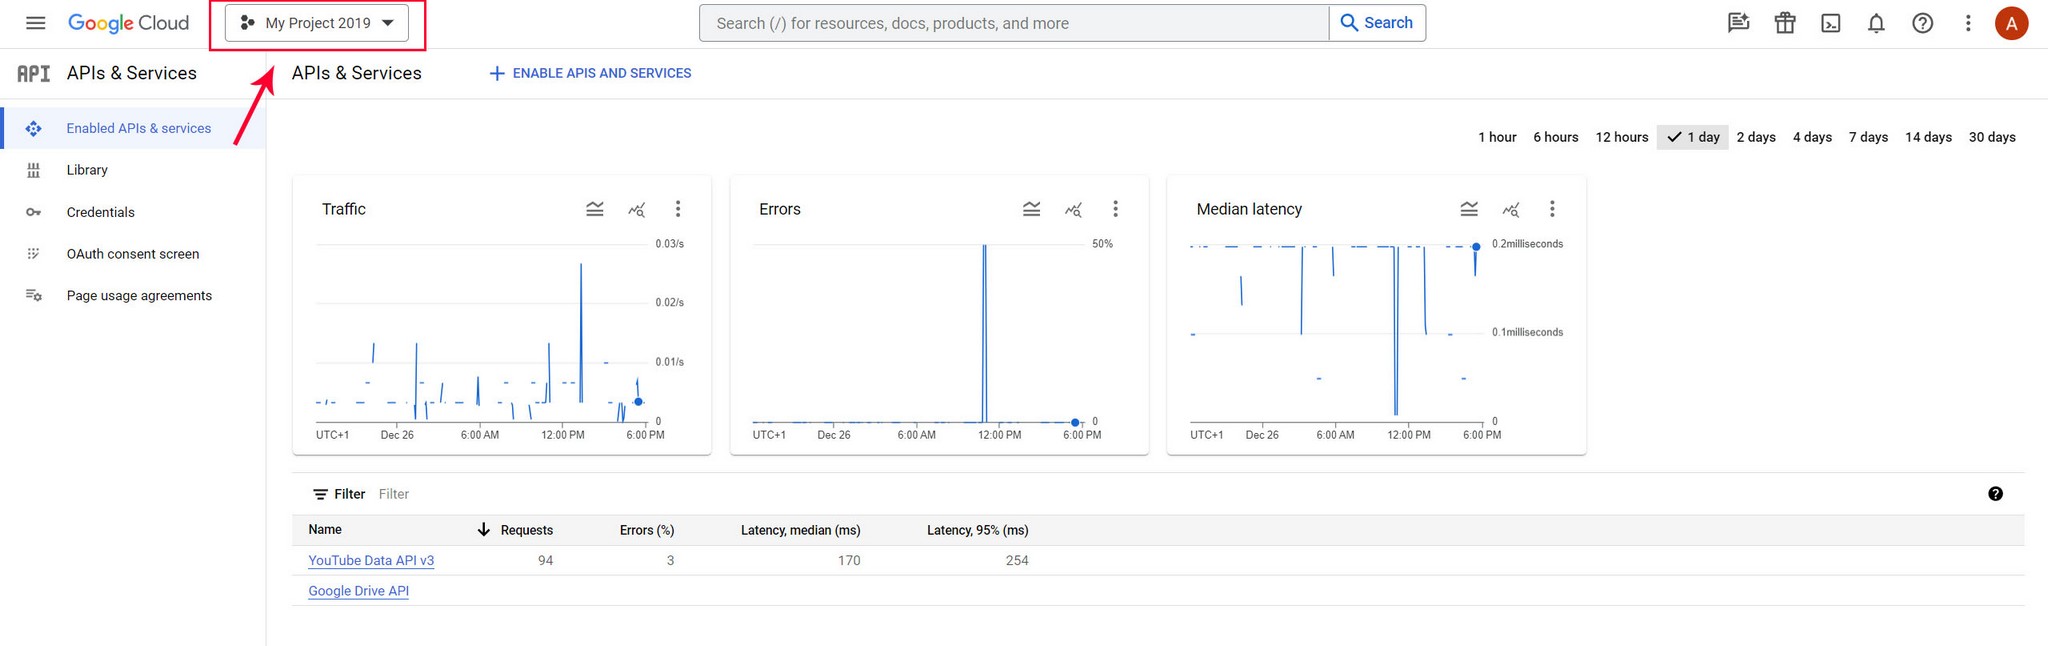

After creating project, go to Enable APIs and Services
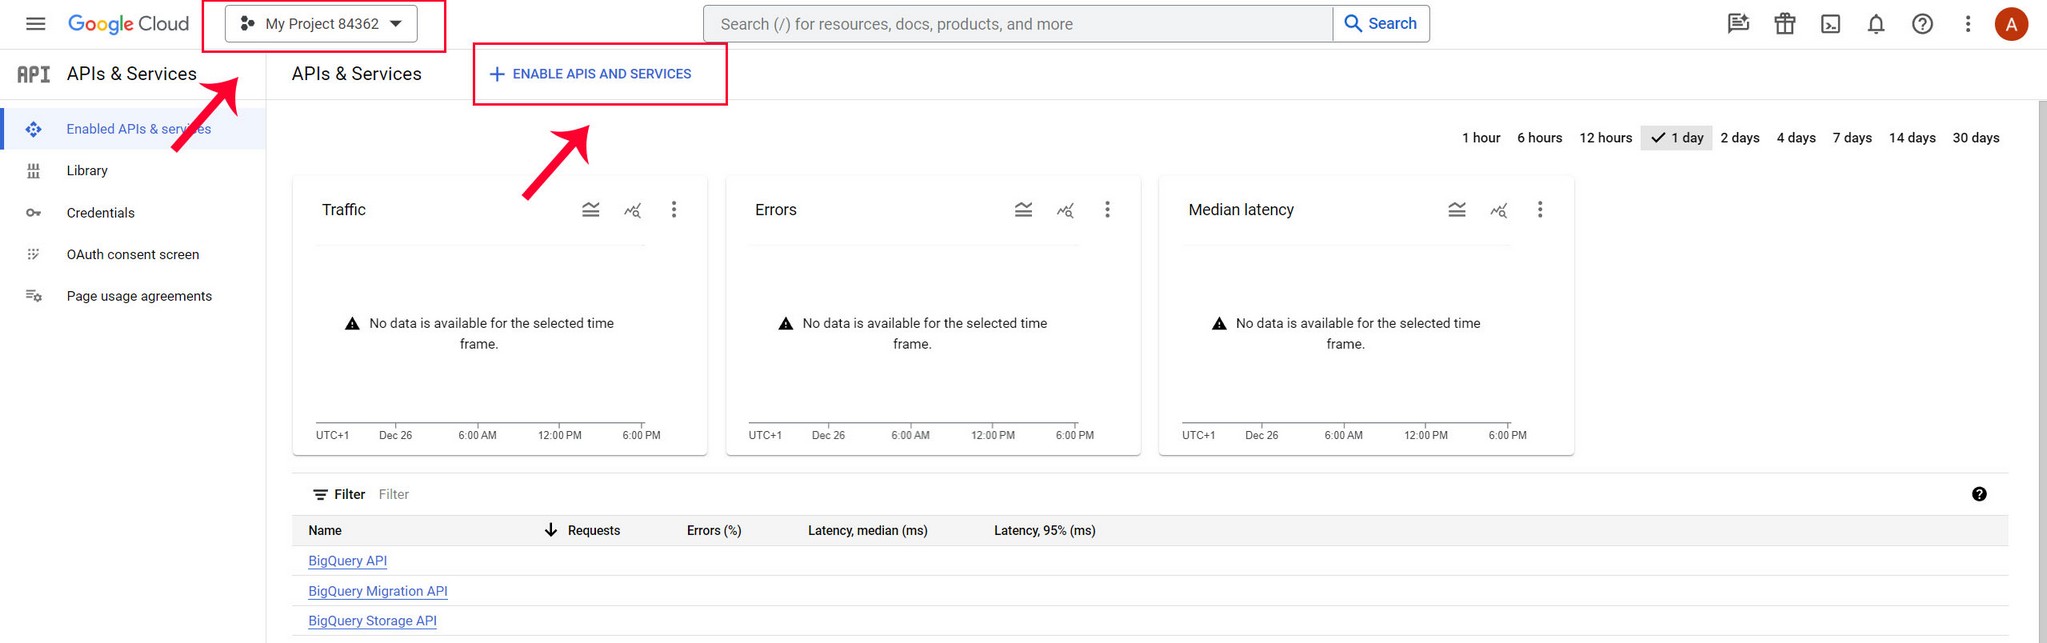
Search for Google Drive API and Enable Google Drive API


Go to Credentials, Create credentials, create API key

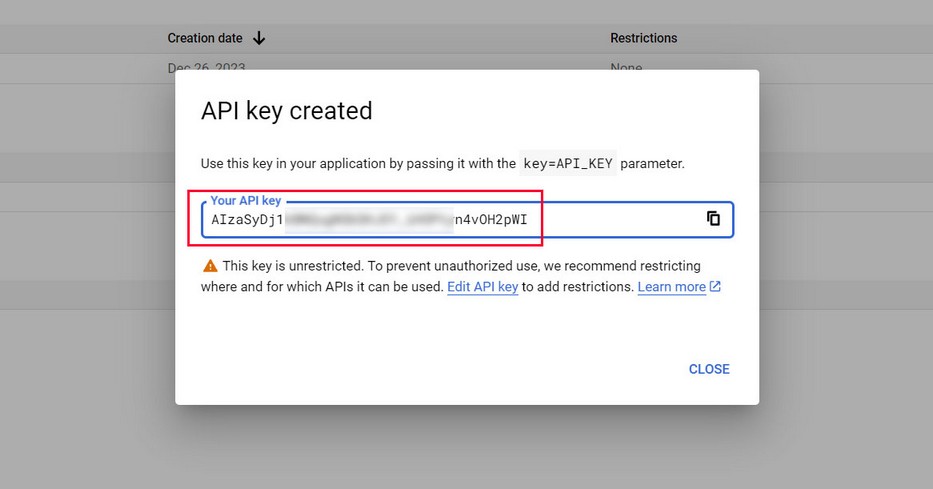
Copy key in Player settings (Google Drive API key)
Google drive folder needs to be public. Example of google drive folder: https://drive.google.com/drive/folders/0ByzcNpNrQNpWbjJGY19NSFF0R3M
This is the part you enter inside admin: '0ByzcNpNrQNpWbjJGY19NSFF0R3M'
Required folder organization
You need to have following organization when loading files from google drive folders:
Basic rule is that inside that directory equivalent audio and thumbnail files need to be named the same!
So you end up with the following file organization:
    song1.mp3
    song1.png
    song2.mp3
    song2.png
    ...
Supported formats for audio files are mp3, wav, aac, flac. Supported formats for image thumbnails is jpg/png.
If your google drive folder does not work, try to load this example url for test: https://drive.google.com/drive/folders/0ByzcNpNrQNpWbjJGY19NSFF0R3M
This is the part you enter inside admin: '0ByzcNpNrQNpWbjJGY19NSFF0R3M'
Make sure you enable access to folder on Google Drive:

If you want to use single files from google drive, use the following method:
Go to Disc – My drive:

https://drive.google.com/drive/my-drive
right click on file, Get shareable link and you get something like this:

https://drive.google.com/open?id=0ByzcNpNrQNpWZUlJVjZQVHoxWnM

use that file ID to create google drive file URL:

https://drive.google.com/uc?export=view&id=videoID
This is final URL how google drive file URL should look:

https://drive.google.com/uc?export=view&id=0ByzcNpNrQNpWZUlJVjZQVHoxWnM – use this link in player as type normal audio and mp3 url:


Troubleshooting


If your Google drive folder does not work, use our test folder with all the instructions here.

This is an example of google drive folder: https://drive.google.com/drive/folders/0ByzcNpNrQNpWbjJGY19NSFF0R3M

If it still doesnt work, provide us with link to the player in your page loading our test folder linked here.
Reading One drive files
You can load folder of files from One Drive or single files.
How to load folder of songs from One Drive?
Required folder organizationPlace audio files in your One drive folder (folder needs to be public). You can also place thumbnail images(optional).
So you end up with this structure in your folder:
    song1.mp3
    song1.jpg//optional thumbnail image
    song2.mp3
    song2.jpg//optional thumbnail image
    ...
This is an example of One Drive folder: https://1drv.ms/u/s!Av88sx97Izeif5Y1OnNBDdRMaEs
How to load single song from One Drive?
If you want to use single files from One Drive, use the following method:
Right click on the file - Embed and copy link, you will get something like this:

<iframe src="https://onedrive.live.com/embed?cid=A237237B1FB33CFF&resid=A237237B1FB33CFF%21157&authkey=AAEOpycSee6Jd-o" width="98" height="120" frameborder="0" scrolling="no"></iframe>

Use just the src part:

https://onedrive.live.com/embed?cid=A237237B1FB33CFF&resid=A237237B1FB33CFF%21157&authkey=AAEOpycSee6Jd-o

and replace 'embed' with 'download'

so you end up with:

https://onedrive.live.com/download?cid=A237237B1FB33CFF&resid=A237237B1FB33CFF%21157&authkey=AAEOpycSee6Jd-o

Use this url in player as type audio.
Playlist from XML source
Url to XML file needs to be on the same server! Example of XML files are provided in plugin package.
XML nodes explanation:
Example minimal:
<div class="hap-playlist-item" data-type="audio" data-path="PATH/TO/MP3"></div>
Example full:
<div class="hap-playlist-item" data-type="audio" data-path="PATH/TO/MP3" data-artist="ARTIST_NAME" data-title="SONG_TITLE" data-thumb="PATH/TO/THUMB" data-download="PATH/TO/AUDIO" data-start="2" data-end="13" data-playback-rate="1.5" data-link="WEB/URL/LINK" data-target="_blank"></div>
Parameters:
| Parameter | Required | Value |
|---|---|---|
| data-type | yes | audio |
| data-path | yes | path to audio file (mp3, wav, aac, flac...) |
| data-artist | artist name | |
| data-title | song title | |
| data-thumb | path to thumb image | |
| data-download | download path | |
| data-link | playlist item url link | |
| data-target | blank/parent, http://www.w3schools.com/tags/att_a_target.asp | |
| data-start | media start time in seconds | |
| data-end | media end time in seconds | |
| data-playback-rate | media playback speed: http://www.w3schools.com/tags/av_prop_playbackrate.asp |
You can use absolute or relative urls for audio and thumbnails in xml file.
If you use relative urls you can prefix media urls with Prefix media url playlist option in Edit playlist section. For example, you have this in xml file:
<div class="hap-playlist-item" data-type="audio" data-path="song1.mp3" data-thumb="song1.jpg"></div>
<div class="hap-playlist-item" data-type="audio" data-path="song2.mp3" data-thumb="song2.jpg"></div>
And you have folder named "audio" located in wordpress uploads directory (where your audio files and thumbnails are located), then you prefix with url, so all media from "audio" folder will have this url prepended:
http://localhost/xampp/wp/wp-content/uploads/map-file-dir/audio/Final url will become:
http://localhost/xampp/wp/wp-content/uploads/map-file-dir/audio/song1.mp3
http://localhost/xampp/wp/wp-content/uploads/map-file-dir/audio/song1.jpg
If you have trouble uploading xml file to wordpress, you can always paste absolute url to xml file inside the input field directly, or add this line in wp-config.php file before /* That's all, stop editing! Happy publishing. */ and restart server.
define( 'ALLOW_UNFILTERED_UPLOADS', true );
Playlist from JSON
Load playlist from json file
Url to json file needs to be on the same server! Example of json file are provided in plugin download package.
Example of properties in json file:
Example audio:
{
  "type": "audio",
  "mp3": "media/audio/2/01.mp3",
  "artist": "Soundroll",
  "title": "A Way To The Top",
  "thumb": "media/thumb/1/01.jpg",
  "link": "http://www.google.com",
  "target": "_blank",
  "download": "media/audio/2/01.mp3",
  "video": "URL_TO_VIDEO_SYNC",
  "lyrics": "URL_TO_LYRICS_FILE",
},
Example youtube (only with media addon):
{
  "type": "youtube_playlist",
  "path": "PLMC9KNkIncKtPzgY-5rmhvj7fax8fdxoj",
  "limit": 15
}
Example soundcloud:
{
  "type": "soundcloud",
  "path": "http://soundcloud.com/astateoftrance",
  "thumbDefault": "data/default_artwork/sc.jpg",
  "limit": 10
},
You can use absolute or relative urls for audio and thumbnails in json file.
If you use relative urls you can prefix media urls with Prefix media url playlist option in Edit playlist section. For example, you have this in json file:
{
  "type": "audio",
  "mp3": "song1.mp3",
  "artist": "Soundroll",
  "title": "A Way To The Top",
  "thumb": "song1.jpg",
},
And you have folder named "audio" located in wordpress uploads directory (where your audio files and thumbnails are located), then you prefix with url, so all media from "audio" folder will have this url prepended:
http://localhost/xampp/wp/wp-content/uploads/map-file-dir/audio/They will become:
http://localhost/xampp/wp/wp-content/uploads/map-file-dir/audio/song1.mp3
http://localhost/xampp/wp/wp-content/uploads/map-file-dir/audio/song1.jpg
If you have trouble uploading json file to wordpress, you can rename json file to .txt extension.
Or add this line in wp-config.php file before /* That's all, stop editing! Happy publishing. */ and restart server.
define( 'ALLOW_UNFILTERED_UPLOADS', true );
Playlist from CSV file
Load playlist from csv file
Url to csv file needs to be on the same server! Example of csv file are provided in plugin download package.
M3u Playlist
Supported is m3u playlist file with audio urls inside. Example of m3u playlist file is provided in m3u directory in plugin package. Make sure you follow exact format. You can load multiple m3u files inside same playlist but you cannot mix m3u with other media types!
HLS Streaming
Example of hls live streaming m3u8:
http://a.files.bbci.co.uk/media/live/manifesto/audio/simulcast/hls/nonuk/sbr_low/ak/bbc_radio_one.m3u8
This example will not retrieve artwork for the player thumb and title but you can set this values when adding songs to playlist (or with shortcode).
Additional settings
Hls
You can pass your own config parameters to hls in Edit player / General / HLS tab:
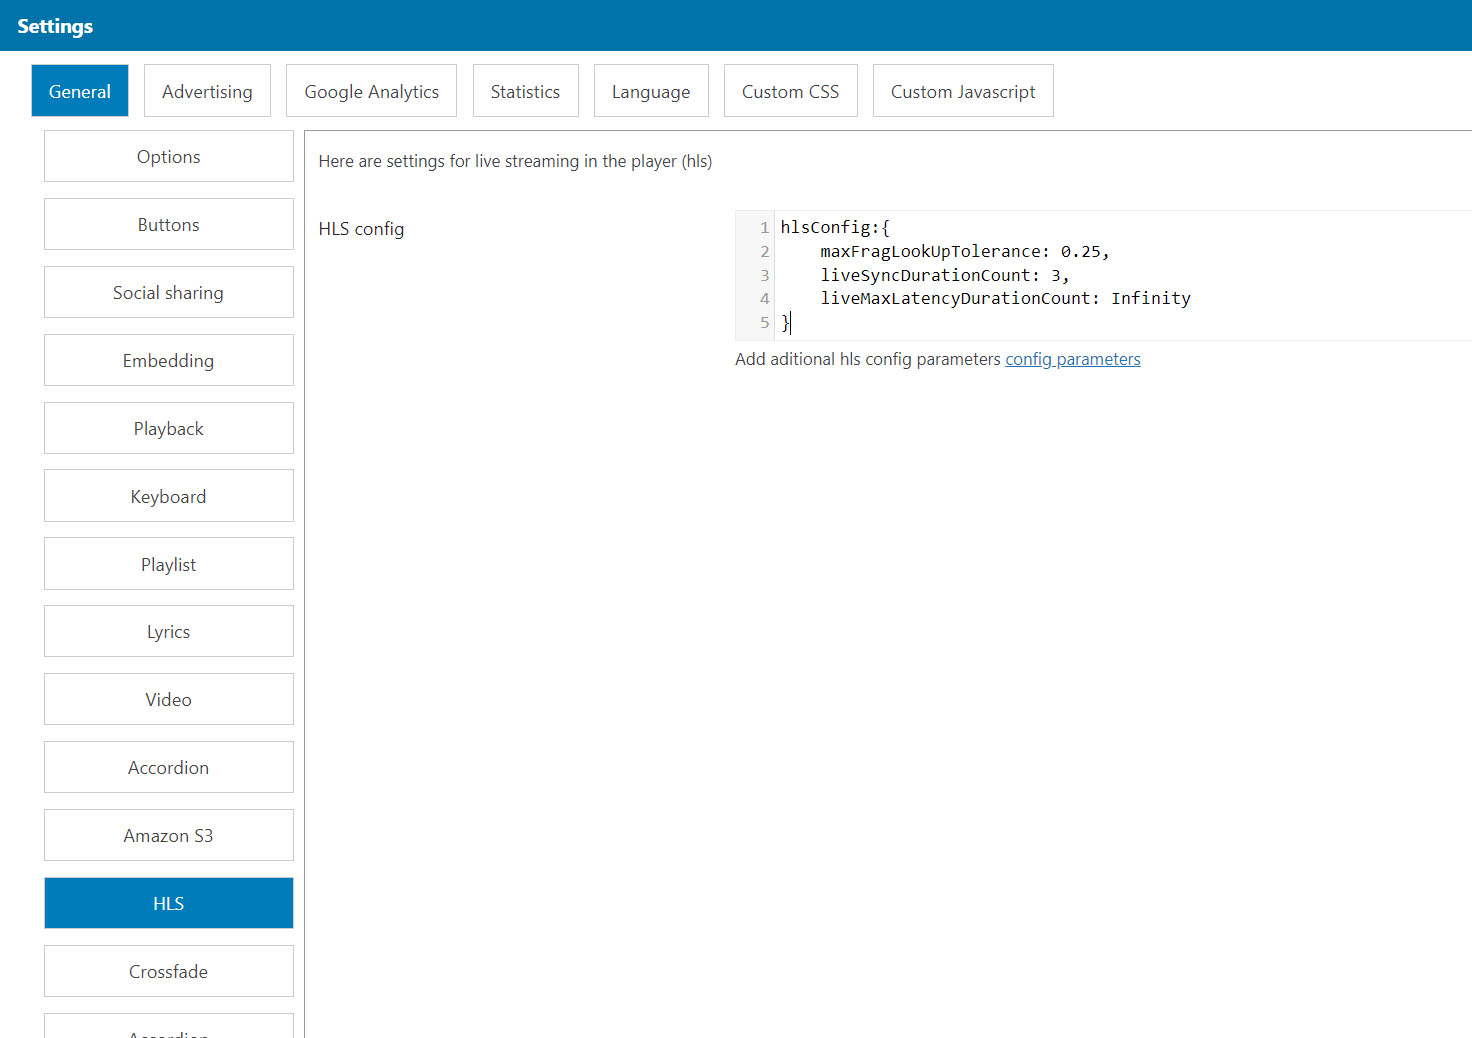
For example:
hlsConfig:{
    maxFragLookUpTolerance: 0.25,
    liveSyncDurationCount: 3,
    liveMaxLatencyDurationCount: Infinity
}
Other supported media
Its possible to play additional formats in player (Youtube, Soundcloud, Vimeo, Wista, Twitch) using media addon.
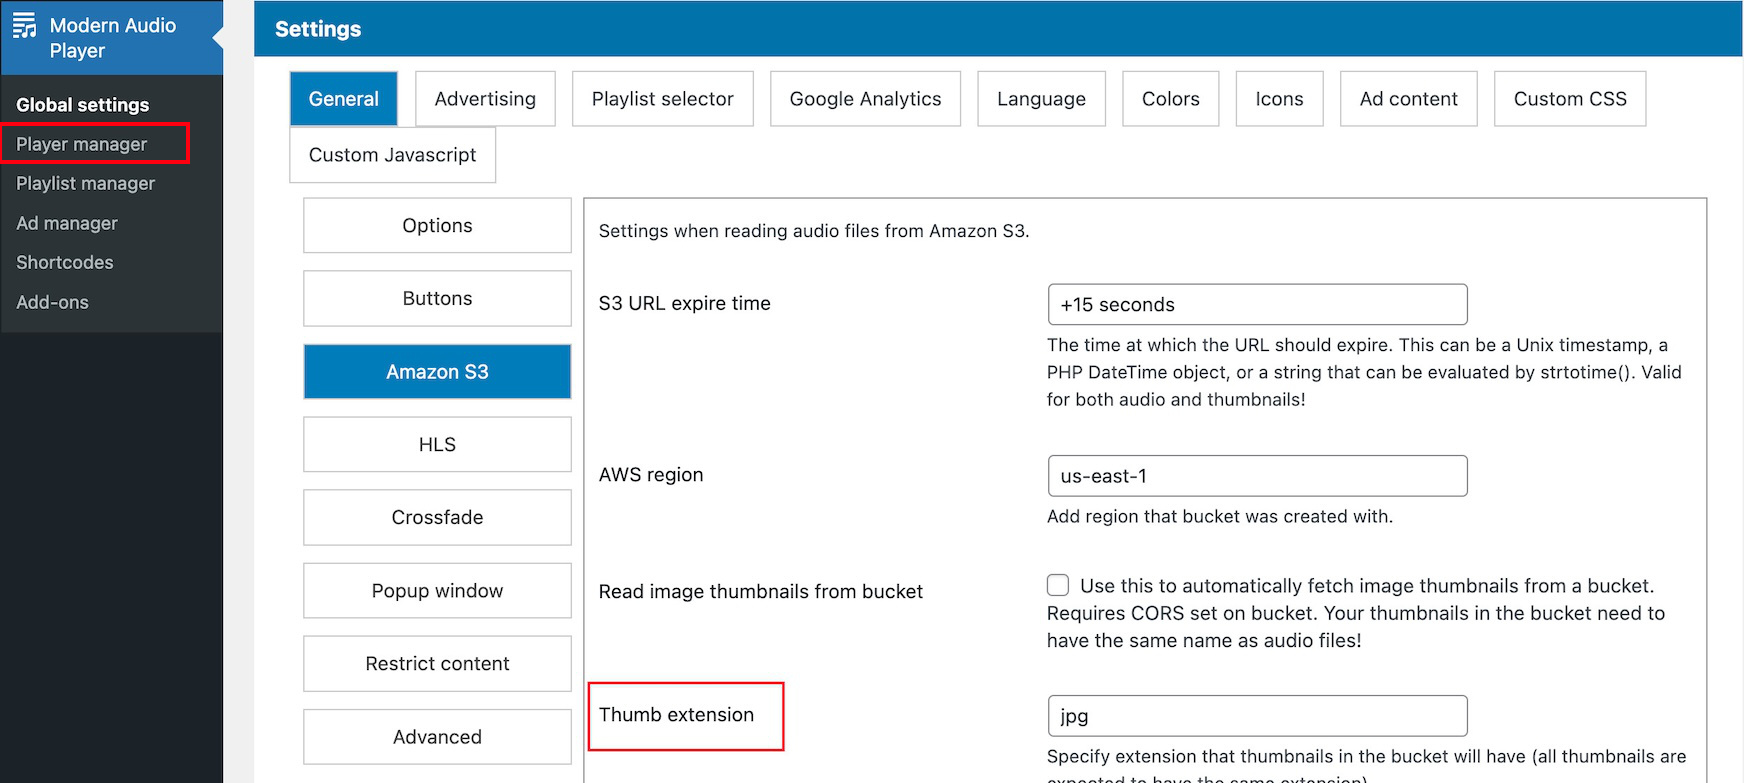
Amazon S3
How to use audio on Amazon S3
Note: if you just want to place your files in public bucket on Amazon S3, you dont need this setup! Then just link to files as usual and use media audio.
Note that the following only works with Amazon Addon for this plugin

Register Amazon Addon
Register plugin inside Player manager / Edit player / General / Amazon Addon tab
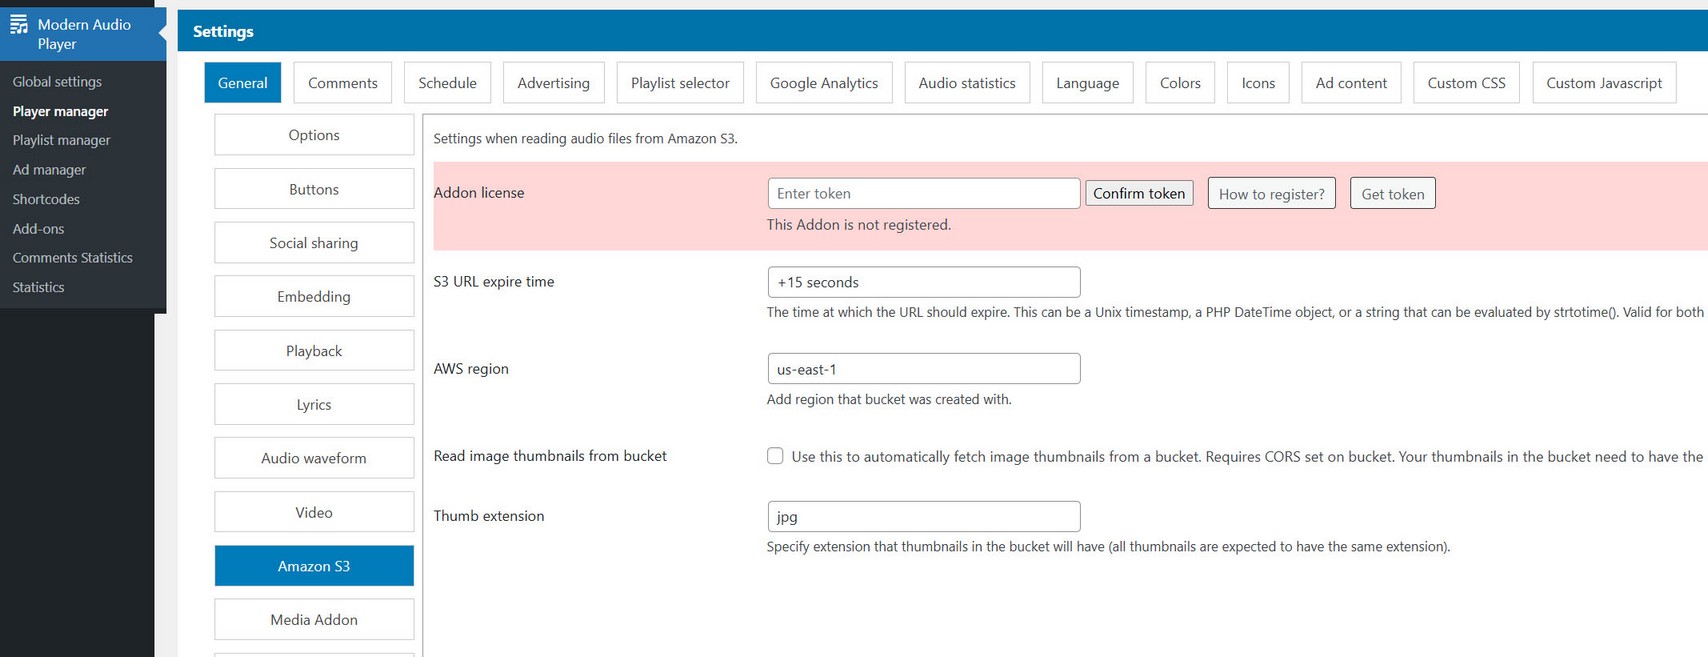
Registration is done the same way as registering main plugin.
Supported are public and private buckets. Supported are single audio urls and reading a whole bucket with audio files inside.
Credentials setup
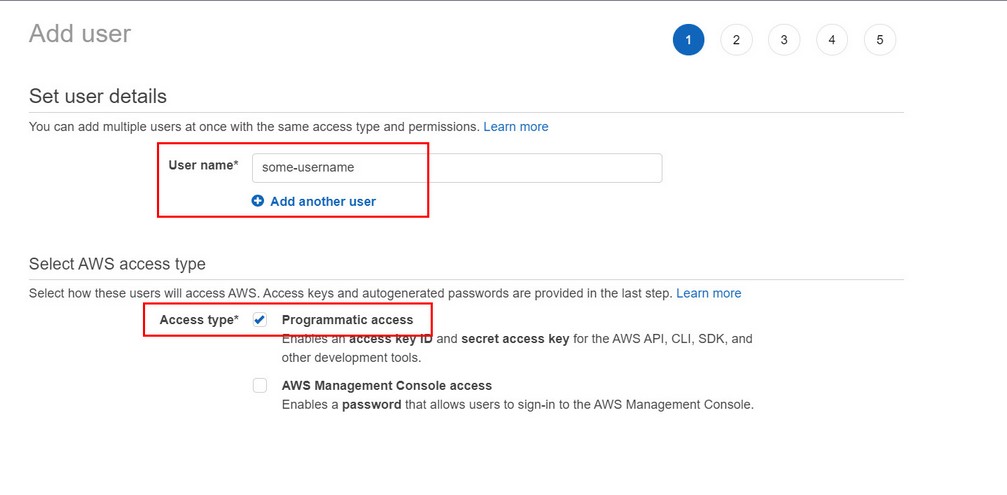
1. Create IAM user with credentails on the following link:
https://console.aws.amazon.com/iam/home#/home2. Add username and enable Programmatic access:
3. Enable AmazonS3ReadOnlyAccess policy for user:

4. After user is created copy his credentials (key and secret) and enter then in Global settings / Credentials:


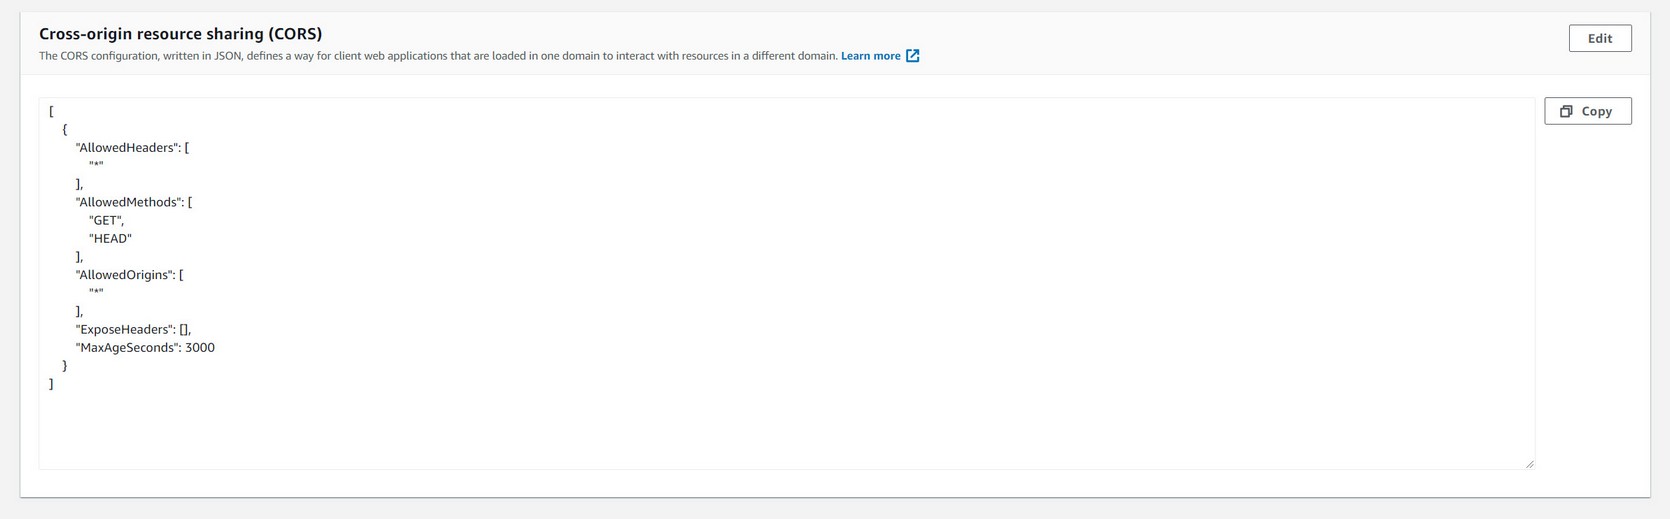
CORS setup
Add CORS policy to bucket (this is required if you want to use image thumbnails in player which are also located in the bucket):
To add CORS policy, go to permissions tab in the bucket, scroll to CORS section and enter the following:
[
    {
        "AllowedHeaders": [
            "*"
        ],
        "AllowedMethods": [
            "GET",
            "HEAD"
        ],
        "AllowedOrigins": [
            "*"
        ],
        "ExposeHeaders": [],
        "MaxAgeSeconds": 3000
    }
]
Audio setup
Supported are single audio urls and reading a whole bucket with audio files inside.
1. Read whole bucket with audio files:
Create bucket, and choose AWS region closest to you.
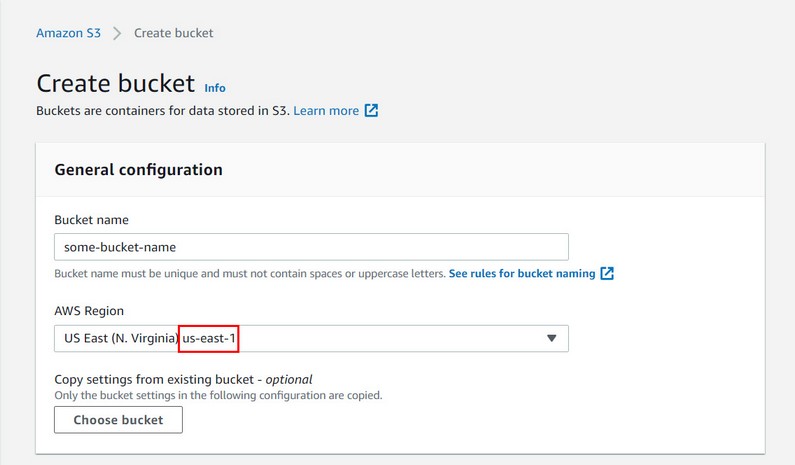
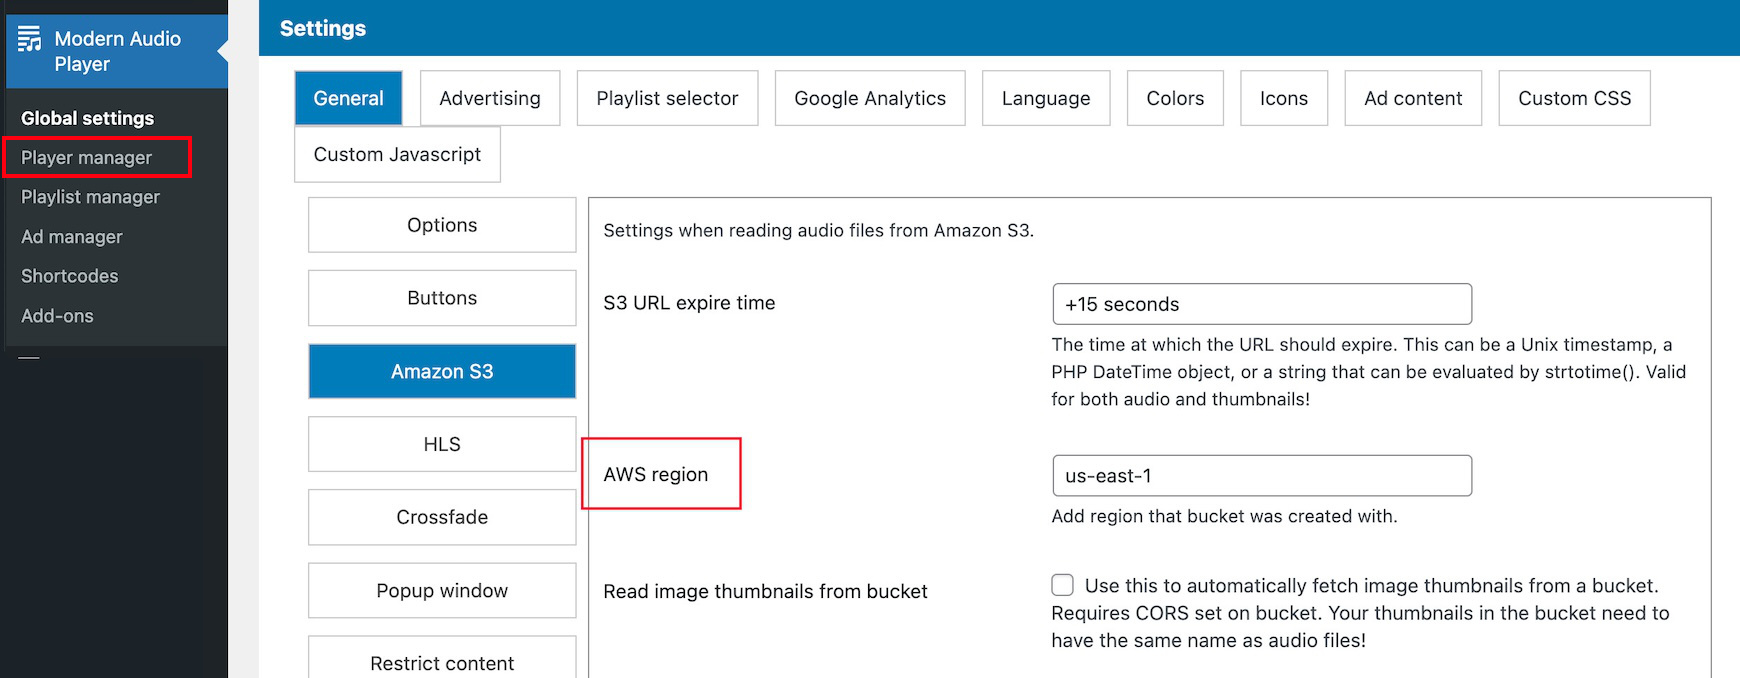
Enter highlighted region in plugin settings:
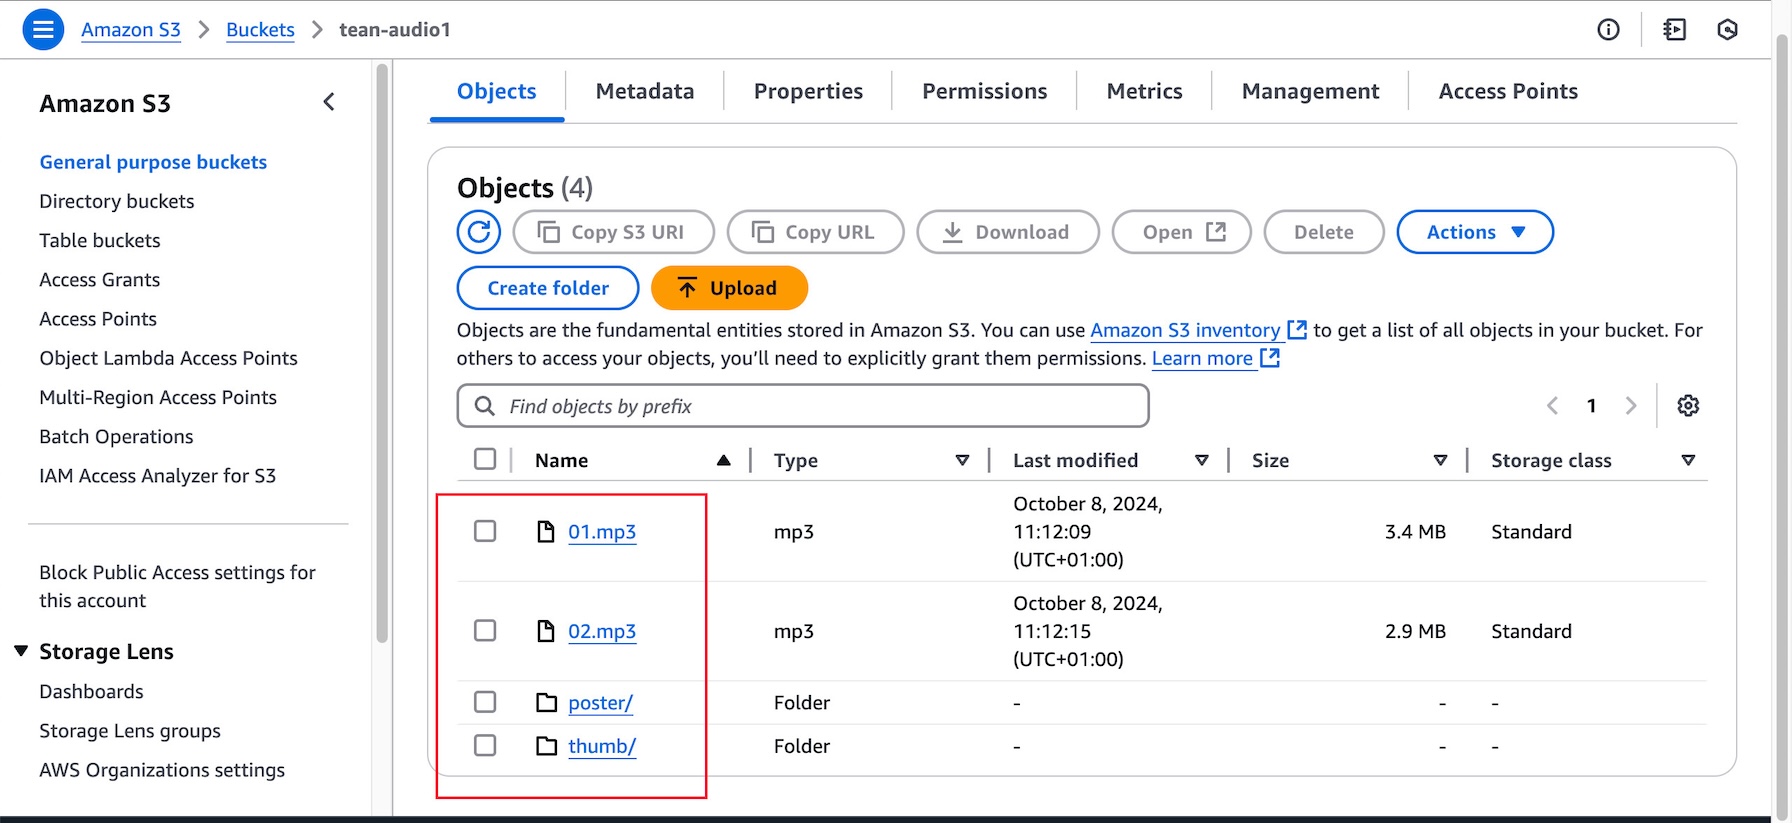
Upload audio files inside bucket. If you want to host image poster on S3 as well create folder named "poster" inside this bucket and place your image files for poster inside that folder. The same is true for thumbnails (in this case create folder named "thumb") Images for poster and thumbnails need to have the same name as audio files!. Example this bucket has audio files and poster / thumbnails named the same!
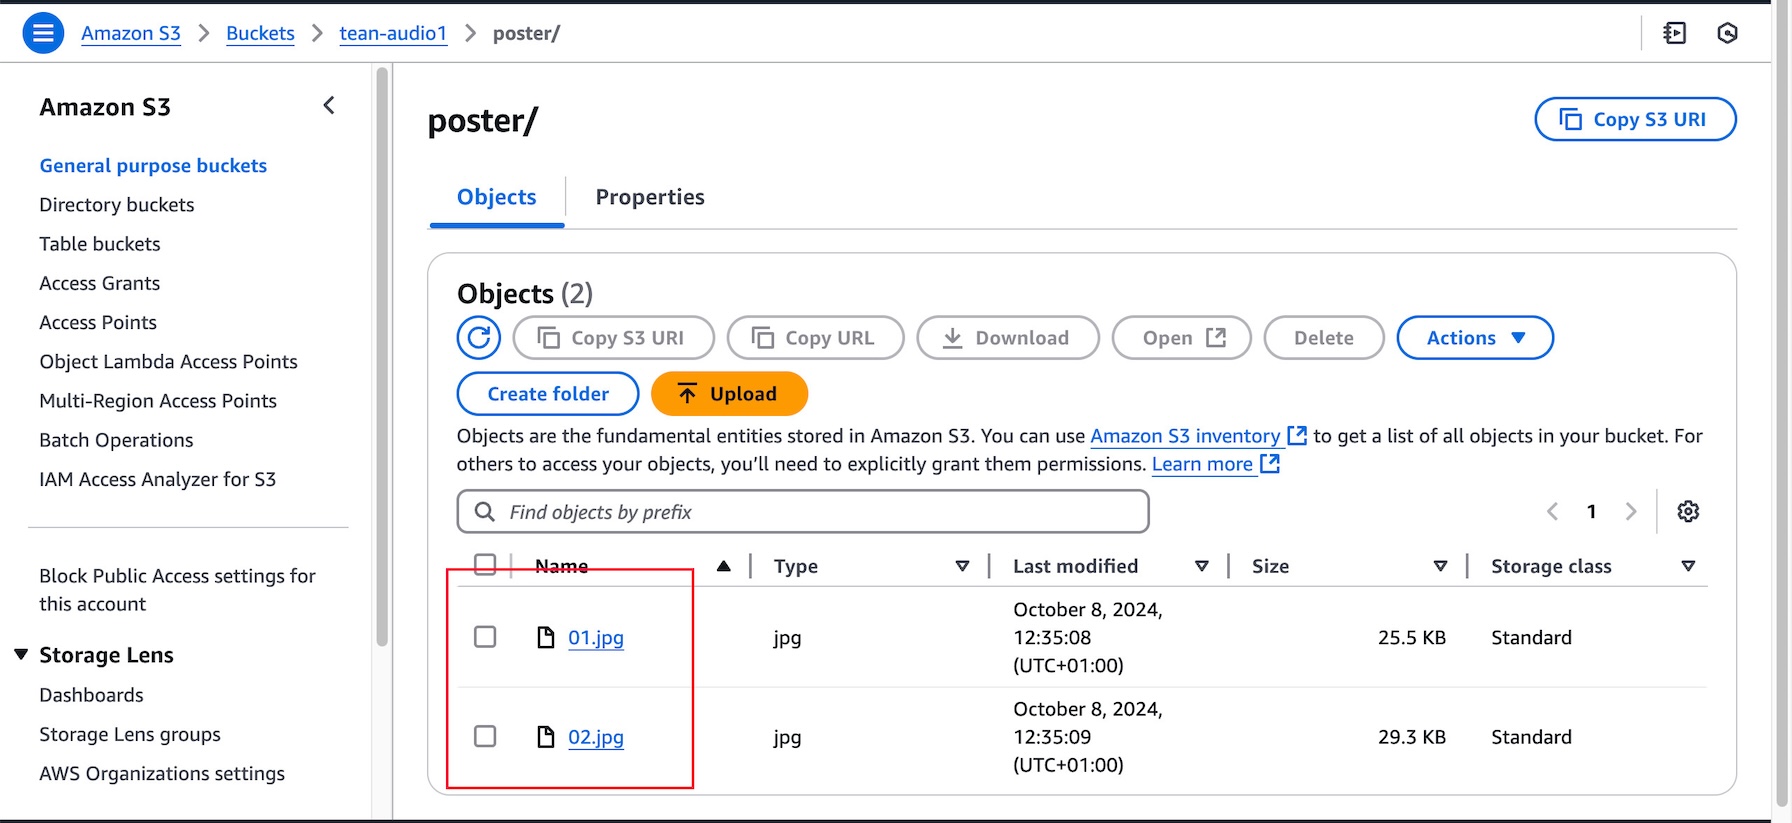
Poster images in example above use .jpg extension. You can set this option in settings:
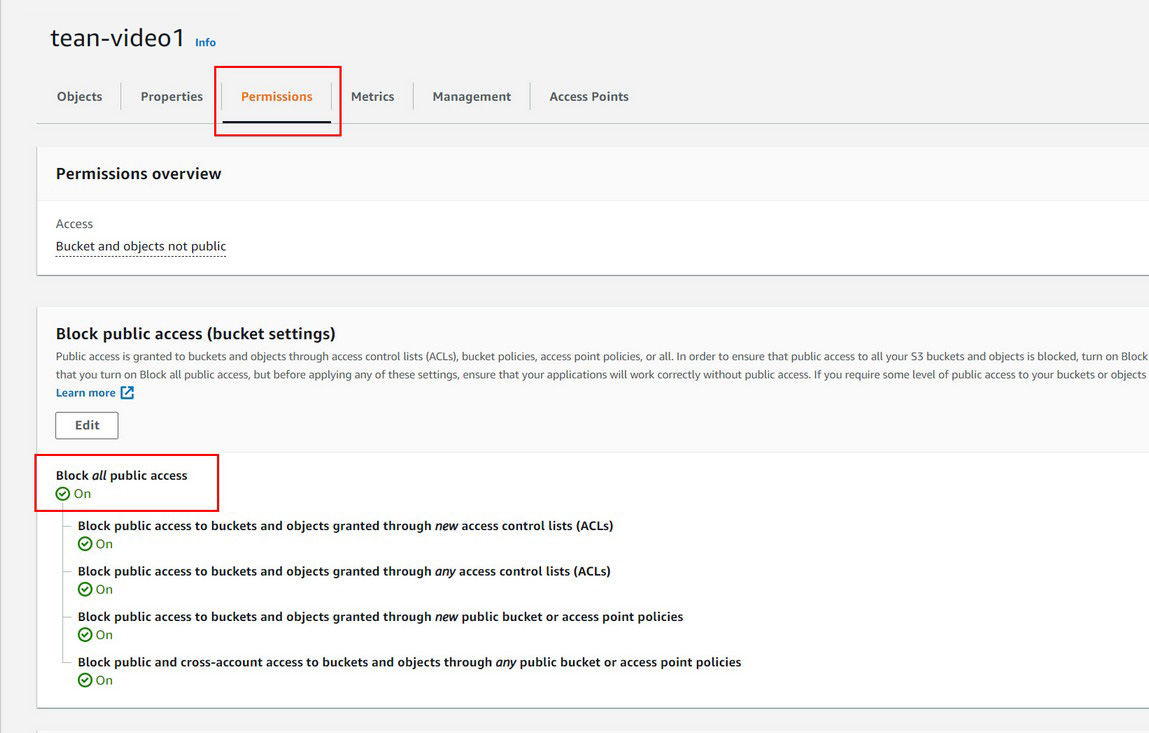
Bucket privacy
Bucket can be public or private. If you want a bucket to be private go to Permissions tab inside a bucket and check Block all public access
Amazon S3 with Cloundfront
Note that the following only works with Amazon Addon for this plugin
How to integrate Amazon S3 buckets using Cloudfront?
First follow all steps in the Amazon S3 section. Once you have completed that you can continue with this section.
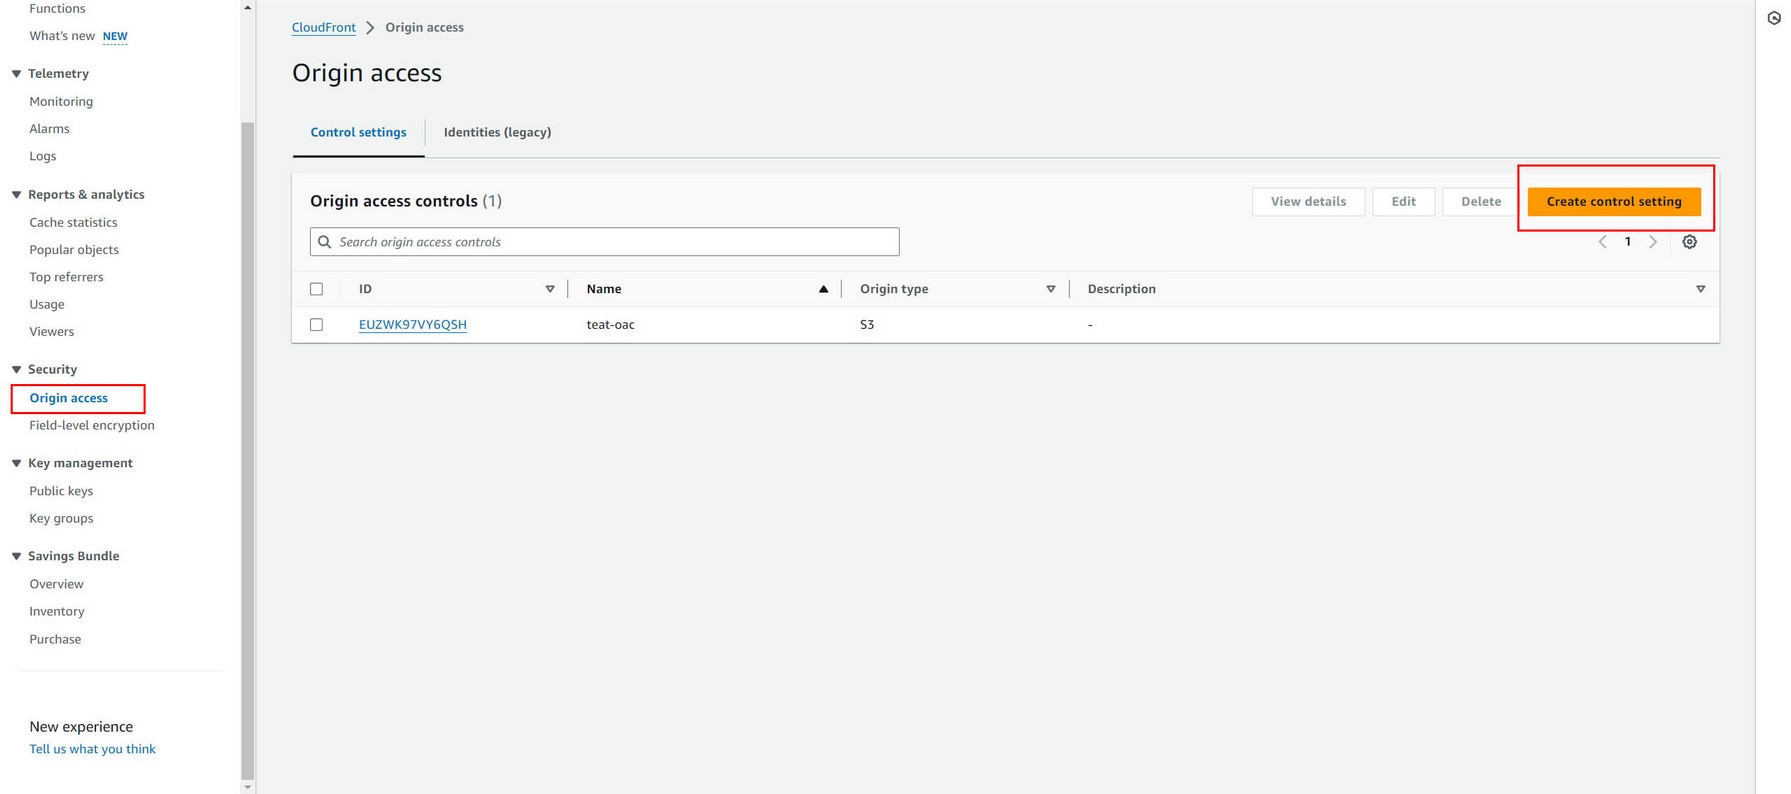
Sign in to the AWS Management Console and open the CloudFront console at https://console.aws.amazon.com/cloudfront/v3/home
Create Origin access identity (OAI)

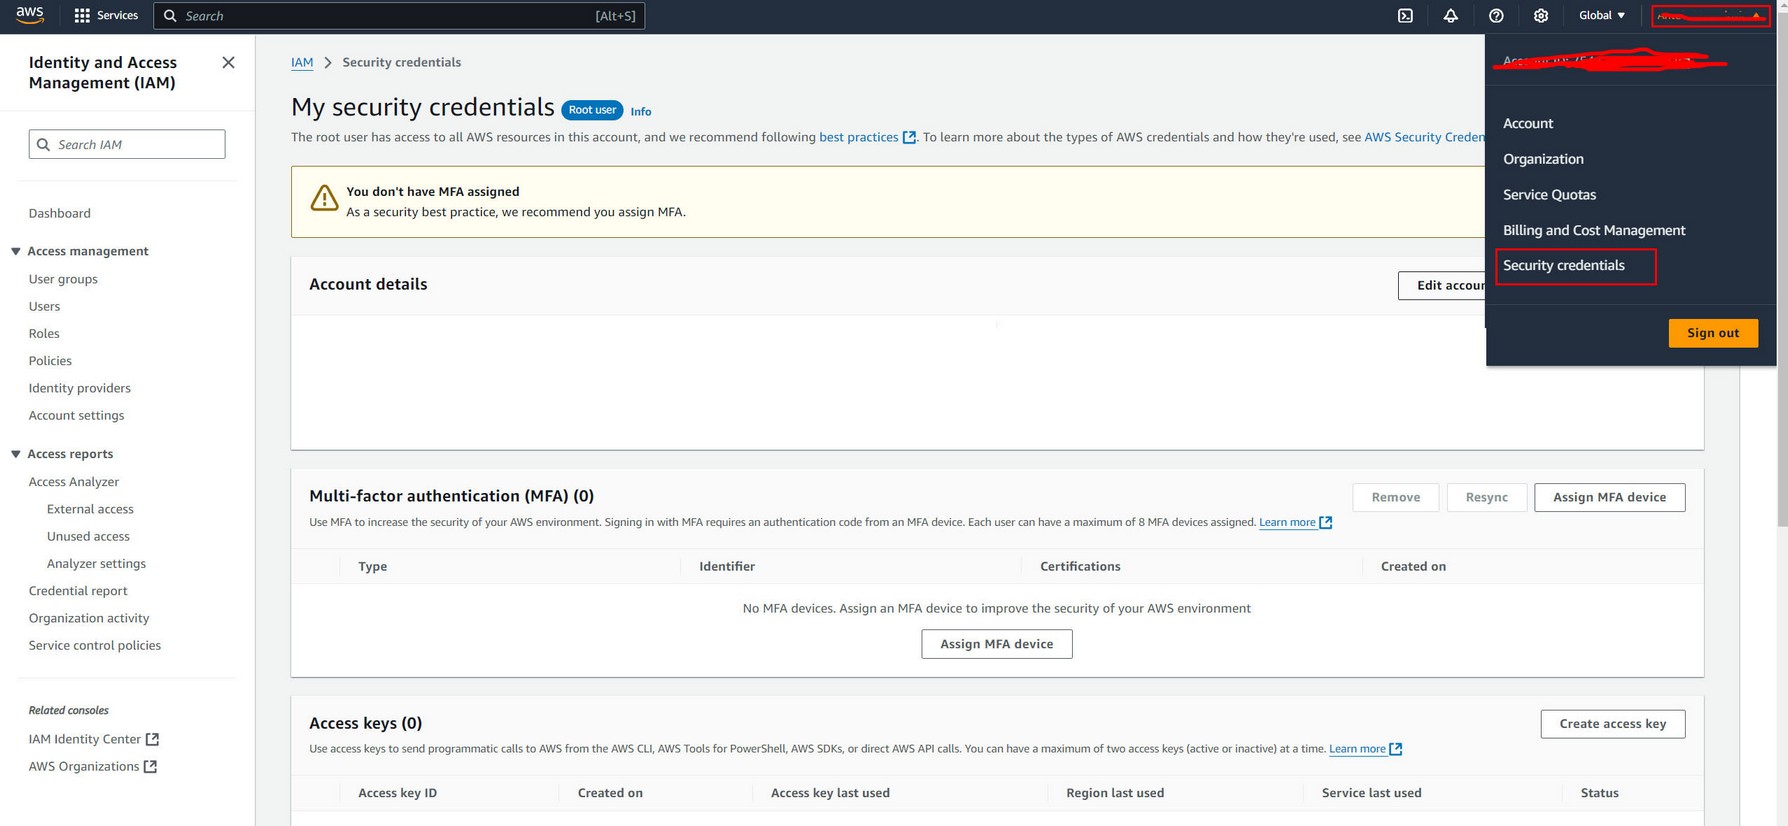
Create New key pair. Go to My account -> My security credentials:
Create Cloudfront key pair

Create New key pair. And download both public and private key immediately after creation.
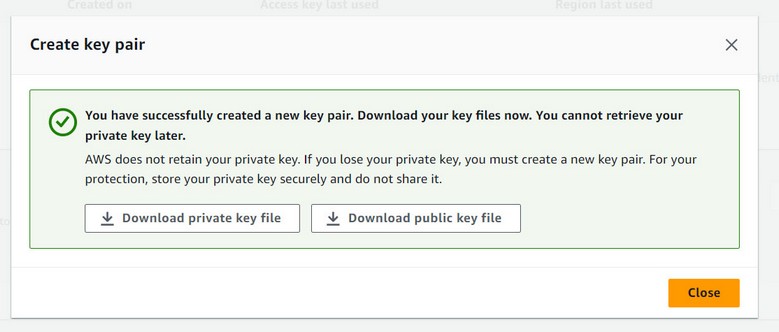
Rename private key to "private-key.pem" and move this file in WordPress uploads / map-file-dir directory.
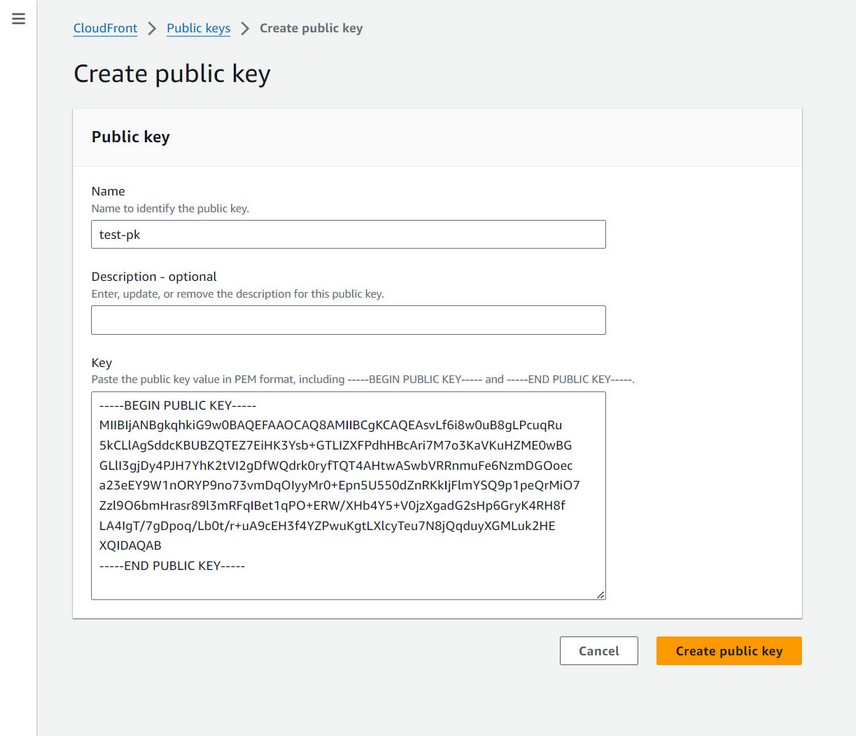
Create Public key under Key management.
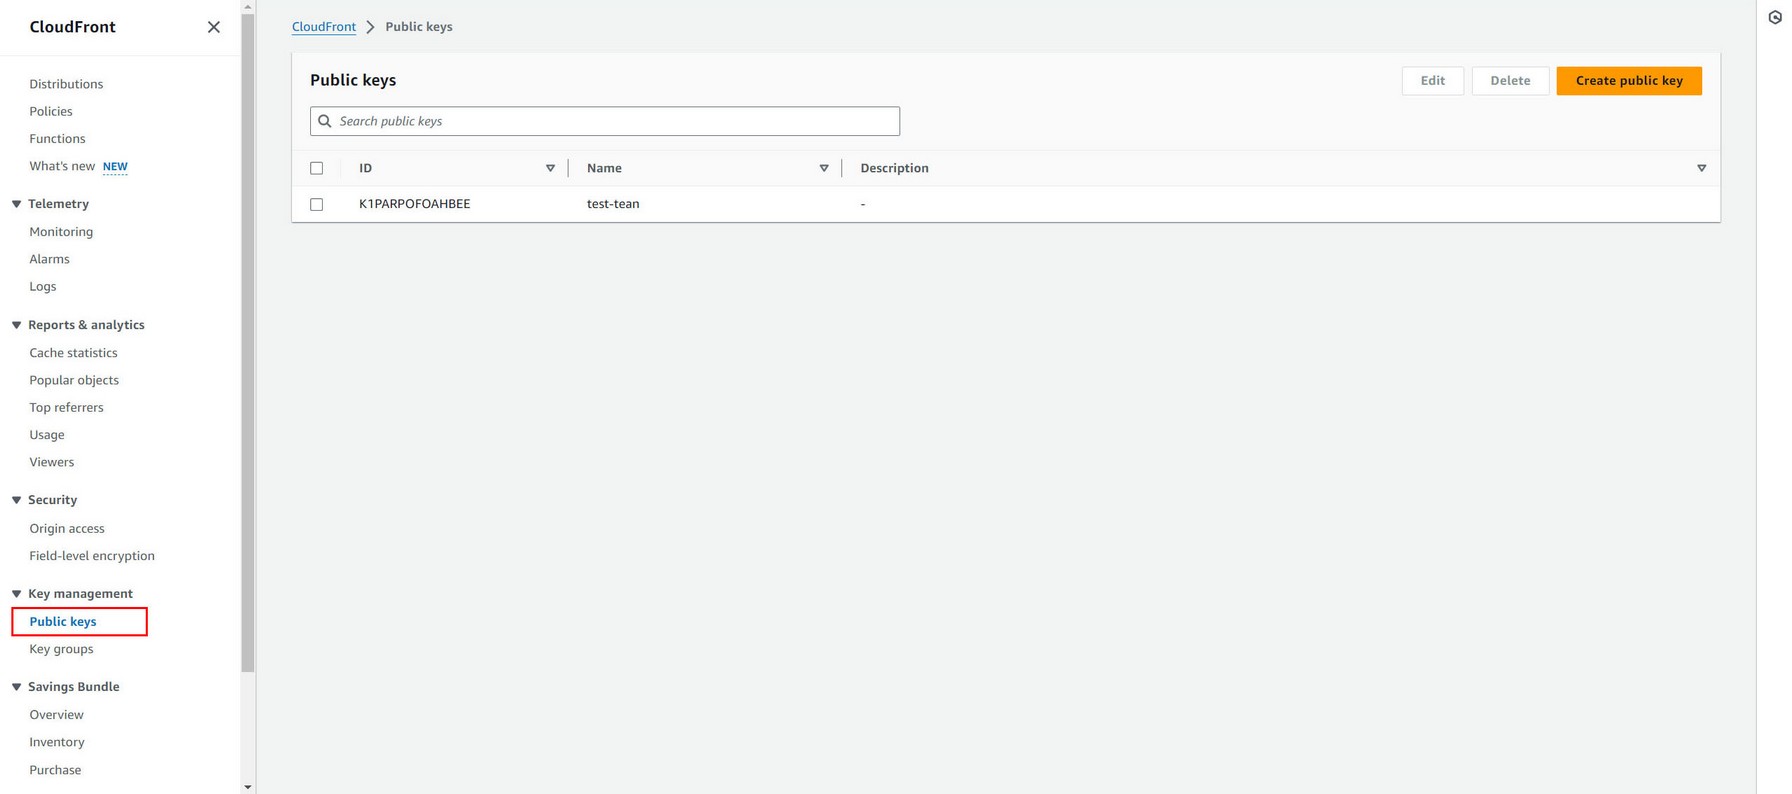
Give it some name, then open public key (you downloaded from the previous step) in any text editor and copy its content inside Key field. (Paste this public key value in pem format...). Make sure its a public key you copy not a private key!
Create Key group under Key management.
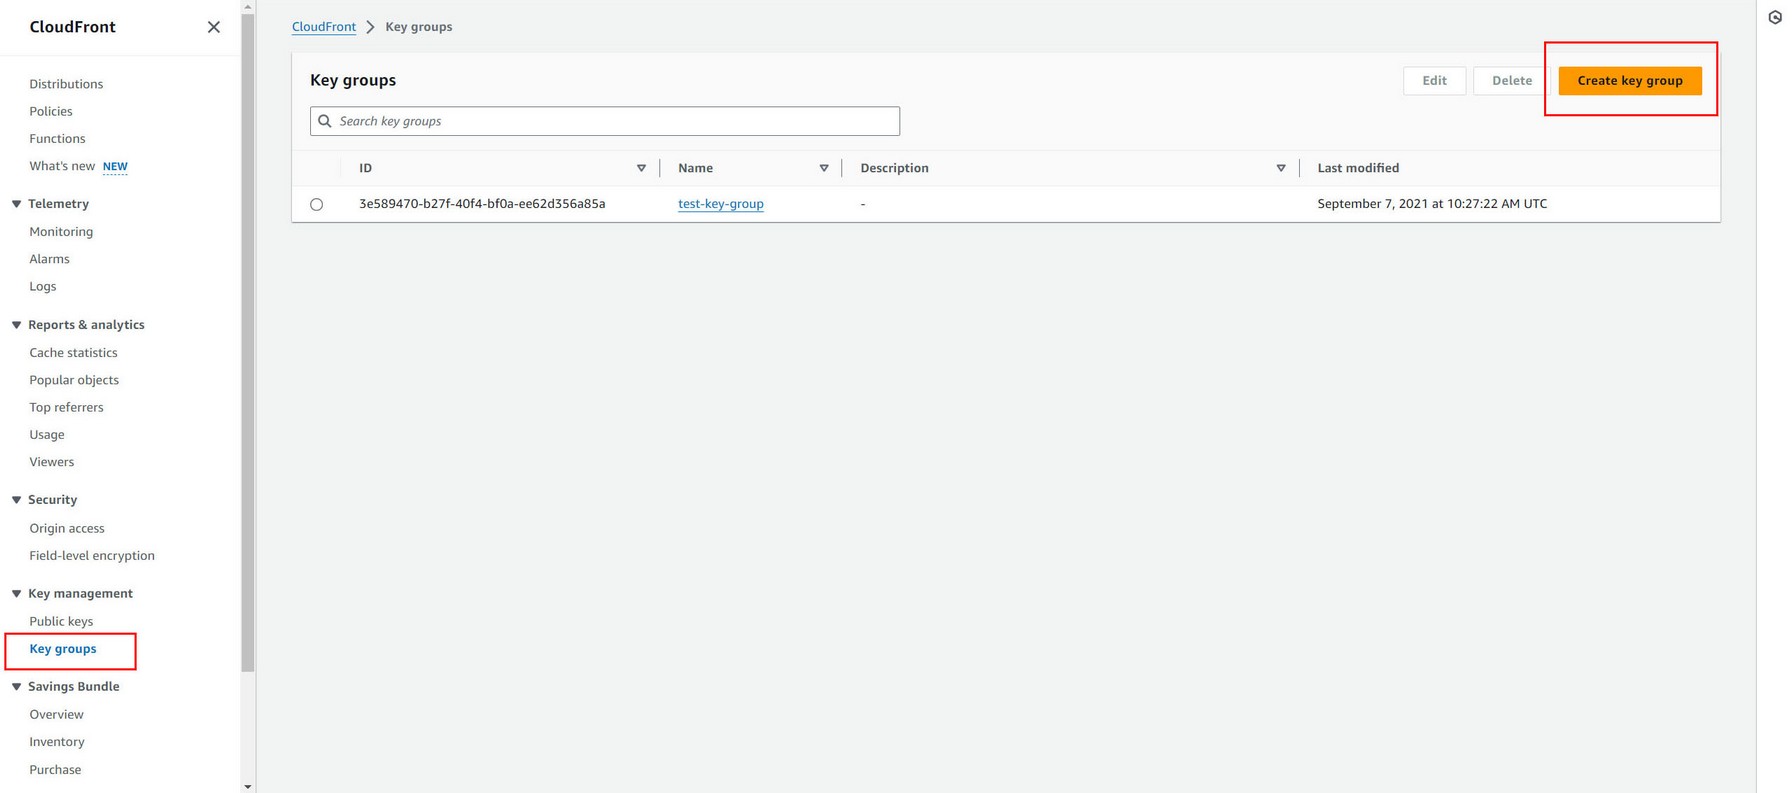
Choose public key you created in previous step to add to this key group.

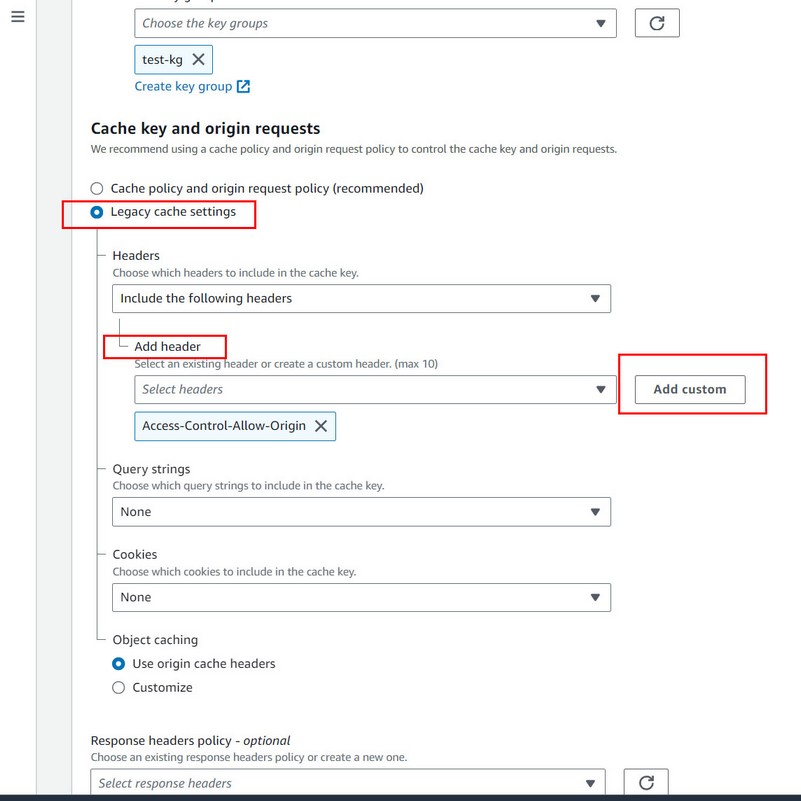
Now create distribution
Under Origin domain choose the Amazon S3 bucket you want to connect with this distribution.

Under Restrict viewer access select Yes, and choose Trusted key groups, and select Key group you have created in previous steps in dropdown menu.

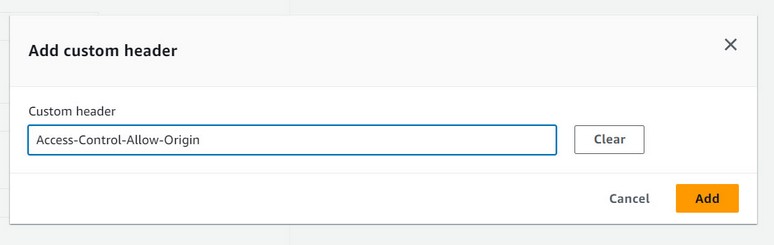
Under Cache key and origin requests select Legacy cache settings, choose Include the following headers, click Add custom button, and paste this as custom header inside: Access-Control-Allow-Origin
Access-Control-Allow-Origin
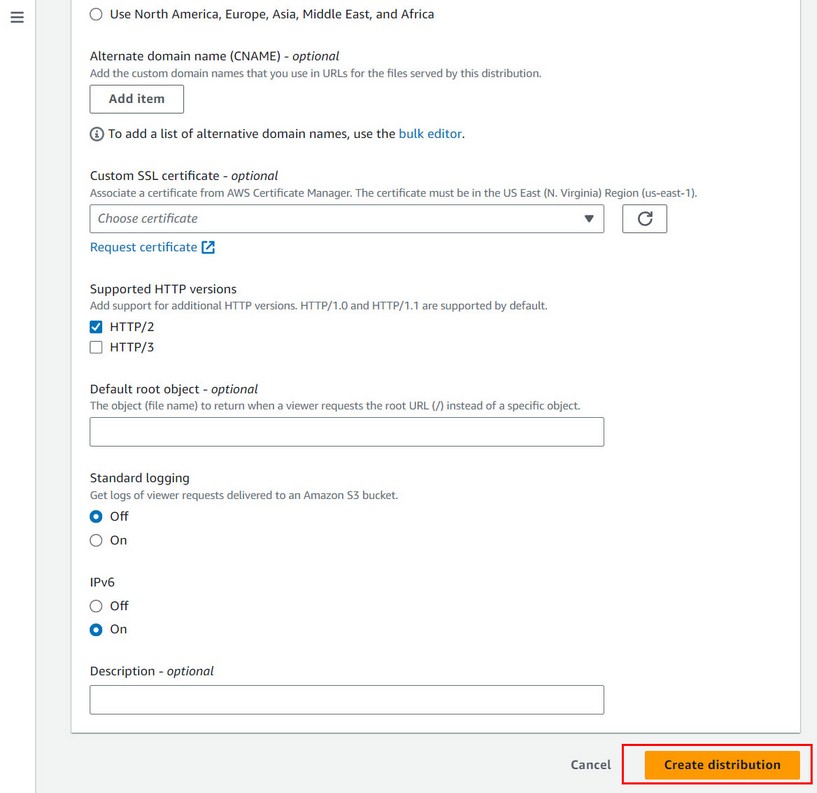
Now end creating distribution.
Copy distribution domain name and Public key pair ID into credentials, and set Use Cloudfront option:


Copy distribution domain name as Cloudfront domain url and Public key pair ID into credentials, and set Use Cloudfront option:

https://xxxxxxxxxxxxx.cloudfront.net/

xxxxxxxxxxxxx = your distribution domain

Note the full url with HTTPS, just replace your xxxxxxxxxxxxx distribution domain name!
If you need to update bucket policy you can use this example:
https://docs.aws.amazon.com/AmazonCloudFront/latest/DeveloperGuide/private-content-restricting-access-to-s3.html
{
    "Version": "2012-10-17",
    "Statement": {
        "Sid": "AllowCloudFrontServicePrincipalReadOnly",
        "Effect": "Allow",
        "Principal": {
            "Service": "cloudfront.amazonaws.com"
        },
        "Action": "s3:GetObject",
        "Resource": "arn:aws:s3:::<S3 bucket name>/*",
        "Condition": {
            "StringEquals": {
                "AWS:SourceArn": "arn:aws:cloudfront::111122223333:distribution/<CloudFront distribution ID>"
            }
        }
    }
}
Amazon S3 adding audio
Supported are single audio and reading whole bucket of audio files.
Adding single audio files
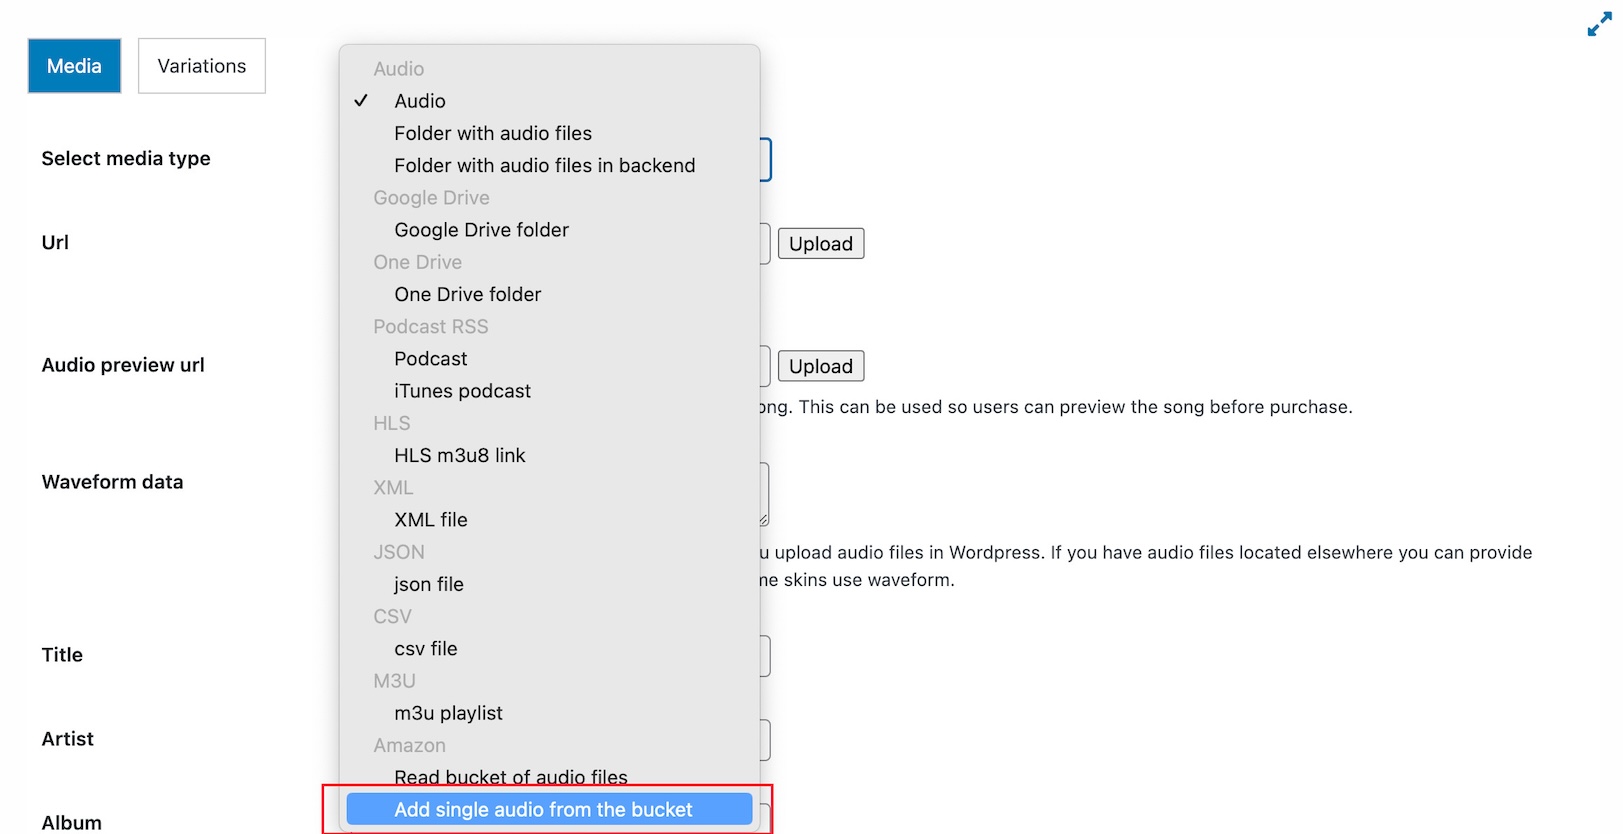
In Playlist manager / Edit Playlist / Add song dialog choose Add single audio from the bucket and enter bucket name and filename (key):

Adding whole bucket of audio files
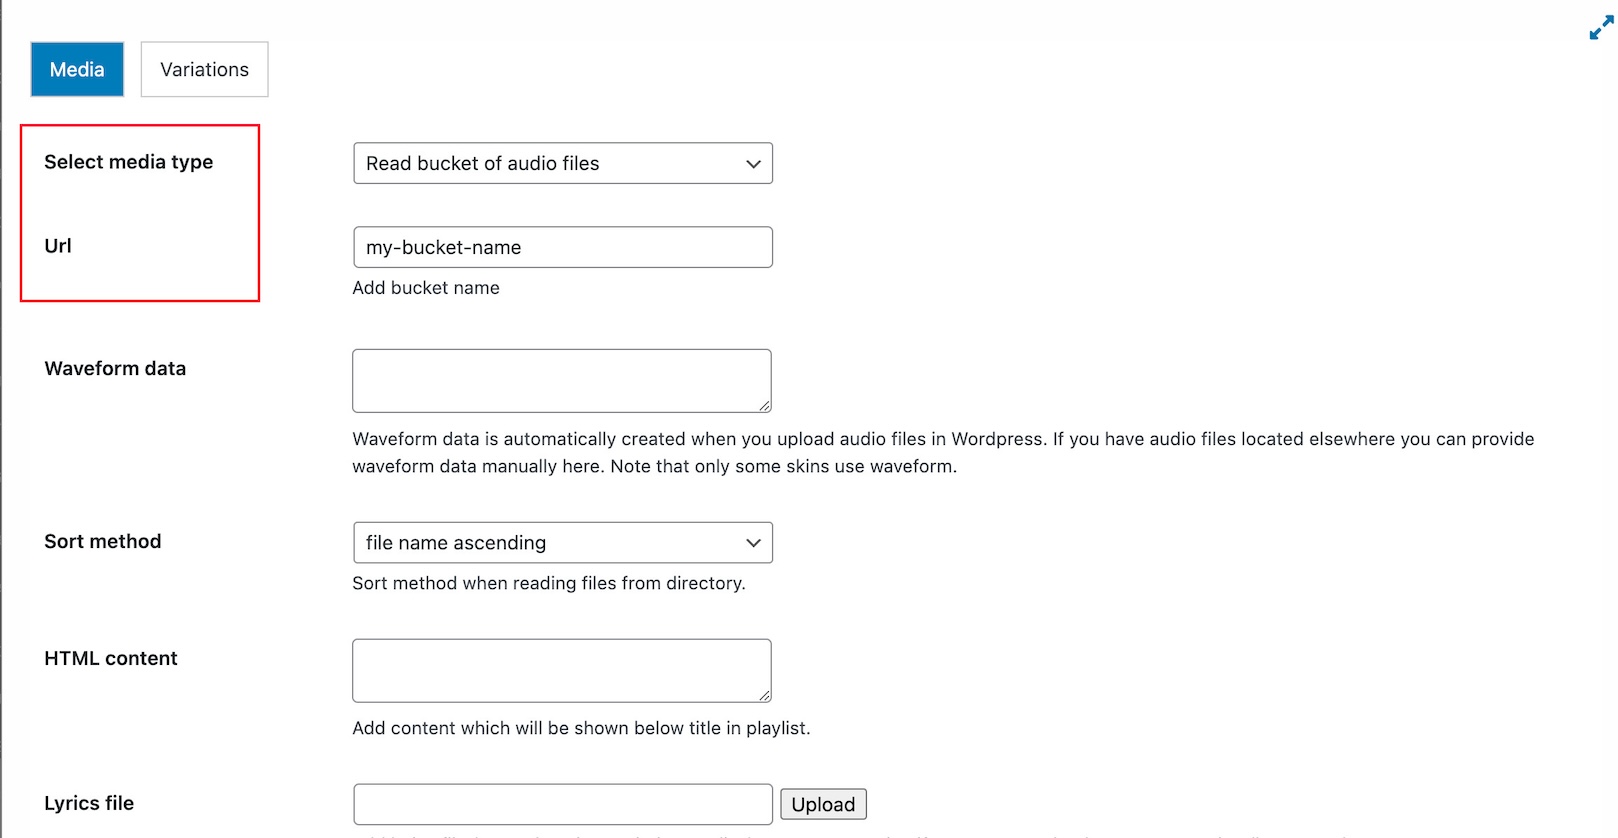
In Playlist manager / Edit Playlist / Add song dialog choose Read bucket of audio files and enter bucket name:
Audio bucket structure
Here is example how the bucket structure needs to look (it includes everything: poster, thumbnails which are optional)
audio - bucket name
    -- audio1.mp3
    -- audio2.mp3
    -- audio3.mp3

    poster folder (optional)
        -- audio1.jpg
        -- audio2.jpg
        -- audio3.jpg

    thumb folder (optional)
        -- audio1.jpg
        -- audio2.jpg
        -- audio3.jpg
We have bucket (called "audio" in our example, this can be called anyhow). Inside "audio" folder are audios, poster, thumb folder. "poster", "thumb" folders are optional. Inside "poster" directory image poster files are located, inside "thumb" directory thumbnails for the playlist are located.
Note: Equivalent audio and poster/thumbnail file names need to be the same!
Importing songs into playlist
You can import songs from different sources into playlist in Playlist manager.
Currently supported sources are CSV.
To use this feature in Edit Playlist, choose Import songs:

Songs will be imported into this playlist. You can repeat this process as many times you need if you have mutiple files to import.
Example of csv file is provided in plugin download package / documentation / csv folder.
Supported properties (fields) are:
| Parameter | Required | Value | Description |
|---|---|---|---|
| type | yes | audio / podcast / folder / gdrive_folder / xml / hls / m3u | Media type
With media addon following formats are supported as well: youtube_single / youtube_playlist, youube_link, soundcloud, soundcloud_link, vimeo_link, wistia_link, twitch_link |
| path | yes | Audio url | |
| audio_preview | url to short song preview snippet. Can be used in combination with useAudioPreview option to show song preview in player instead of full song. | ||
| title | Title | ||
| artist | Artist | ||
| description | Description | ||
| duration | seconds | Song duration in seconds | |
| date | date | Song date | |
| thumb | Thumb image | ||
| thumb_small | Small thumb image for the playlist. Large thumb is by defualt used for player artwork cover which can be large. | ||
| alt | Thumb alt text | ||
| video | Add video to syncronize video with playing audio. | ||
| thumb_default | Backup thumb image for items that do not have thumb set with api. | ||
| download | Playlist download url | ||
| lyrics | Url to lyrics file lrc, srt, vtt (same domain restriction) | ||
| link | Playlist url link | ||
| target | _self / _parent / _blank | Playlist url target | |
| start | number | Media start time in seconds | |
| end | number | Media end time in seconds | |
| pwd | password | Password to asccess song (base64 encoded) | |
| lock_time | seconds | Lock song for logged in users. Enter time in seconds (0 means song is locked from beginning) | |
| peaks | Audio waveform peak data (optional). | ||
| vast | Url to VAST advertizing file |
Variations
Player can display multiple version of a song in playlist. For example, you can have 3 songs in playlist, and each song can have multiple variations (long version, short version etc...). Variations are available for media type audio only.

You can add variations to songs in Edit Playlist / Add media section (when you add songs to playlist). Note that you can attach url and download link to each variation as well.

General shortcode
After you create a player and a playlist and generate shortcode in Shortcode section shortcode will look like this:
playlist_id will be loaded in player on start.
playlist_id can contain multiple playlist id's for example:
This means that first playlist_id will be loaded in player on start, other playlists will be located in page and can be loaded in player on runtime using API methods
You can override this with active_playlist (playlist_id=3 is loaded on start):
If you dont want to load playlist on start set active_playlist=""):
Then later you can use api methods to load any playlist from playlist_id="1,2,3"
Automatic player instance id
Player instance ID is generated automatically starting from 0 for every new player in page. For example, if you add one player in page instance_id will be 0.
You can also manually add instance_id in shortcode (then the player will use this as ID), example (This player will have instance_id 5):
This is usefull if you have multiple players in page and you want to control them with javascript or css. By adding instance_id you can target each player in page.
To target player with CSS use: hap-wrapper + INSTANCE_ID (for example #hap-wrapper0).
#hap-wrapper0{
	max-width:500px;
}
To target player with javascript use: hap_player + INSTANCE_ID (for example window.hap_player0 or just hap_player0).
hap_player0.playMedia(); //Play current media
Multiple players in the same page
1. Create new player for every instance you use:
Wrong: (2 same players cannot repeat in the same page!)
[apmap player_id="1" playlist_id="PLAYLIST_ID"]
[apmap player_id="1" playlist_id="PLAYLIST_ID"]
Correct:
[apmap player_id="1" playlist_id="PLAYLIST_ID"]
[apmap player_id="2" playlist_id="PLAYLIST_ID"]
2. Use same player with different instance_id in shortcode:
[apmap player_id="1" playlist_id="PLAYLIST_ID" instance_id="0"] [apmap player_id="1" playlist_id="PLAYLIST_ID" instance_id="1"](instance_id is just a unique number you choose for each player)
Player shortcodes
Shortcodes for the player:
| Parameter | Required | Value | Description |
|---|---|---|---|
| preset | yes | art_wide_light / art_wide_dark / art_narrow_light / art_narrow_dark / brona_light / brona_dark / artwork / modern / metalic / classic / poster / wall / wall2 / tiny_dark_1 / tiny_dark_2 / tiny_dark_3 / tiny_light_1 / tiny_light_2 / tiny_light_3 / widget / grid | Player skin |
| selector_init | DOM selector | Specify dom selector (ID/Classname) which will open player on click. | |
| playlist_content | DOM selector | Custom element in which to place playlist items (ID or classname). By default playlist itmes are placed in hap-playlist-content element, but you can specify your own element. Use this to separate playlist from the player for example. | |
| auto_open_popup_window | Auto open popup window | Auto open popup window on page load or by clicking DOM selector. | |
| volume | 0-1 | Volume | |
| auto_play | 0=false / 1=true | Autoplay | |
| random_play | 0=false / 1=true | Randomize playlist | |
| loop_state | playlist, single, off | Loop playlist, loop current playing audio (single), or off (on playlist end no loop) | |
| use_share | 0=false / 1=true | Use social sharing icons | |
| use_popup | 0=false / 1=true | Use button to open player in popup window. | |
| use_playback_rate | 0=false / 1=true | Use playback rate slider (speed) | |
| playback_rate_min | 0=false / 1=true | Minimum playback rate (if playback rate slider is used). | |
| playback_rate_max | 0=false / 1=true | Maximum playback rate (if playback rate slider is used). | |
| use_range | 0=false / 1=true | Use A-B loop (range) | |
| use_playlist | 0=false / 1=true | Playlist opened on start | |
| playlist_opened | 0=false / 1=true | Playlist opened on start | |
| player_opened | 0=false / 1=true | Player opened on start. Valid for fixed skin. | |
| active_item | number | Active song on start. Enter number, counting starts from zero (-1 = no song loaded, 0 = first song, 1 = second song etc..) | |
| display_all_playlists_in_page | 0=false / 1=true | If true, display all playlists in page (from Playlist manager) when player runs. Useful if you want to use API method loadPlaylist (playlist-ID) on run-time. If false, display just active playlist from shortcode. | |
| use_playlist | 0=false / 1=true | Use playlist or just player. | |
| use_playlist_scroll | 0=false / 1=true | Use scrollbar in playlist. | |
| playlist_scroll_theme | Scroll themes: http://manos.malihu.gr/repository/custom-scrollbar/demo/examples/scrollbar_themes_demo.html | ||
| use_numbers_in_playlist | 0=false / 1=true | Use numbers in front of titles in playlist | |
| number_title_separator | Separator between number and title in playlist | ||
| artist_title_separator | Separator between artist and title in playlist | ||
| playlist_item_content | title, thumb, description, duration, date | Content to create in playlist items. Description, duration, date may be available for Podcast and Soundcloud. | |
| use_keyboard_navigation_for_playback | 0=false / 1=true | Left arrow = previous media, right arrow = next media, space = toggle playback, m = toggle mute. | |
| use_continous_playback | 0=false / 1=true | Remember playback position on new page load (volume, active item, current time). | |
| create_download_icons_in_playlist | 0=false / 1=true | This will create download icons in playlist for podcast, sondcloud (if download is available), folder and google drive. | |
| create_link_icons_in_playlist | 0=false / 1=true | This will create link icons in playlist for podcast, sondcloud, folder and google drive. | |
| playlist_item_multiline_width | number | Player width at which icons in playlist items (link, download icons) go into second line to make room for playlist titles. | |
| limit_description_text | number | Limit number of characters in playlist item description text. 0 means no limit | |
| search_selector | Dom selector | Use your own input search field for the playlist items and specify dom selector (ID/Classname) for this element. |
Media shortcodes
Shortcodes for the media:
| Parameter | Required | Value | Description |
|---|---|---|---|
| type | yes | audio / podcast / folder / gdrive_folder / xml / hls / m3u / | Media type
With media addon following formats are supported as well: youtube_single / youtube_playlist, youube_link, soundcloud, soundcloud_link, vimeo_link, wistia_link, twitch_link |
| path | yes | Audio url | |
| title | Title | ||
| artist | Artist | ||
| description | Description | ||
| thumb | Thumb image | ||
| video | Add video to syncronize video with playing audio. | ||
| thumb_default | Backup thumb image for items that do not have thumb set with api. | ||
| download | Playlist download url | ||
| lyrics | Url to lyrics file lrc, srt, vtt (same domain restriction) | ||
| link | Playlist url link | ||
| target | _self / _parent / _blank | Playlist url target | |
| limit | number | Number of results to retrieve (default all). | |
| load_more | 0=false / 1=true | Load more on total scroll in playlist (when scroll reaches end of playlist). Works in conjuntion with limit option (for example, set limit="10" which will show 10 items in playlist on start, then on load more, it will load another 10, and so on. Works for Soundcloud, Youtube, Folder playlist, Podcast | |
| id3 | Optional for folder | 0=false / 1=true | get id3 tags from files when reading folder |
| folder_sort | Optional for folder | filename-asc / filename-desc / date-asc / date-desc | sort option to apply when reading folder |
| gdrive_sort | Optional for google drive | filename-asc / filename-desc | sort option to apply when reading google drive |
| start | number | Media start time in seconds | |
| end | number | Media end time in seconds |
Ad shortcodes
Shortcodes for audio adverts:
| Parameter | Required | Value | Description |
|---|---|---|---|
| ad_pre | Audio url | Add audio ad that plays before main song starts. | |
| ad_mid | Audio url | Add audio ad that plays in specified interval while main song plays | |
| ad_mid_interval | miliseconds | Ad mid interval (miliseconds) | |
| pause_audio_during_ads | 0=false / 1=true | Pause main audio while audio ad mid plays. | |
| ad_end | Audio url. | Add audio ad that plays after main song ends. | |
| shuffle_ads | 0=false / 1=true | Shuffle ad order for each individual ad type. For example, if you have multiple ad pre, it will shuffle them. |
Shortcode examples:
Take ads from Ad section, these ads will be used for all songs in the player:
Single audio with manually defined ads:
Podcast with manually defined ads:
Podcast with ads from Ad section:
Shortcode playlist examples
Podcast:
Multiple podcast:
Soundcloud (only with media addon):
Folder of mp3 files:
FOLDER_NAME = folder name in wordpress uploads/map-file-dir/FOLDER_NAME
Multiple folder of mp3 files:
Google Drive folder:
path = Google drive folder ID
HLS m3u8 live streaming:
Multiple m3u8 live streaming:
Youtube single videos (only with media addon):
Youtube playlist (only with media addon):
Youtube single video without api (This will not retrieve title from Youtube, only play video):
XML:
URL_TO_XML_FILE = XML file needs to be on the same server. Examples of XML are in plugin package.
JSON:
URL_TO_JSON_FILE = JSON file needs to be on the same server. Examples of JSON are in plugin package.
Single audio:
Multiple audio:
Combine player_id with multiple audio: (so your player settings come from player_id in admin and your audio from shortcode attributes).
Open player on click:
Open player on DOM selector click:
Open player in popup window on DOM selector click:
Automatically open player in popup window on page load:
Advanced custom fields
How to use ACF fields in shortcode?
Let says you have these acf fields:
acf_title = audio title
acf_artist = audio artist
acf_path = audio url (mp3, wav... etc)
acf_thumb = audio artwork
Example, single audio:
If you have multiple audio, you can use shortcode as this:
$rows = get_field('repeater');
if($rows){

	$s = '[apmap preset="art_wide_light"]';

	foreach($rows as $row){
		$s.= '[apmap_audio type="audio" title="'.$row['title'].'" artist="'.$row['artist'].'" path="'.$row['path'].'" thumb="'.$row['thumb'].'"]';
	}

	$s .= '[/apmap]';

	echo do_shortcode($s);

}
Load more
When displaying songs in player there are 2 options of more efficient and faster player loading.
1. If you have lots of songs in the playlist its recommended to use Retrieve more on total scroll option which can be found in Edit Playlist / Playlist Options / General tab:

This way on start only 20 songs (or other desired amount) will be loaded in the player and on total scroll (when user scrolls to the end of the playlist) another 20 will be retrieved. Or in case of a Grid skin, then load more button is used.
Note that Grid skin also has option to use Pagination buttons instead of Load more button (which is set in Player Manager)

2. If you are using Youtube, Podcast, Soundcloud, Folder of mp3 files in your playlist its recommended to use Enable Load more option option which can be found in Edit Playlist / Add media section (when you add songs to playlist):

This way on player start only 20 songs (or other desired amount) will be loaded in the player and on total scroll (when user scrolls to the end of the playlist) another 20 will be retrieved.
Change player colors
Player css files are located in wp-content\plugins\apmap\source\css directory. You can modify the css there (but note that this will be overwritten on plugin update, so its better to put custom css elsewhere is your page). You can also add css in custom css section in Edit player / Custom CSS tab.
Making player responsive
Player has built in method for making it responsive. You can use this method or you can write your own CSS instead.
To use this method do the following for specific skin:
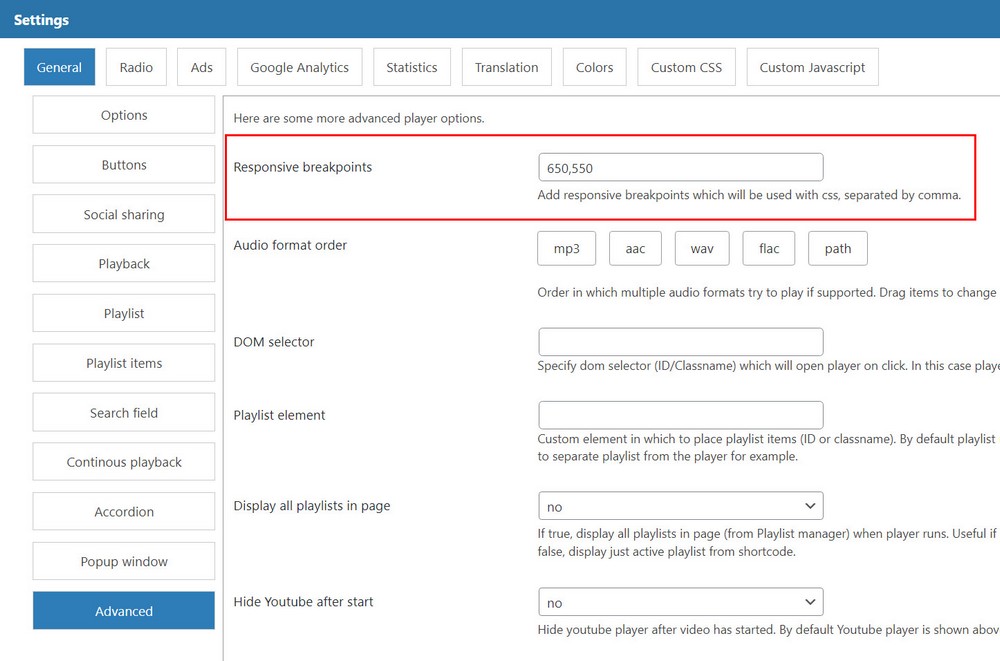
Breakpoints can be adjusted in Edit Player / General / Advanced tab / Breakpoints. These breakpoints [px] are used in CSS.
Example, skin brona has this in hap.css file:
.hap-brona.hap-breakpoint-650 .hap-contr-btn{
	width:35px;
}
.hap-brona.hap-breakpoint-650 .hap-player-holder{
	height: auto;
	flex-direction:column;
}
.hap-brona.hap-breakpoint-650 .hap-player-thumb-wrapper{
	width: 100%;
	height: auto;
	padding-top: 100%;
}
.hap-brona.hap-breakpoint-650 .hap-player-right{
	flex:none;
}
.hap-brona.hap-breakpoint-650 .hap-center-elements{
	margin-left: 0;
  	margin-top: 20px;
}
.hap-brona.hap-breakpoint-650 .hap-playlist-inner{
	padding: 0 30px 30px 30px;
}

.hap-brona.hap-breakpoint-550 .hap-volume-seekbar{
	display: none!important;
}
.hap-brona.hap-breakpoint-550 .hap-volume-wrap{
	width: 40px!important;
}
.hap-brona.hap-breakpoint-550 .hap-popup-toggle,
.hap-brona.hap-breakpoint-550 .hap-playback-rate-toggle{
	display: none;
}
This means player has 2 responsive breakpoints set (500 and 650 px). Adding a breakpoint will add class of hap-breakpoint-x to the player. When player has width of 650 (or less) CSS written above will take effect. You can add your own custom breakpoints and then use CSS to control how the player will behave on different screens.
The advantage of this is that is works when player is placed in sidebar or similar (not only on full page width).
You can of course disregard this and use your own CSS media queries.
Custom CSS
Using custom css in player
If you have your own custom CSS, you can add it to each player in Player manager / Edit Player / Custom Css tab. This will apply only for this player.

If you have you want to apply to all players, you can add it in Global settings / Custom Css tab.

Make playlist show all tracks
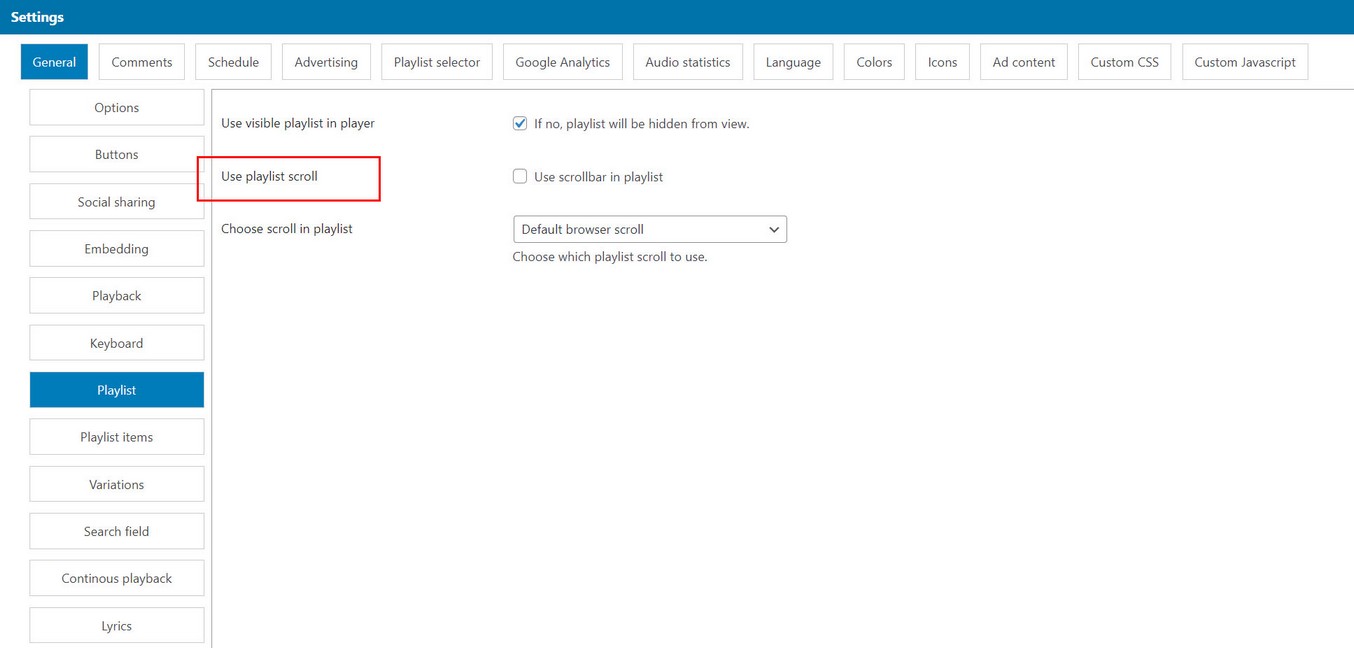
If you want to show all songs in playlist (without having scroll) do the following (this should work with most player skins)
Deactivate scroll:
Add this CSS somewhere (in player custom CSS section or somewhere in your page):
.hap-playlist-inner{
	max-height:none!important;
}
Save playlist from frontend
This example shows how to save playlist from frontend. It generates input field where user can enter playlist name and all tracks from specified player will be saved as new playlist.
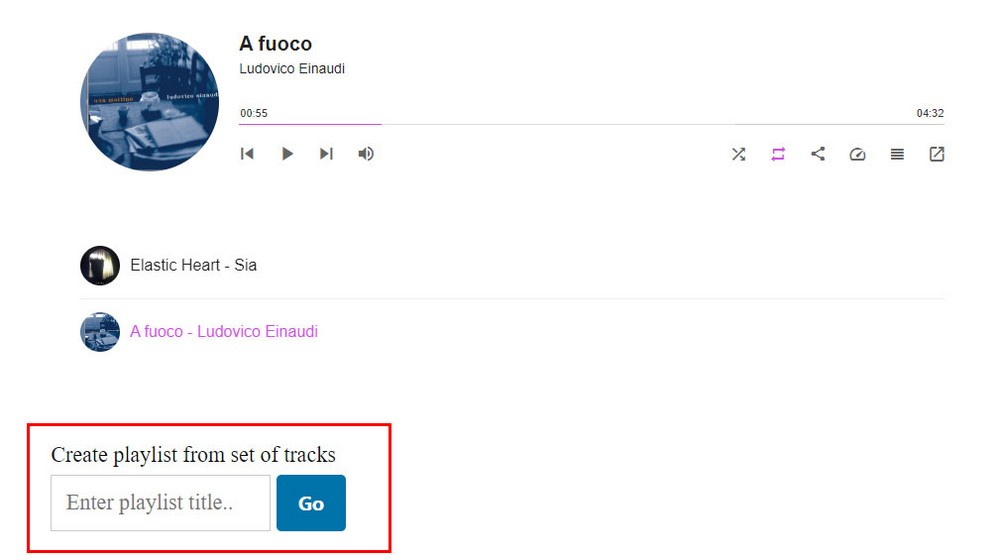
| Parameter | Value | Description |
|---|---|---|
| playlist_id | Playlist id to display in player. | |
| player_id | Related player ID. player_id should have the same attribute in both shortcodes! | |
| instance_id | Player instance ID is generated dynamically starting from 0 for every new player in page. Which means first player in page is going to have instance_id 0. If instance_id is specified in shortcode, then player will use this instance_id. | |
| playlist_create_format | single / group | Use single if your playlist contains audio tracks from single sources (like single audio urls). Use group if your playlist contains audio tracks from grouped sources (like podcast, soundcloud, folder of mp3 files, google drive folder..). |
| header | Title above input field. | |
| input_placeholder | Input field placeholder. | |
| btn_text | Button text to create playlist. | |
| playlist_required_msg | Playlist required alert message |
2 shortcodes build this, first for input with button (where user can enter playlist title), second for the player from which we will save playlist. Note how instance_id is the same as player_id!
Playlist display frontend
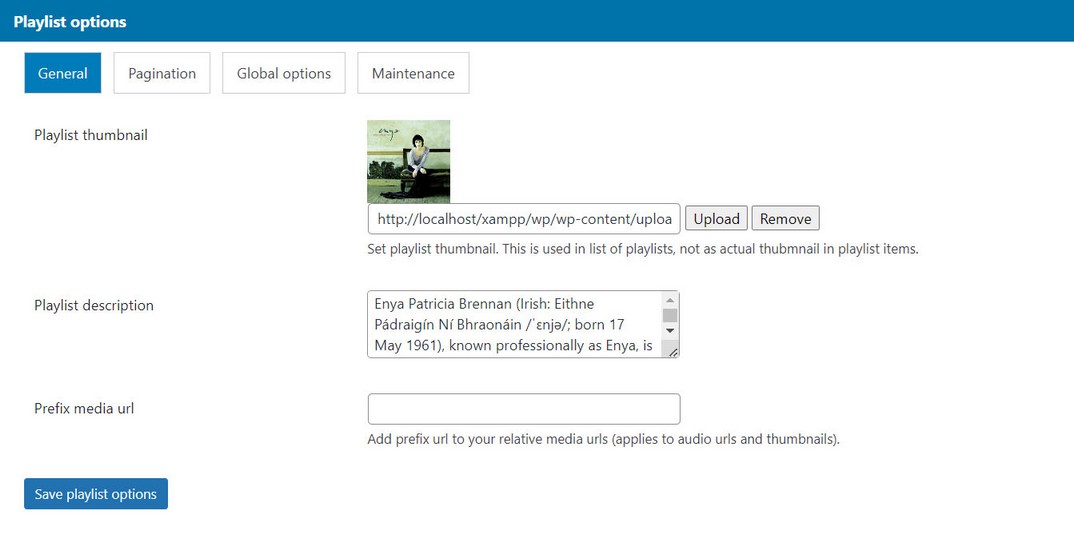
For each playlist, thumb and description can be defined in Edit playlist section:
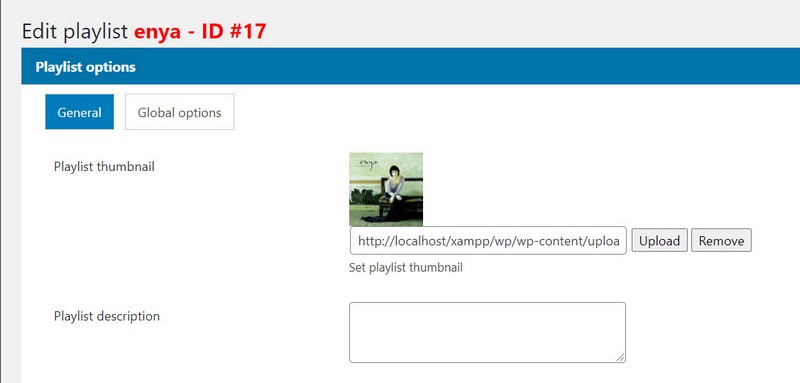
This data can then be used to show playlist thumbs in frontend (for multiple playlists), and by clicking on each thumb new playlist will be loaded in the player.

You can generate shortcode for this in plugin Shortcodes section.
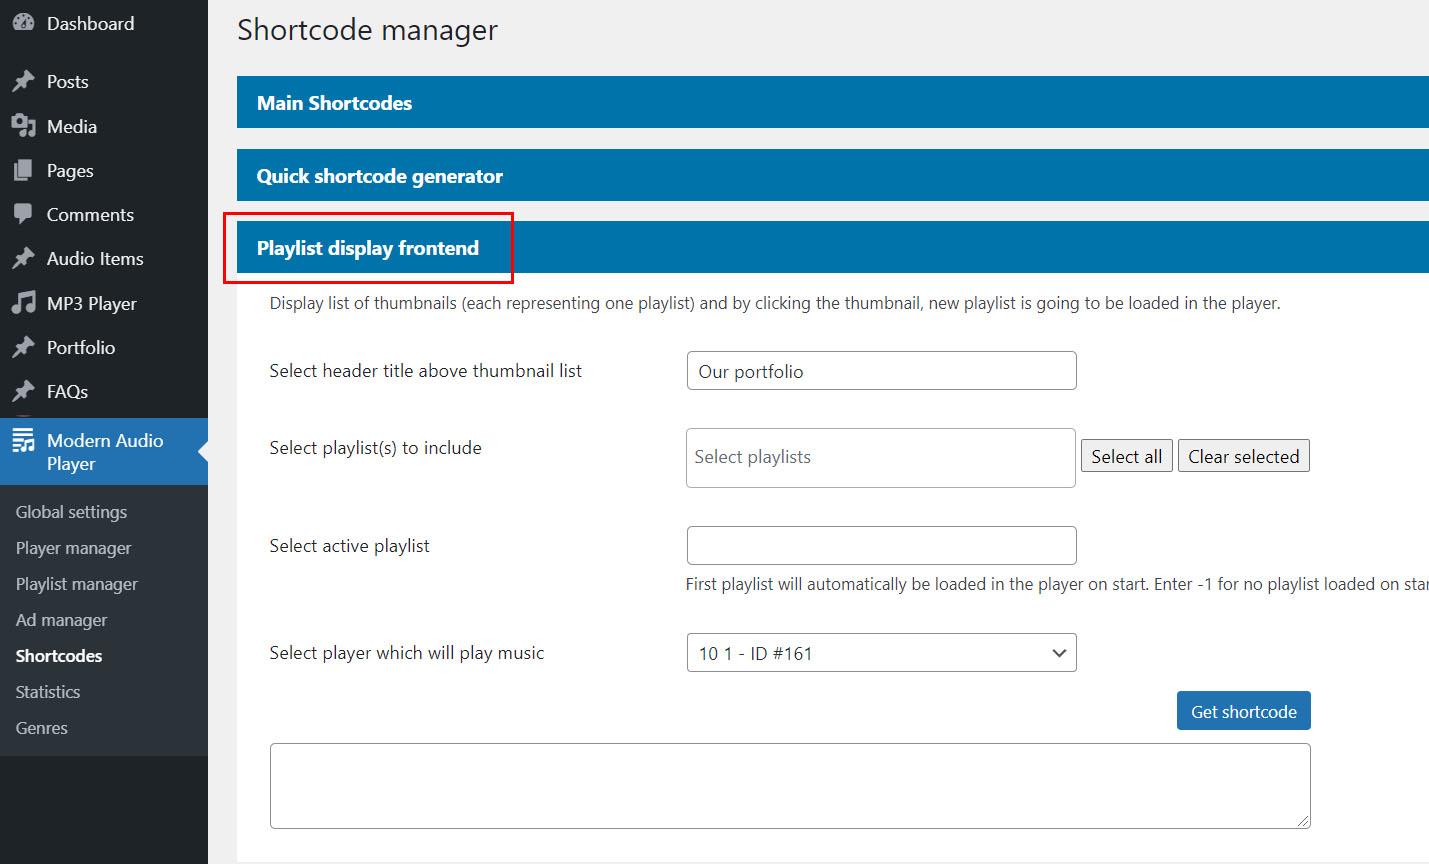
2 shortcodes are required, one for playlists to display, another for the player.
| Parameter | Value | Description |
|---|---|---|
| display_style | grid / select | How to display playlists (grid = thumbnail grid, select = select dropdown menu). |
| playlist_id | Playlist ID(s) to display. playlist_id should have the same attribute in both shortcodes! | |
| active_playlist | Active playlist which is going to be loaded in player on start. | |
| connected_player_id | connected player id which connects playlist with the player. | |
| player_id | Related player ID. player_id should have the same attribute in both shortcodes! | |
| instance_id | Player instance ID is generated dynamically starting from 0 for every new player in page. Which means first player in page is going to have instance_id 0. instance_id should have the same attribute in both shortcodes! | |
| header_title | Header title. | |
| placeholder | Select placeholder text |
Show 3 playlists with ID (1,2,3) in player ID (CONNECTED_PLAYER_ID):
First playlist_id will be loaded in player on start. You can override this with other playlist_id (for example playlist_id=3 is loaded on start):
If you dont want to load a playlist on start remove active_playlist in shortcode.
To hide the player until music starts use hide_player_until_music_start in CONNECTED_PLAYER:
Using this only makes sense if no playlist is loaded on start.
Grid mode
Thumbnail grid skin
To create grid choose grid skin when creating player in Player manager. Thumbnail grid skin can used in combination with sticky player at the page bottom or on its own.

Visual song progress
You can add visual song progress inside the thumbnail by enabling Use inline seekbar option:

Note that inline seekbar is currently not seekable.
Pagination
Grid mode can also be used with Load more and pagination option.
Custom Icons in player
You can add any number of icons in player and attach url to each icon. Icons can be SVG, font icons, full img tag.
![]()
You can add icons to player in Edit Player / Player icons tab:
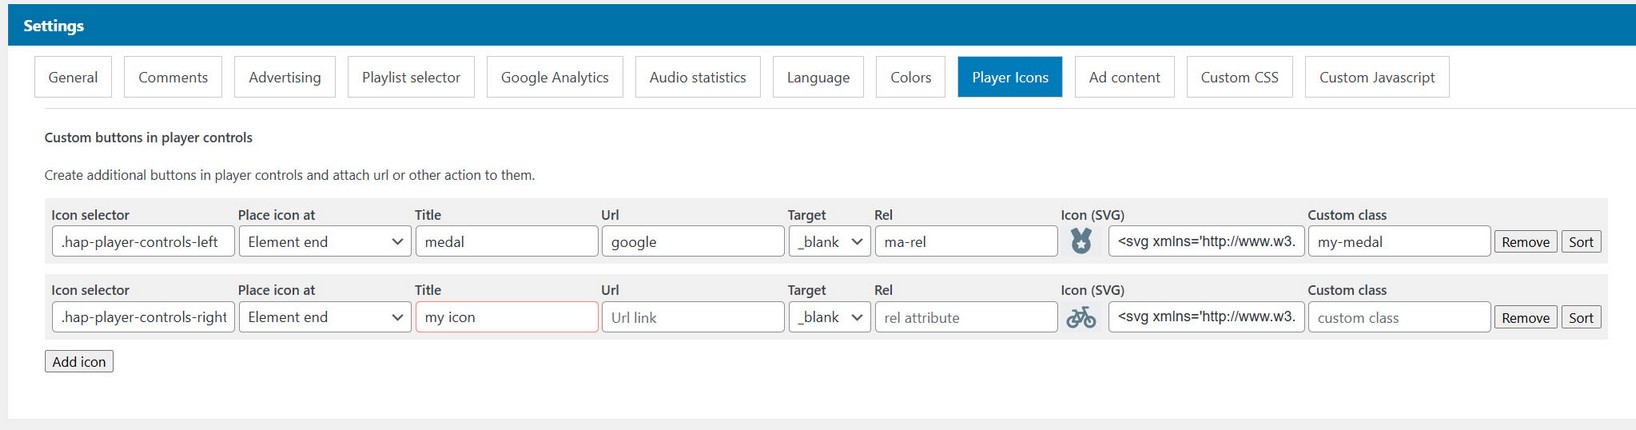
You can use Font Awesome selector for adding icons, but you can also add SVG code or full img tag inside icon field value instead. Note that using some formats (like SVG or img tag) may require additional CSS added! Plain text can also be used instead of icon.
Icon properties:
selector - DOm selecor (ID attribute or classname) where the icon is going to be placed (for example .hap-player-controls-left). Depends on the skin (different skins have different controls). Use browser developer console to inspect element and get its classname.

location - at the beginning or end of the selector element

icon - SVG, font icon, img tag, text

class - icon custom class (optional)
title - shows on hover (optional)

url - www url to open on click
target - url target
rel - rel attribute
Function call on icon click
If you want to call a function when some icon is clicked do the following.
Add icon with chosen class attribute.
![]()
Note that url and target are optional attributes in custom playlist icons and dont need to be used. You can just use an icon to trigger javascript function.
Add javascript code to listen for icon click:
 <script>
document.addEventListener('click', e => {
   if (e.target.closest('.my-icon-class')) {
       alert('function is called')
   }
})
 </script>
Custom Icons in playlist
You can add any number of icons in playlist and attach url to each icon. Icons can be SVG, font icons, full img tag.
![]()
You can add icons to songs in Edit Playlist / Add media section (when you add songs to playlist):

You can use Font Awesome selector for adding icons, but you can also add SVG code or full img tag inside icon field value instead. Note that using some formats (like SVG or img tag) may require additional CSS added! Plain text can also be used instead of icon.
Icon properties:
icon - SVG, font icon, img tag, text

class - icon custom class (optional)
title - shows on hover (optional)

url - www url to open on click
target - url target
rel - rel attribute
Function call on icon click
If you want to call a function when some icon is clicked do the following.
Add icon in song with chosen class attribute.
![]()
Note that url and target are optional attributes in custom playlist icons and dont need to be used. You can just use an icon to trigger javascript function.
Add javascript code to listen for icon click:
 <script>
document.addEventListener('click', e => {
   if (e.target.closest('.my-icon-class')) {
       alert('function is called')
   }
})
 </script>
Icon color
If you want to change icon colors you can target them with following css:
.my-icon-class{
	color:#aaaaaa;
}
Update old Font Awesome icons
If you have used Font Awesome icons before Font Awesome selector was introducted, and you have been manually adding icon code (for example f167), you can update icons automatically in Settings section:
![]()
Open content in lightbox
Create icon in songs in playlist items that can open any content in lightbox (video, audio, image, html...)

How to add icons:
You can add icons to songs in Edit Playlist / Add media section (when you add songs to playlist):
You can use Font Awesome selector for adding icons, but you can also add SVG code or full img tag inside icon field value instead. Note that using some formats (like SVG or img tag) may require additional CSS added! Plain text can also be used instead of icon.
Icon properties:
icon - SVG, font icon, img tag, text

class - icon custom class (optional)
title - shows on hover (optional)

type - content to open in lightbox: (video, audio, image, youtube, vimeo, iframe, inline)
url - link to content (video, audio, image, youtube, vimeo, iframe, inline)
hook - connect multiple items in lightbox by providing same hook

description - description (optional)
thumb - thumbnail url
purchaseUrl - www url (if set, will display purchase icon in lightbox) (optional)
Connect multiple items in lightbox by providing same hook:
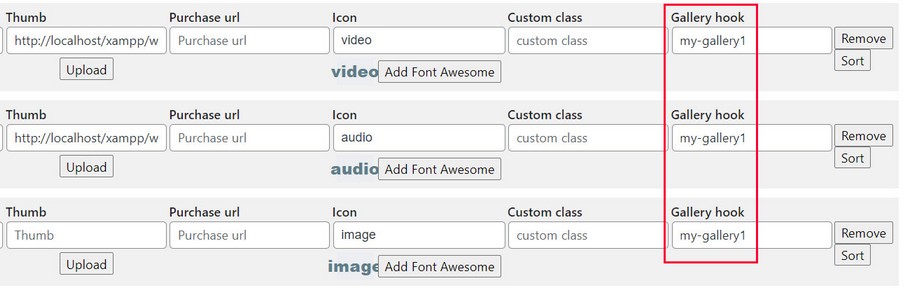
By providing the same hook (my-gallery1), lightbox will show all items containing same hook items when opened.
Example of different content type that can be opened in lightbox:
video - self hosted video (mp4)

audio - self hosted video (mp4)

youtube - youtube single video, provide just video ID like CnW_AlnIfBM or full embed source:  https://www.youtube.com/embed/CnW_AlnIfBM?playsinline=1&modestbranding=1&cc_load_policy=0&autoplay=1

vimeo - vimeo single video, provide just video ID like 191947042 or full embed source:  https://vimeo.com/191947042

image - image url

iframe - iframe url, provide just iframe src attribute or full iframe path

inline - show HTML, provide ID atribute to element in page you want to show in lightbox, for example #my-div (content INSIDE my-div wil be shown in lightbox)

<div id="my-div">
<p class="foo">This will be show in lightbox</p>
</div>
Settings available for icons:
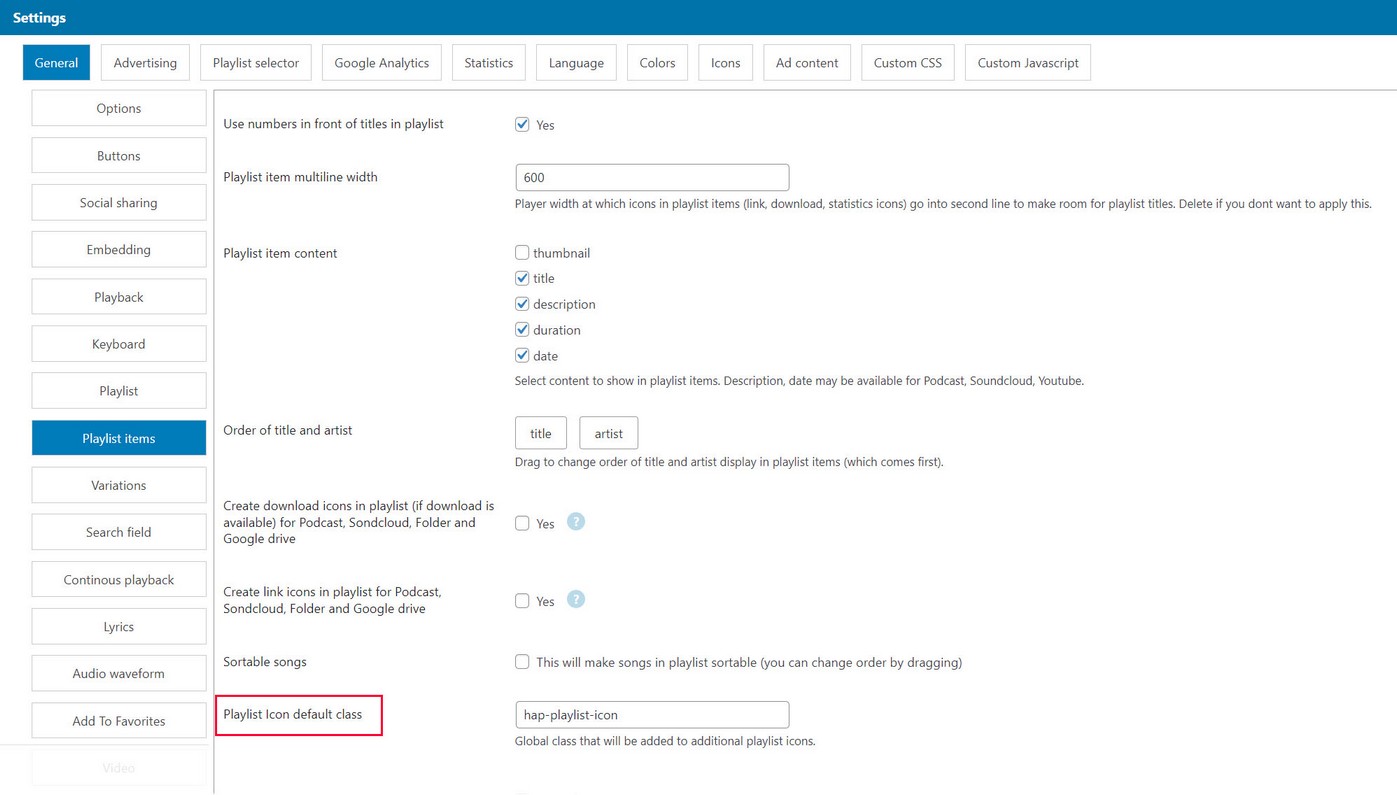
Specify global class that will be added to each icon (not related to class property above) in Edit Player / Playlist items tab:
Settings available for lightbox:
Lightbox settings are available in Global settings plugin menu:

If you want to use lightbox, most important is the you check Add lightbox css option.
Custom content in playlist items
To add HTML content in playlist items in Add / Edit media dialog inside Edit Playlist, use HTML content section:
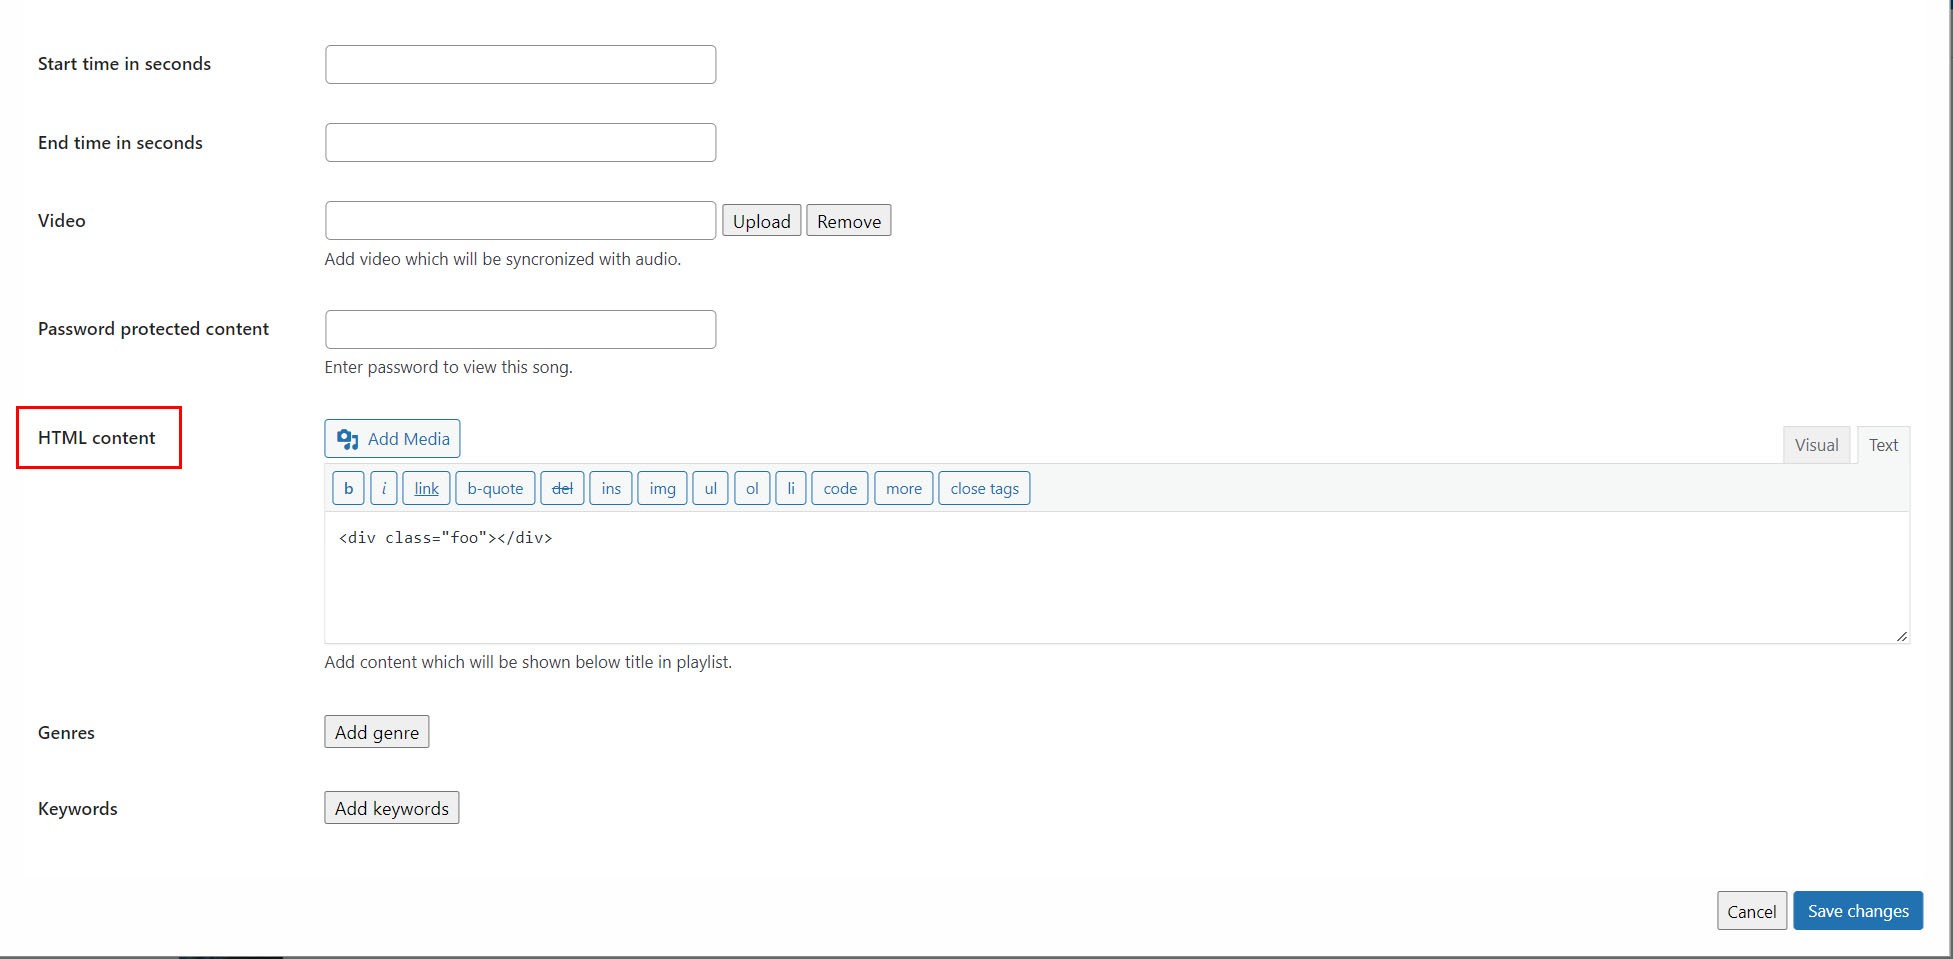
This will be inserted after song title / artist in playlist. Then you can use your own CSS for the styling.

Playlist selector
Using playlist selector
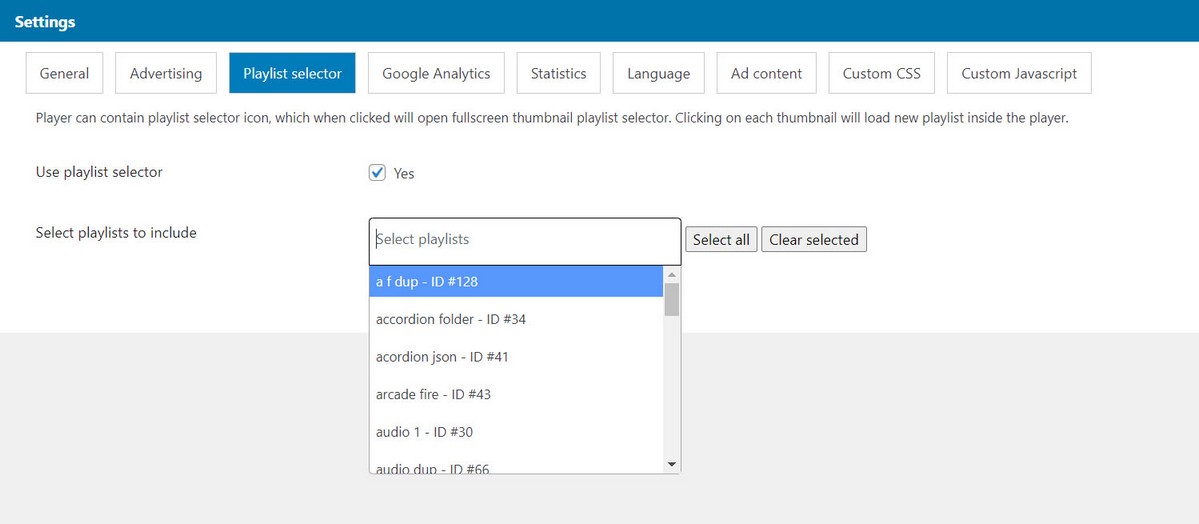
Player can contain playlist selector icon, which when clicked will open fullscreen thumbnail playlist selector. Clicking on each thumbnail will load new playlist inside the player.
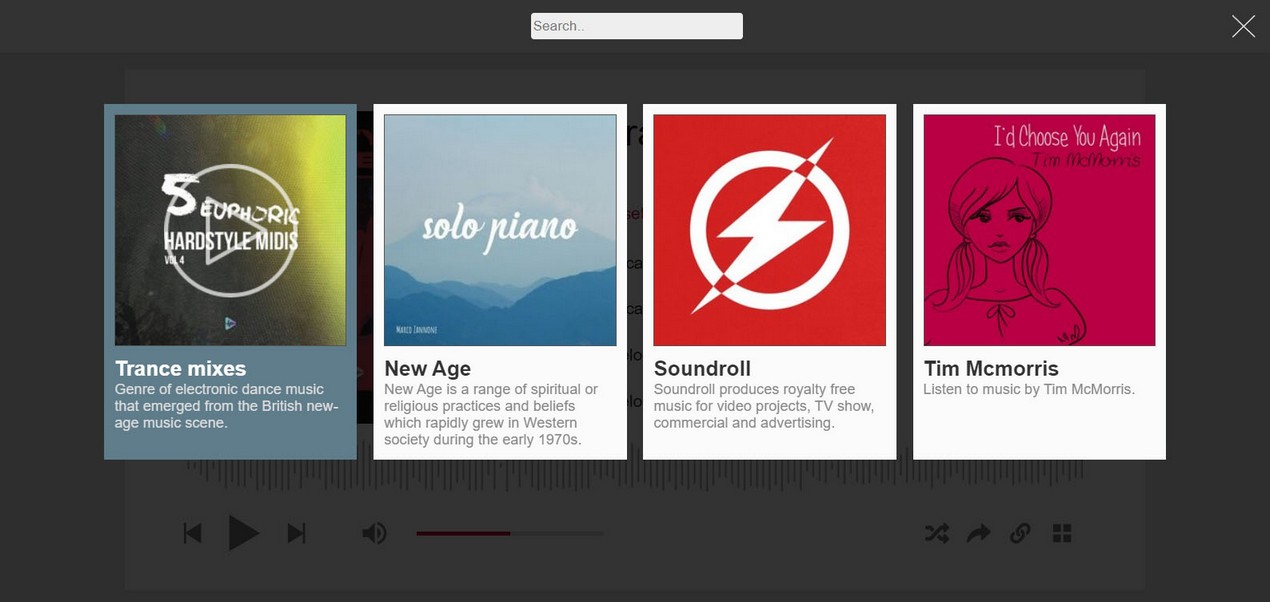
Thumbnail and description come from playlist options in Edit Playlist:
How to create playlist selector?
Activate playlist selector inside Edit Player / Playlist selector tab and choose playlists to include:
Directy in shortcode
use_playlist_selector_list = comma separated PLAYLIST_ID (s)
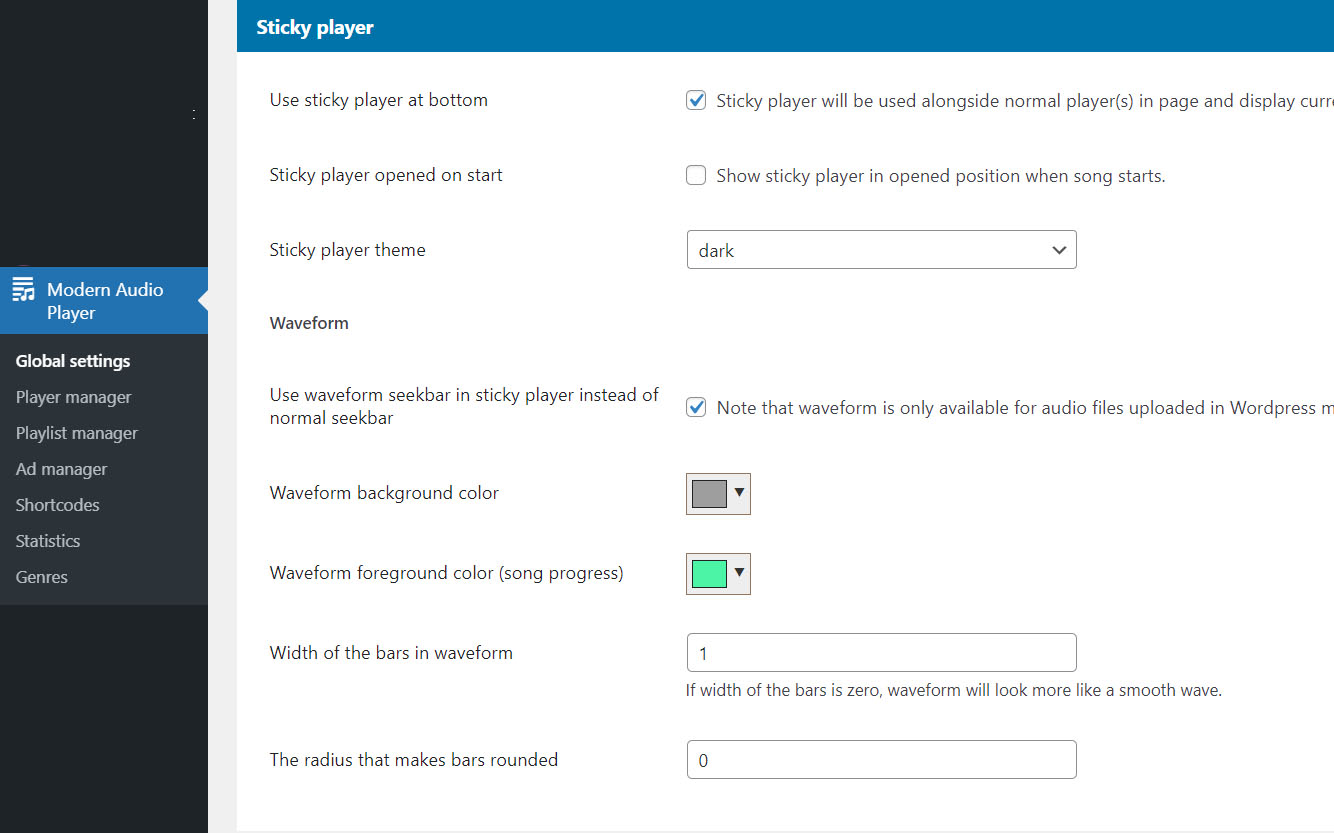
Sticky player
When using normal player in page, you can also activate sticky player which will be visible at page bottom at all times. Sticky player will play song from any active player in the page. You can access settings for the sticky player in Global settings:
Note that normal skins like fixed, fixed2 are fixed to page bottom and will NOT work with sticky player because sticky player also sticks to page bottom!
Using only sticky player
Its possible to just use sticky player in plage and completely hide main player. Settings from main player will will apply, just the player will not be placed inside the page. Activate this feature in Global settings / Miscellaneous tab

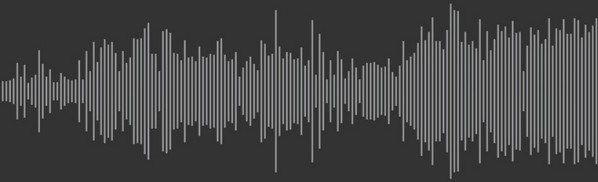
Audio waveform
Using audio waveform as seekbar.
Audio waveform as seekbar can be used in sticky player and in some other player skins (epic, wave..)
For song to have waveform as seekbar, song needs to have waveform data available.
Waveform data can automatically be created for songs uploaded in Wordpress media library. Activate this option here in Global settings / Waveform tab:

You can also manually add waveform data for each song when adding songs to playlist in Edit Playlist / Add media dialog:

Waveform style
Here are couple of waveform examples, to create such waveforms use following settings in Edit Player / General / Audio Waveform tab:

Settings:
Width of the bars in waveform: 5,
The radius that makes bars rounded: 3,
Spacing between bars of the wave: 5,
Settings:
Width of the bars in waveform: 1,
The radius that makes bars rounded: 0,
Spacing between bars of the wave: 5

Settings:
Width of the bars in waveform: 0,
The radius that makes bars rounded: 0,
Spacing between bars of the wave: 0,
Demo waveforms
You can provide "fake" waveform data using Demo peaks option in Global settings / Waveform tab and player will use this as a backup waveform if main waveform does not exist. You can provide multiple and they will be randomized each time.
How to add waveform manually to shortcode?
If you use audio url directly in shortcode use peaks attribute like this:peaks="WAVEFORM_HERE"
Trouble importing songs from Wordpress media library
If you use Wordpress media library upload to add songs, then audio waveform is created for each song, and since this process requires a lot of memory in browser, depending on the amount of songs and their sizes (the larger the songs the more it takes to create a waveform), it can happen that browser runs out of memory and crashes.
Solution would be to upload / import smaller amount of songs at once.
Unless there is another issue present, and the process simply stops (it does not progress further after some song), you can open browser console and check if some messages appear when this happens.
View browser console in javascriptLyrics
Using song lyrics
Supported lyrics extensions are lrc, vtt, srt. If you have trouble uploading these extensions into WordPress, rename lyrics file to .txt extension.
To add lyrics to song, When adding songs in Playlist manager section, upload lyrics file in lyrics field:

Or set lyrics url directly in shortcode:
| Parameter | Value | Description |
|---|---|---|
| lyrics_auto_open | 1 = true / 0 = false | Auto open lyrics dialog on song start |
| lyrics_auto_scroll | 1 = true / 0 = false | Auto scroll lyrics |
You can find lyrics examples in plugin package documentation / lyrics directory.
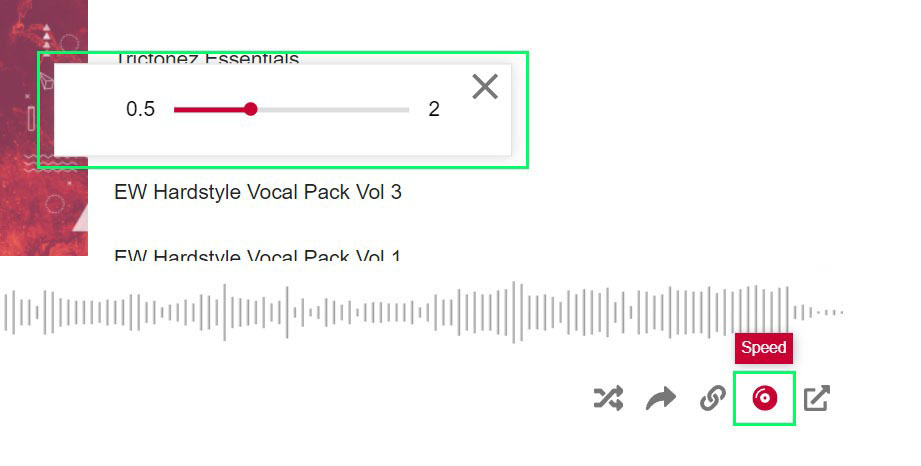
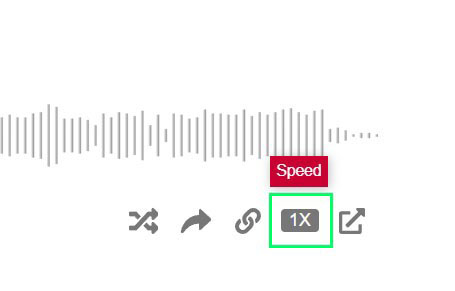
Playback rate
Using audio playback rate (speed)
2 types of playback rate can be used: slider and button. Slider changes playback rate by sliding, while button on click.
Slider version
Button version
Settings for playback rate can be found in Edit Player / General / Buttons tab:
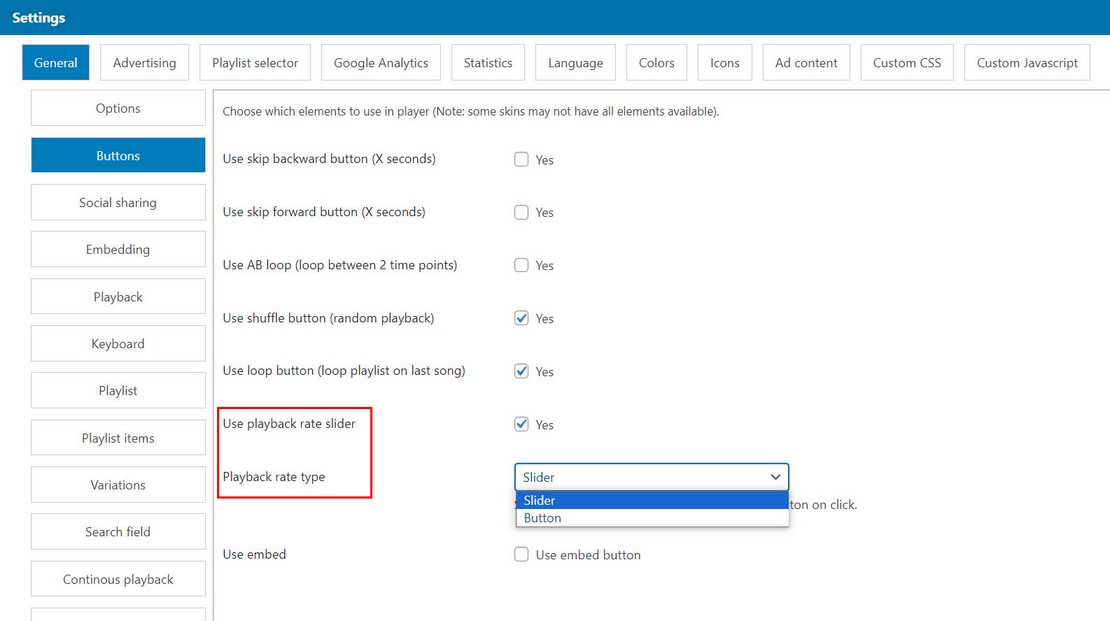
Also in Edit Player / General / Playback tab:
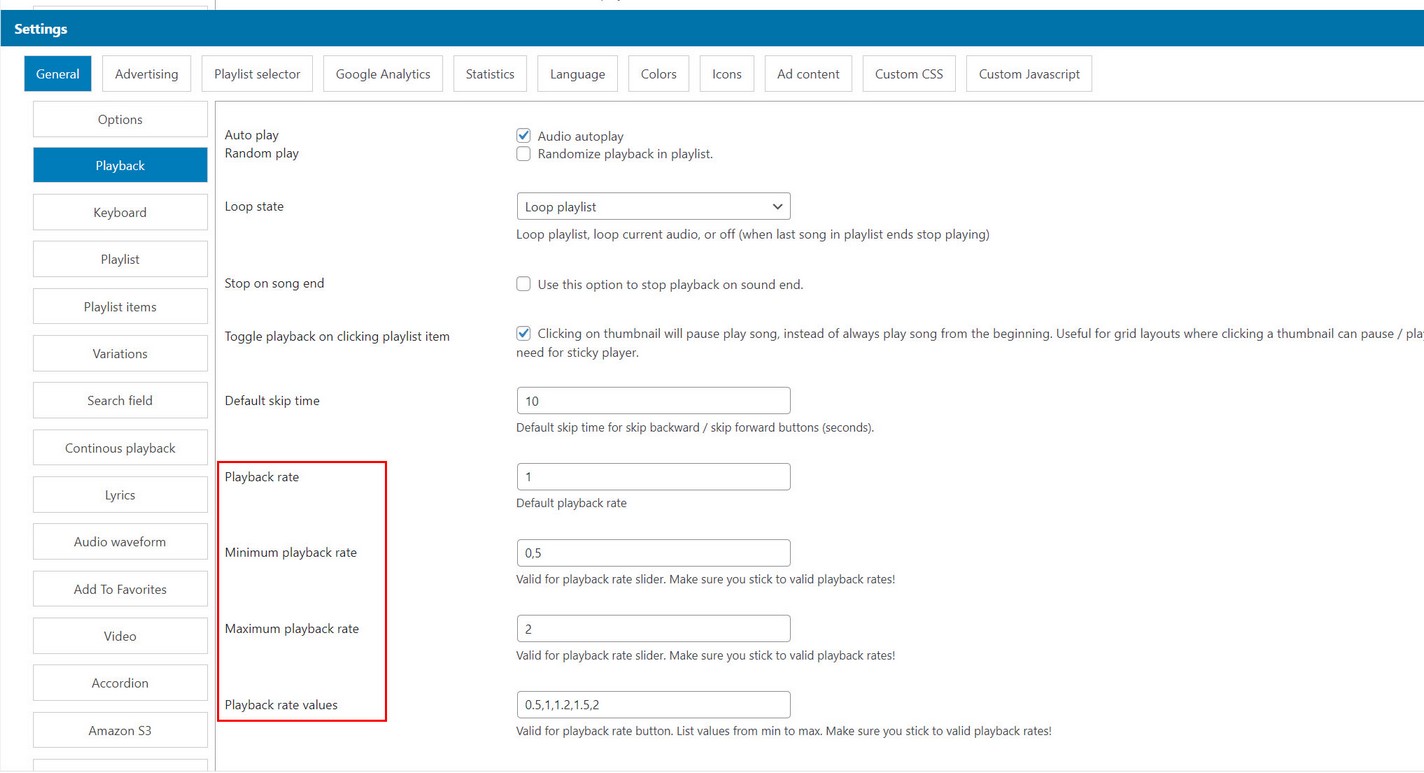
Notes:
Make sure you stick to valid playback rates!
Some demos may not have this playback button implemented, in which case you are welcome to contact is and we will include it in that skin (its only matter of copying html and css to that demo somewhere in player markup, no javascript involved).
Video sync
Syncronize video with playing audio.
Add video in same duration as playing audio and video will be syncronized with audio as it plays.
To attach video to song, When adding songs in Playlist manager section, upload video file in video field:

Or set video url directly in shortcode:
Available settings:
| Parameter | Value | Description |
|---|---|---|
| video_auto_open | 1 = true / 0 = false | Auto open video dialog on song start |
| use_video_controls | 1 = true / 0 = false | Use video controls |
| use_video_fullscreen | 1 = true / 0 = false | Use fullscreen button in video. use_video_controls needs to be true for this to work. |
| use_video_picture_in_picture | 1 = true / 0 = false | Use picture in picture button in video. use_video_controls needs to be true for this to work. |
| use_video_download | 1 = true / 0 = false | Use download button in video. use_video_controls needs to be true for this to work. |
Query string parameters
Using query string parameters. Rules:
- must include hap-query-instance=INSTANCE_NAME so player can be recognized (INSTANCE_NAME is from settings)
- all parameters begins with "hap-"
- replace parameter camelCase with dash
use + instead of space
use comma for array values
Player settings example:
www.domain.com/some-page?hap-query-instance=INSTANCE_NAME&hap-volume=1&hap-active-item=5&hap-loop-state=playlist&hap-download-icon-title=some+title+here&hap-playlist-item-content=title,thumb
For parameters check configuration
How to create a playlist from query string?
Create audio playlist:
www.domain.com/some-page?hap-query-instance=INSTANCE_NAME&hap-type=audio,audio&hap-path=media/audio/1/01.mp3,media/audio/1/02.mp3&hap-thumb=media/thumb/1/01.jpg,media/thumb/1/02.jpg&hap-title=Driving+In+My+Car,A+Way+To+The+Top&hap-artist=Soundroll,Soundroll
For parameters check player shortcodes
You need to have the same number of properties! (so for each audio in url same number of thumb, same number of title etc..)
Create podcast playlist:
www.domain.com/some-page?hap-query-instance=INSTANCE_NAME&hap-type=podcast&hap-path=http://www.kingola.com/feed/podcast/&hap-limit=11&hap-thumb-default=URL_TO_DEFAULT_THUMB
For parameters check podcast section (remove data- from parameter)
Create soundcloud playlist:
www.domain.com/some-page?hap-query-instance=INSTANCE_NAME&hap-type=soundcloud&hap-path=http://soundcloud.com/astateoftrance&hap-limit=11&hap-thumb-default=URL_TO_DEFAULT_THUMB&hap-load-more=true
For parameters check soundcloud section (remove data- from parameter)
INSTANCE_NAME:

If player_id is used in shortcode then INSTANCE_NAME is hap_playerPLAYER_ID (or if instance_id is used in shortcode then its hap_playerINSTANCE_ID)

[apmap player_id="1" playlist_id="2"]


If anonymous shortcode is used INSTANCE_NAME is hap_playerUNIQUE_ID

[apmap preset="brona_light" path="AUDIO_URL" thumb="THUMB_URL"]

UNIQUE_ID is generated dynamically starting from 0 for every new player in page. Which means first player in page is going to have UNIQUE_ID 0.
The same can be done with other media types, just check each section in Working with media
Init player on click
You can initialize player when clicking some DOM element in page (image, text ...etc). Player will be hidden until user clicks on the element.
Examples:
Open player on DOM selector click:
Open player in popup window automatically with single audio on DOM selector click:
Audio advertising
There are following different kinds of adverts supported in the player (normal adverts and vast).
Normal adverts
Audio ads can be defined in Ads section. You can define audio url to play at specific intervals during main song play.
3 types of audio ads exist. Ad can play before main song starts (ad pre), ad can play during main song play in specified interval (ad mid), ad can play after main song ends (ad end). Multiple ads are supported (meaning you can have multiple ad pre, ad mid, ad end).Audio are defined in Ads section and can be added to any player using ad_id in shortcode. Then these ads will be used for all songs in playlist. For example:
[apmap player_id="1" playlist_id="2" ad_id="5"]
Ad mid can play with main song or main song can be paused while ad mid plays. Ad options can be adjusted in Player Manager / Edit Player / Ads tag.
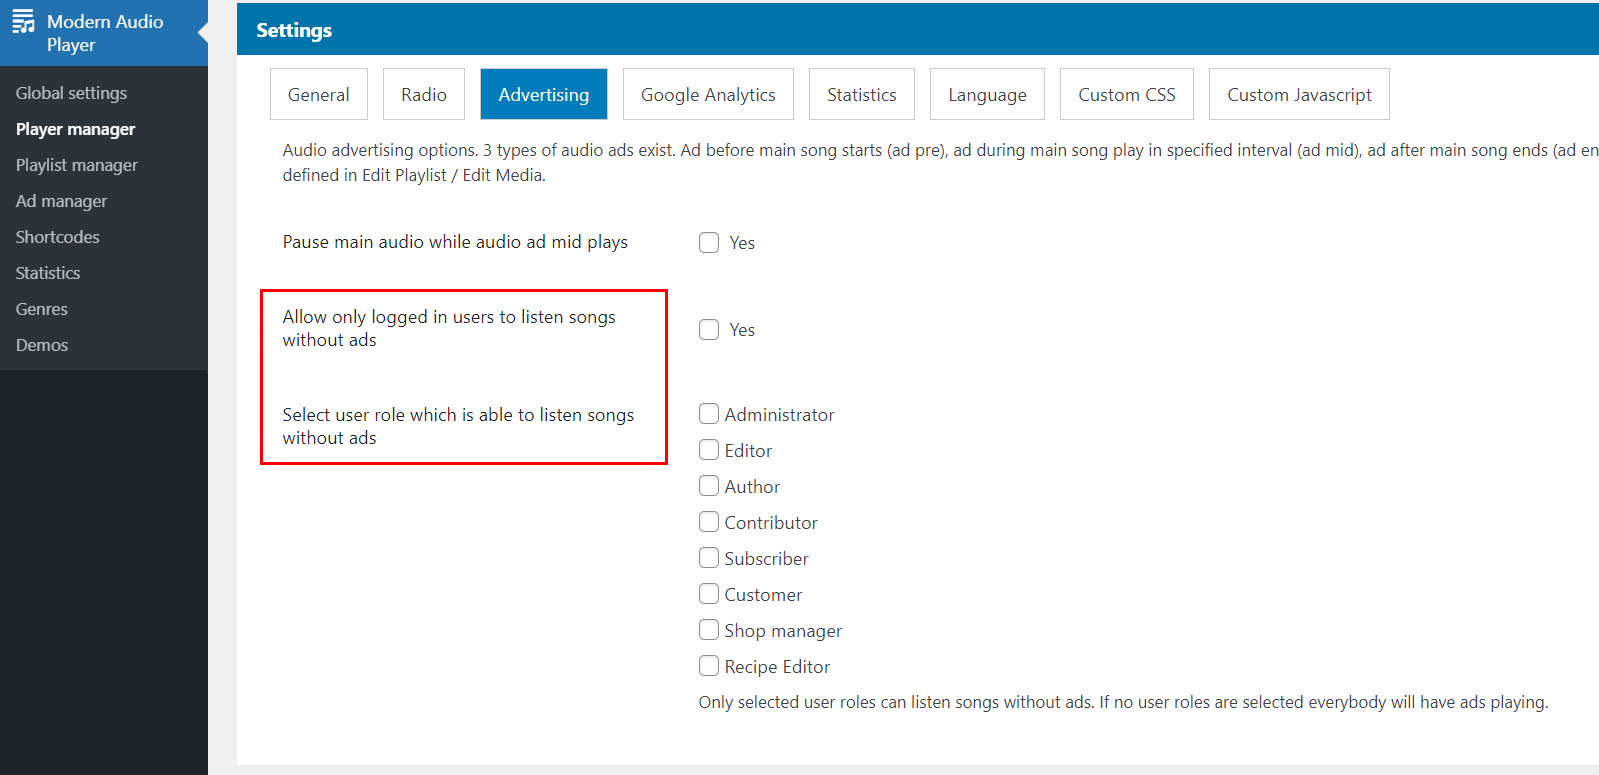
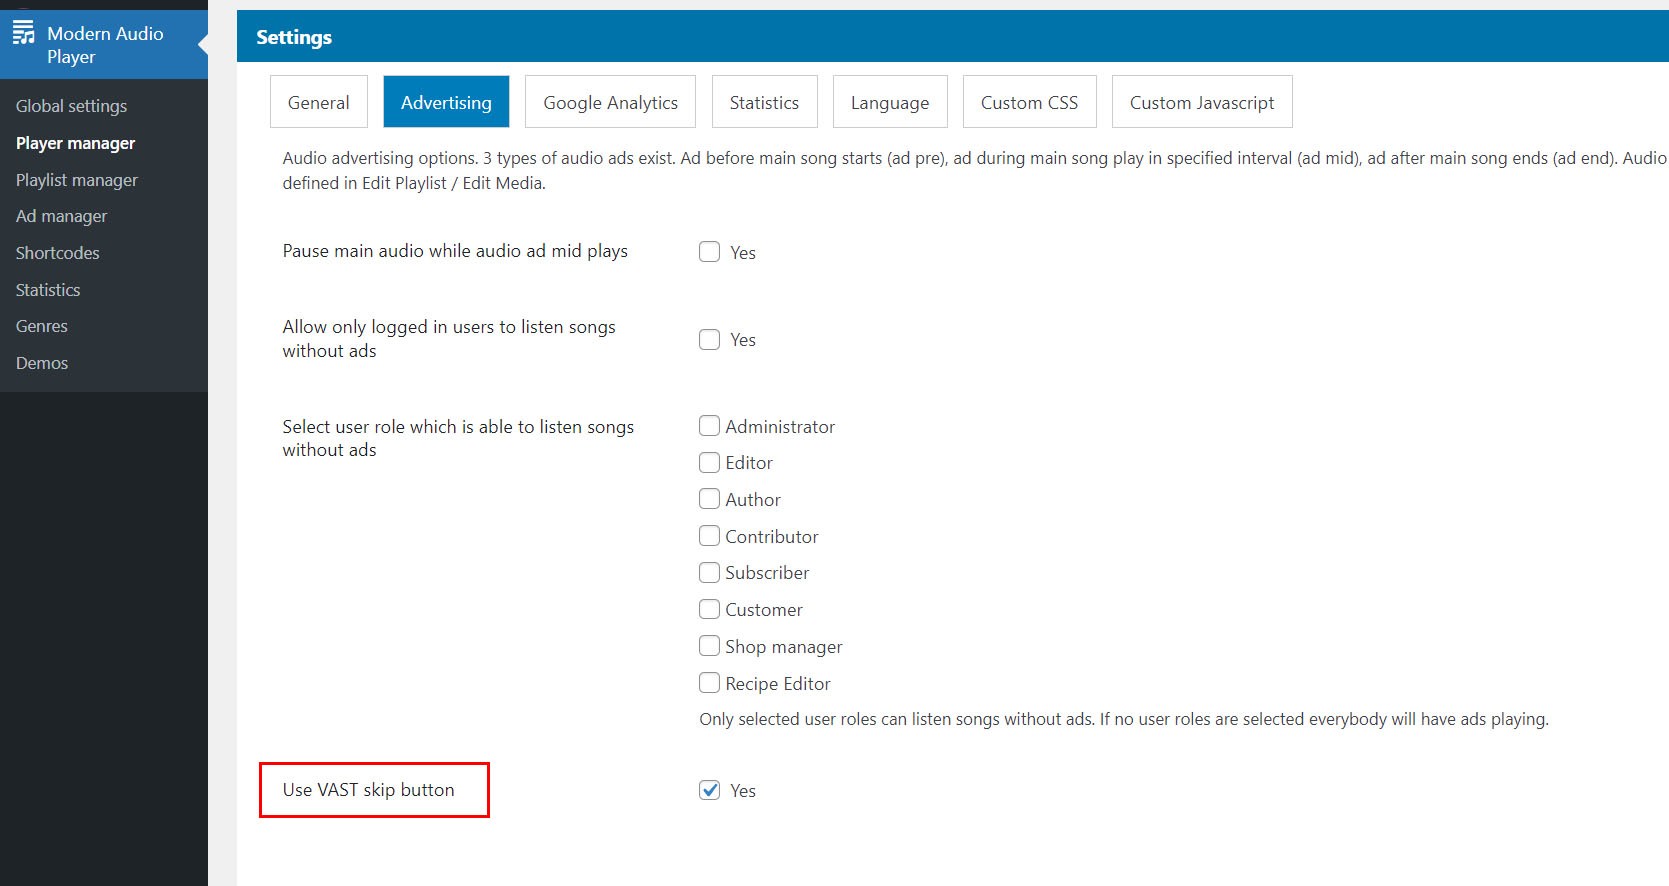
How to allow only logged in users or specific user roles to listen songs without advertising?
For manual shortcodes on audio ads check shortcode-ad section.
Vast
Vast adverts
Vast adverts use Google IMA SDK https://developers.google.com/interactive-media-ads/docs/sdks/html5/client-side
Supported adverts are type non inline. Ima sample tags available here: https://developers.google.com/interactive-media-ads/docs/sdks/html5/client-side/tags
How to add vast url to song?
Vast ads can be defined for a song inside Add / Edit media dialog inside Playlist manager:

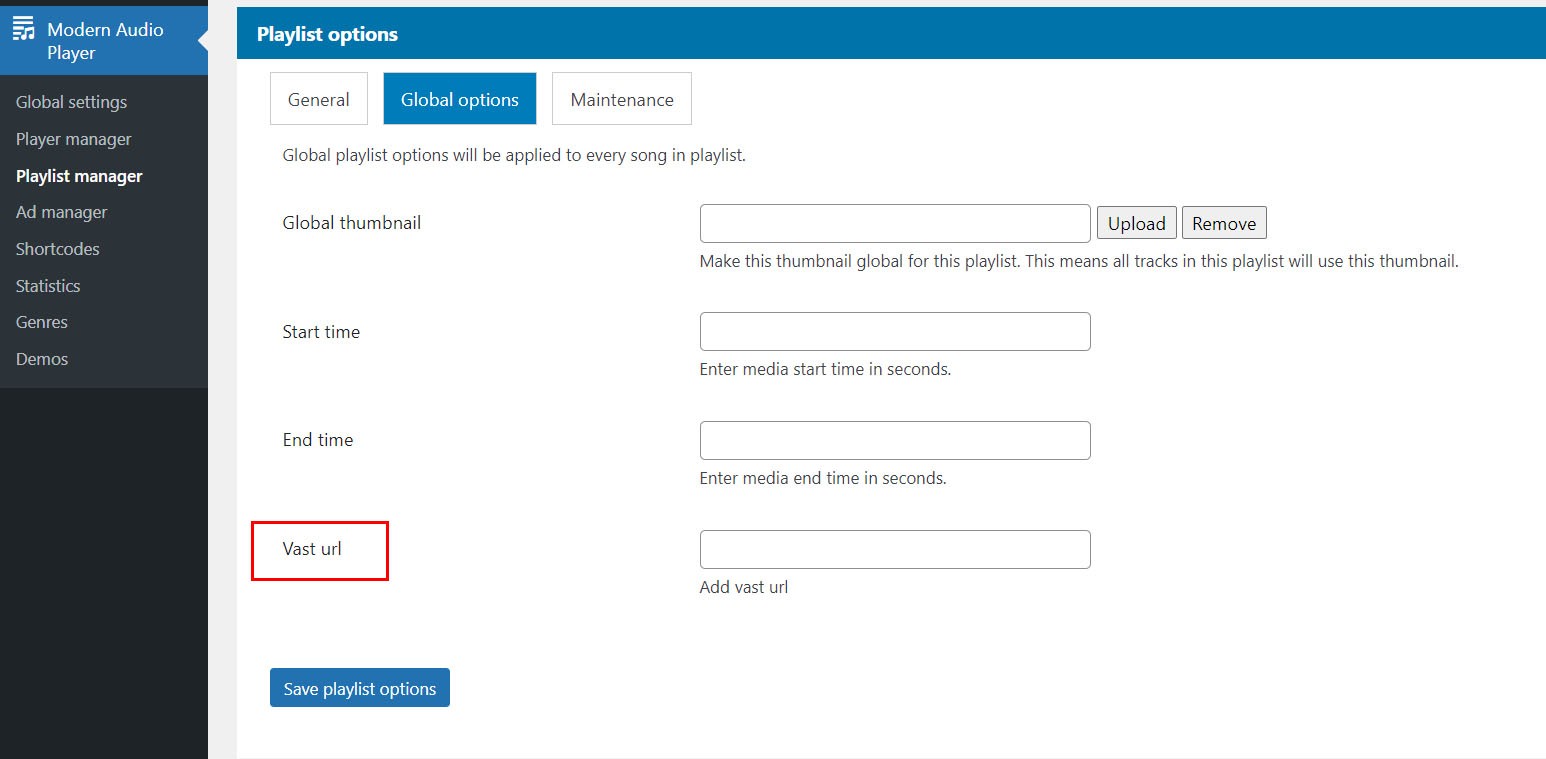
How to apply one vast url for all songs in playlist?
You can also ad vast url in Global playlist options inside Playlist manager and then this vast url will be aplied to every song in the playlist:
Using skip button
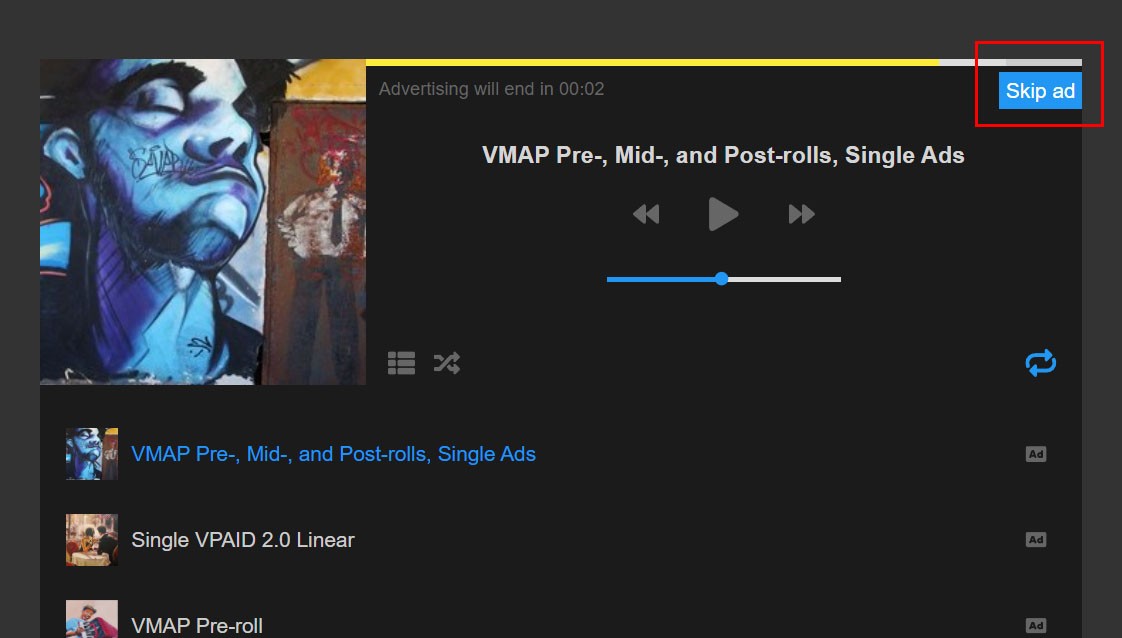
Skip button can be used with VAST ads. To use skip button do the following:
Activate button in Edit Player / Advertising section:
Note that depending on the player skin used, this may require using additional CSS, example:
.hap-ad-skip{
    display: block;
    color: #fff;
    position: absolute;
    background: #2196f3;
    right: 0;
    top: 10px;
    cursor: pointer;
    transition: opacity .3s ease-out;
    padding: 5px;
    display: none;
}
.hap-ad-skip:hover{
    opacity: 0.9;
}
Button will appear if and when ad is skippable!
Custom ads
Custom audio advertising
Insert advertising content into the gallery (Adsense, Amazon Affiliates, Commission Junction etc...). Basically any HTML is allowed. Make sure its properly formatted so it doesnt break the layout.
To set custom ads go to Edit Player / Ad content tab:
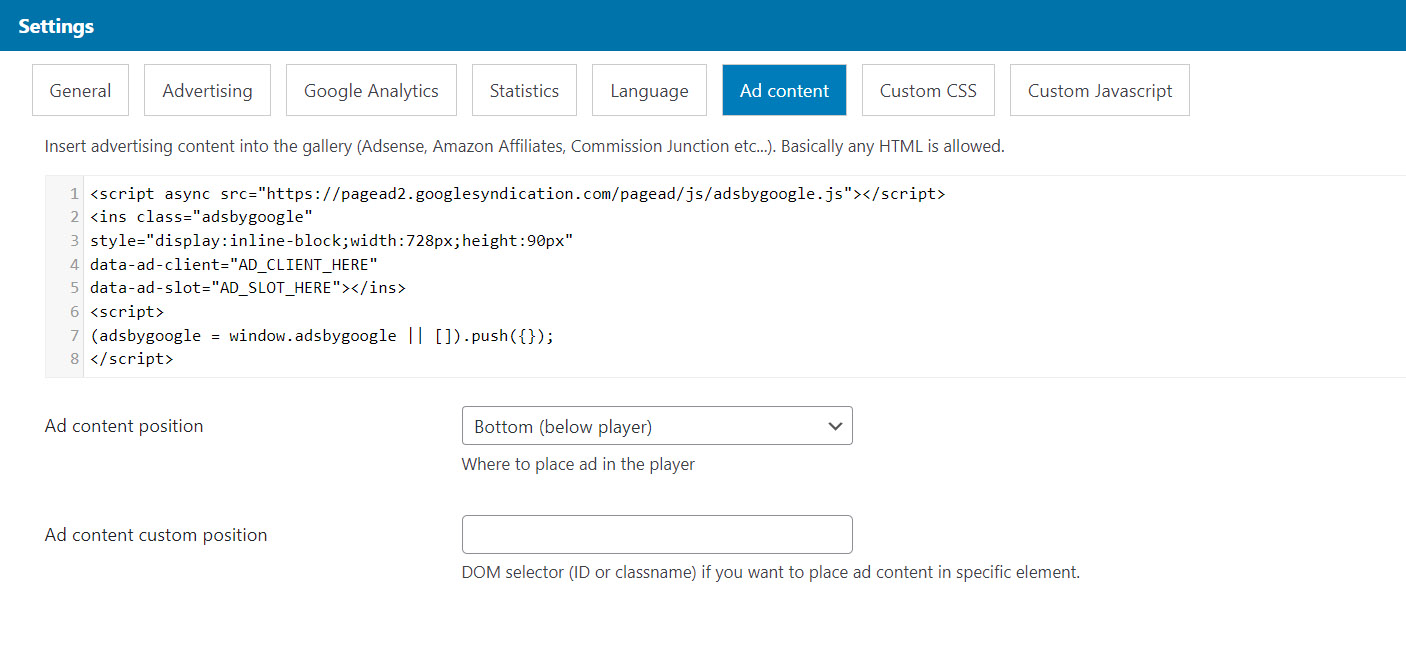
You can add ad content and choose position of the content inside the player. If you set custom position this will take precedence. Example of custom position ("#my-div", ".my-other-div")
Example how to add AdSense code:
<script async src="https://pagead2.googlesyndication.com/pagead/js/adsbygoogle.js"></script>
<ins class="adsbygoogle"
style="display:inline-block;width:728px;height:90px"
data-ad-client="AD_CLIENT_HERE"
data-ad-slot="AD_SLOT_HERE"></ins>
<script>
(adsbygoogle = window.adsbygoogle || []).push({});
</script>
Enter AD_CLIENT_HERE and AD_SLOT_HERE data.
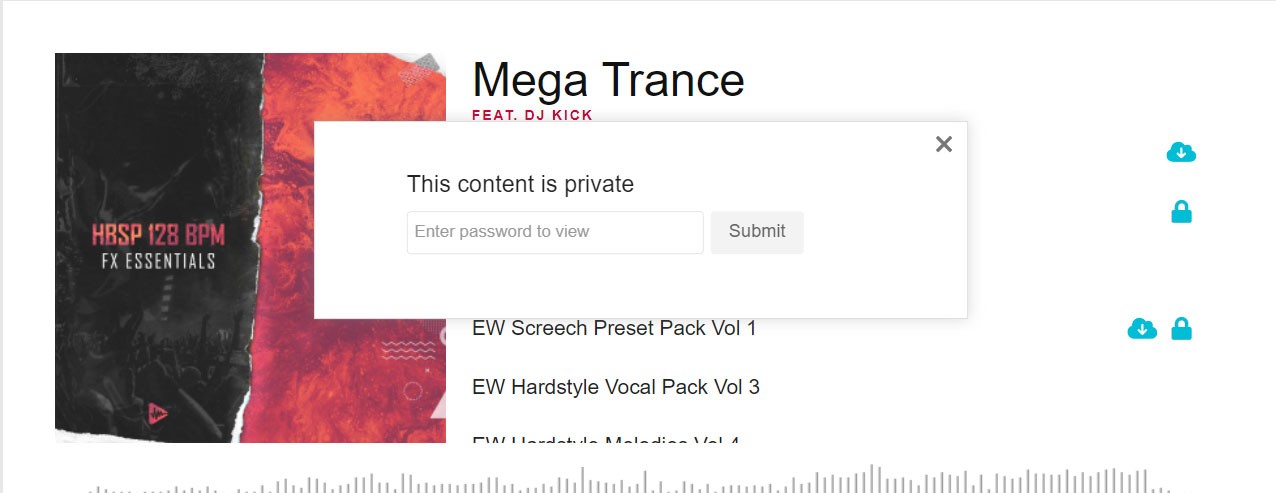
Password protected content
Setting password on a song will prevent user from listening or downloading a song unless he enters valid password in password popup dialog:
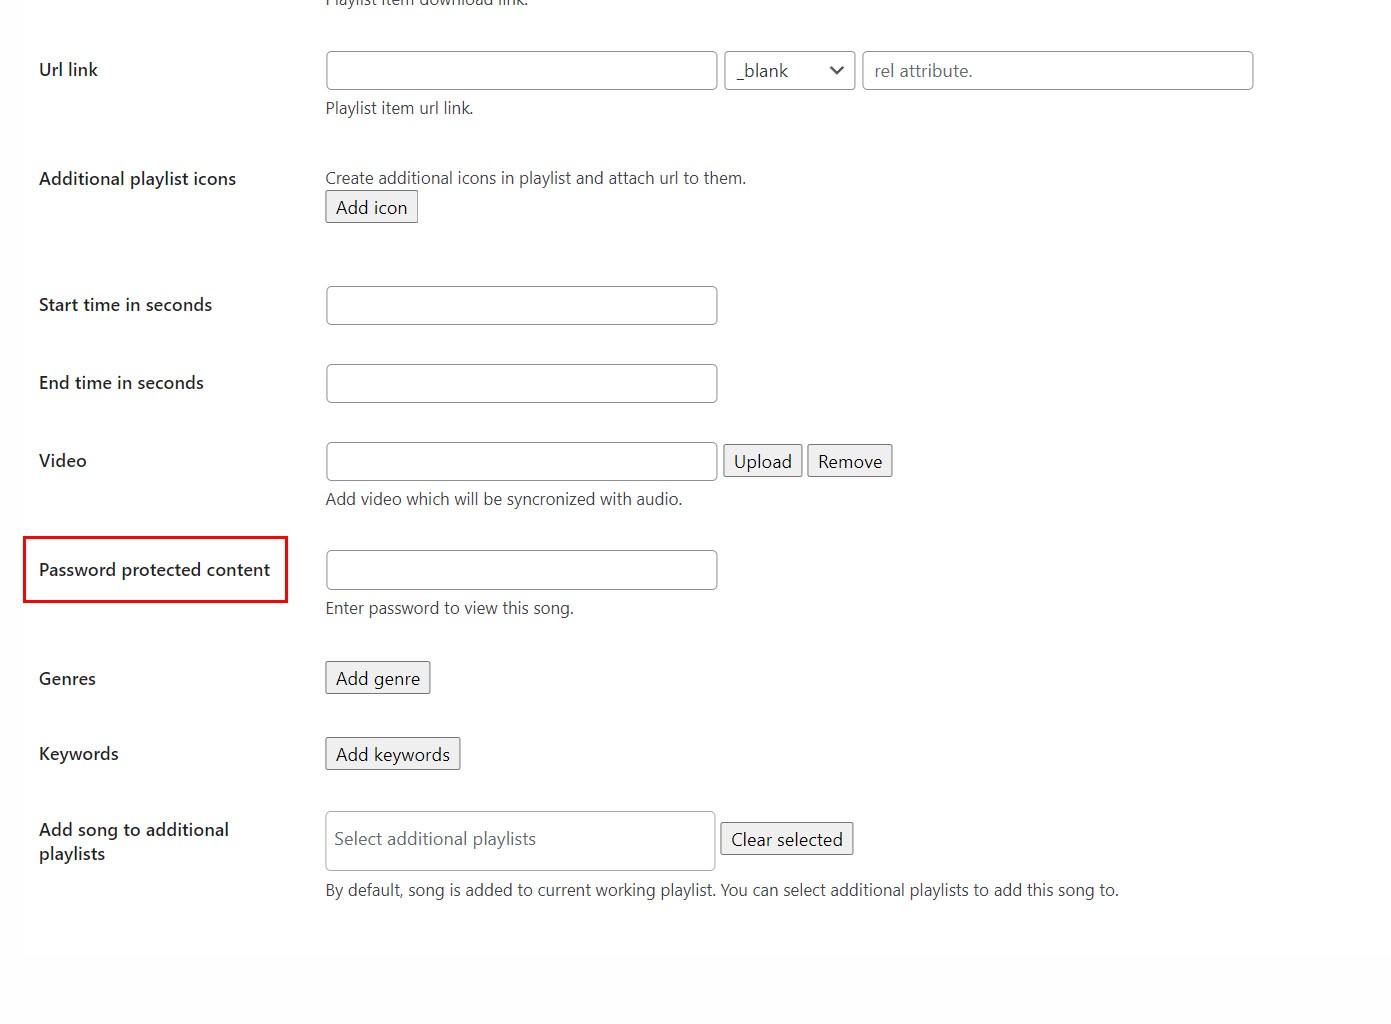
To set password for specific song add password in Add / Edit media modal inside edit Playlist section:
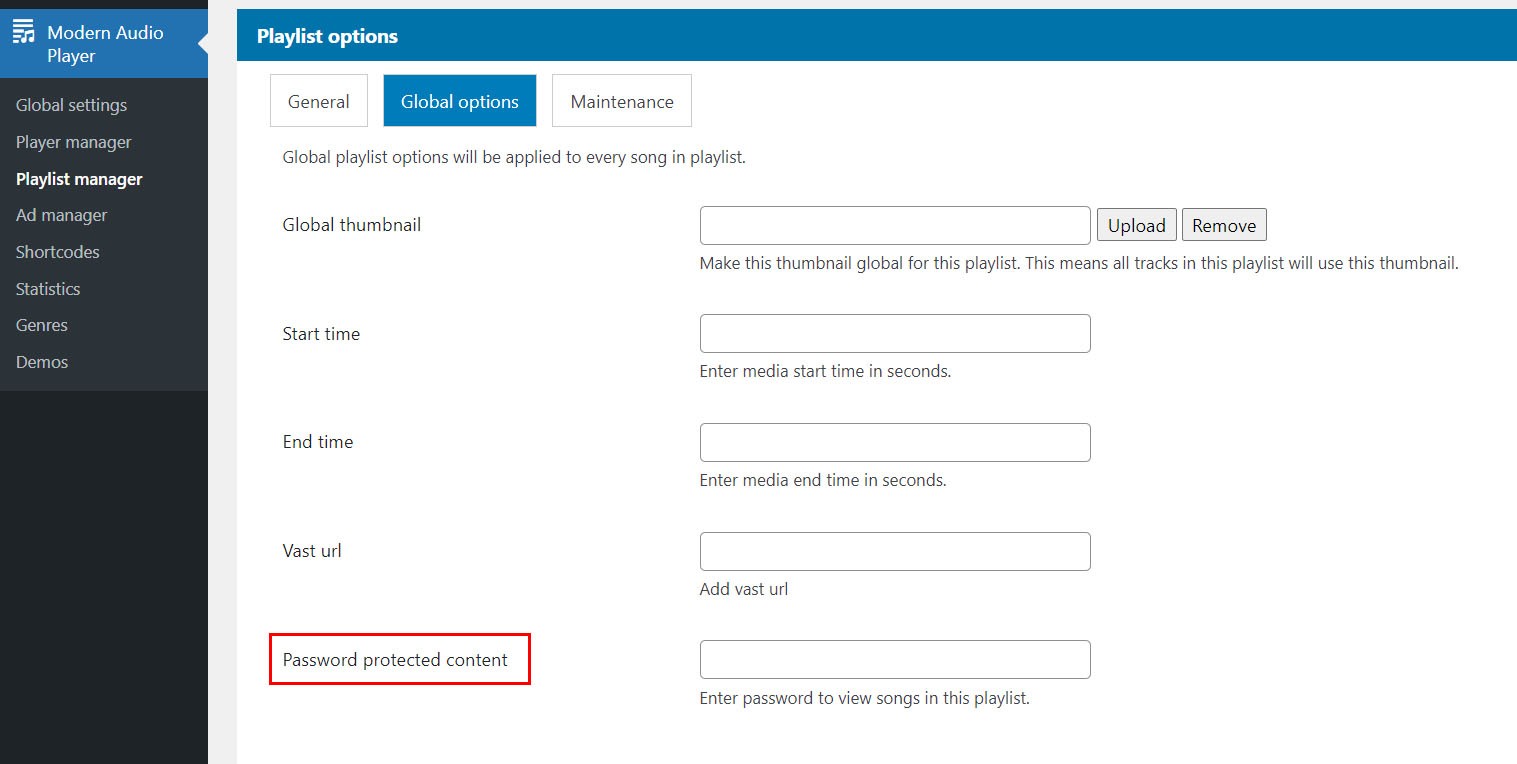
Password can also be defined in Global playlist options which will then apply for every song in playlist:
Notes
Password cannot be used when song audio crossfade is used!
Restrict song access
You can restrict song from being listened by non logged in users or users with specific user roles. Restricting a song would show a screen like this when conditions meet:

To activate this feature set Lock song time and select user roles in Edit Playlist / Playlist options / Global options tab:

You can also set Lock song time in Add / Edit media dialog inside Edit Playlist which will be applied only for specific song.
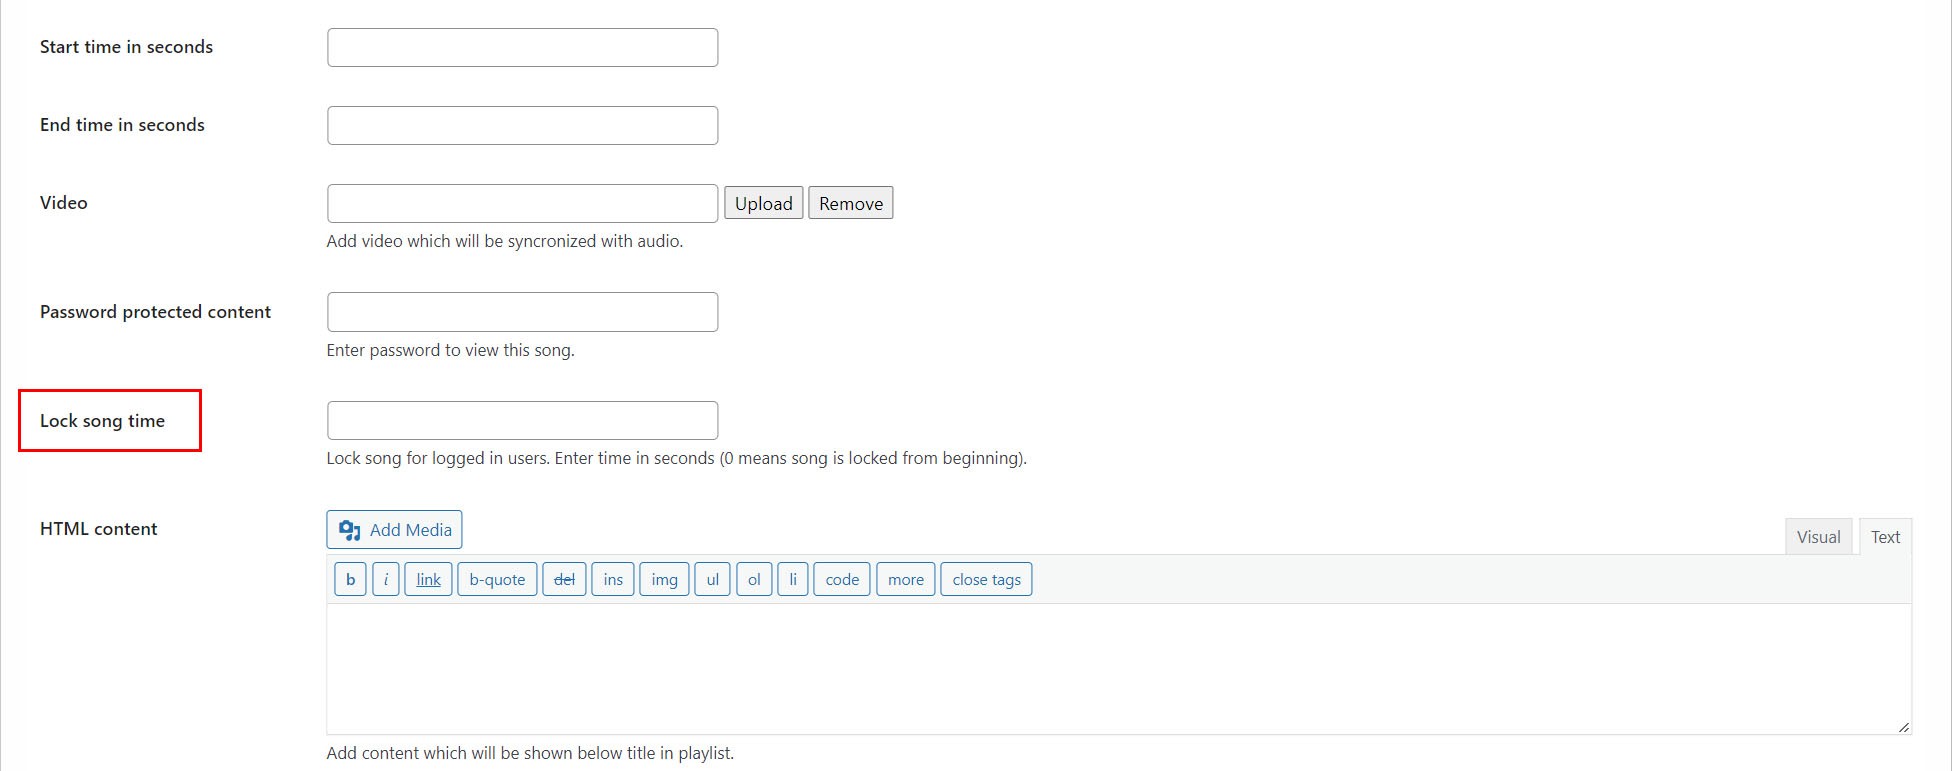
Set restrict screen options in Edit Player / General settings / Restrict content tab:

You can also set custom HTML for restrict screen if you dont want to use default settings:

Restrict song download
You can restrict song from being downloaded by non logged in users or users with specific user roles. Restricting a song would show a screen like this when conditions meet:
Set restrict screen options in Edit Player / General settings / Restrict content tab:
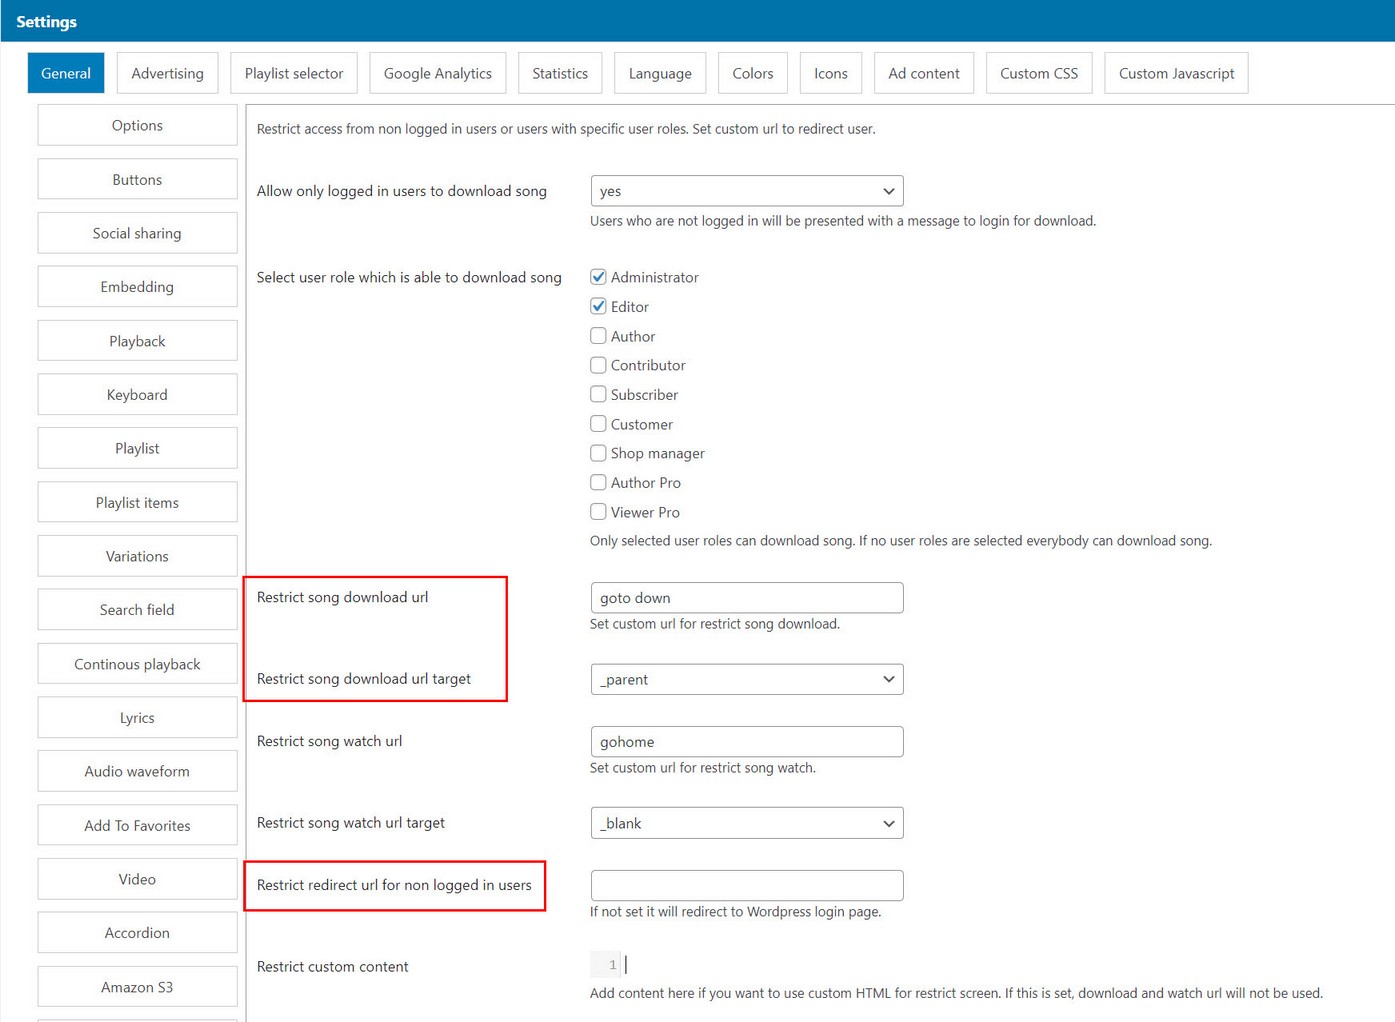
You can also set custom HTML for restrict screen if you dont want to use default settings:
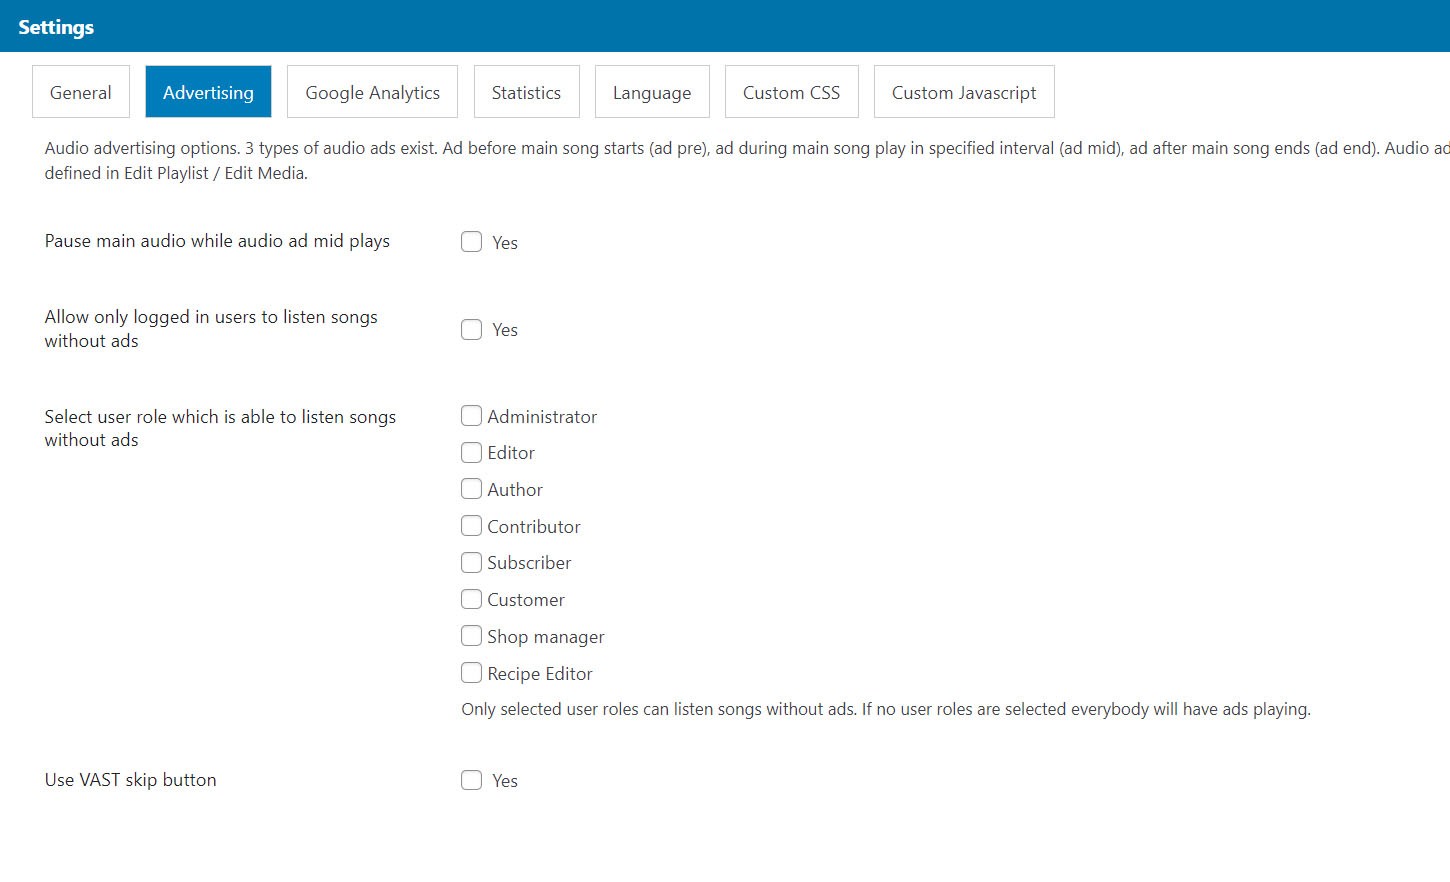
Control song ads
You can choose which users can listen to songs without ads showing.
To activate this feature use these settings in Edit Player / Advertising tab:
Audio crossfade
You can use option to crossfade between current and next playing song.
To activate this option go to Edit Player / Crossfade tab:
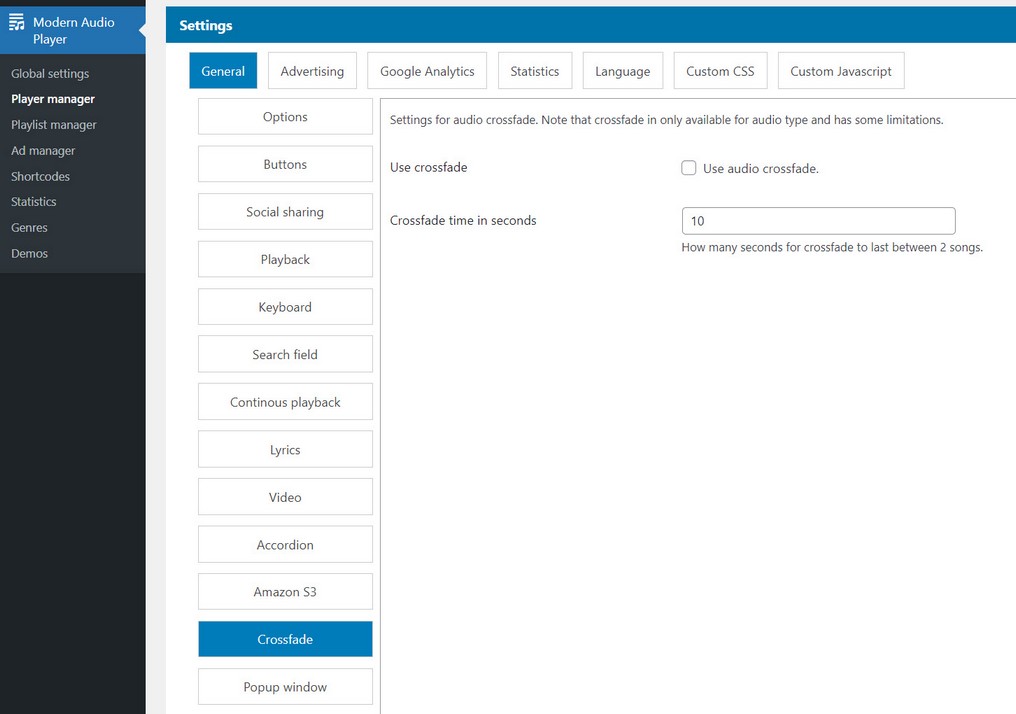
Note that crossfade has some limitations:
1. Crossfade in only available for media type audio.

2. Audio will only crossfade when playback auto advances to next song on its own (it will not crossfade when user clicks next button song in player or other playlist item). Crossfade will get canceled if user seeks through audio.

3. Crossfade cannot work if you have audio ads defined on the song (pre advert / end advert)

4. Crossfade cannot work if song has start or end time defined (the same goes if AB loop is used)

5. Crossfade cannot work with song variations

6. Crossfade cannot work on IOS because volume cannot be controlled with javascript on IOS devices:

Volume cannot control the on Apple IOS with javascript, you have to use the physical button on the actual phone: Volume Control in JavaScript

7. Crossfade cannot work if "Stop on song end" option is set.
Continous playback
How to remember song last played position on page reload
Settings for continous playback can be found in Edit Player / General / Continous playback tab:

Other option for continous playback is to use popup window feature. Check popup section for more info.
Open in Popup window
Note: when using player in popup, its restricted to one player per page.
Settings for popup window settings can be found in Edit Player / General / Popup window tab:
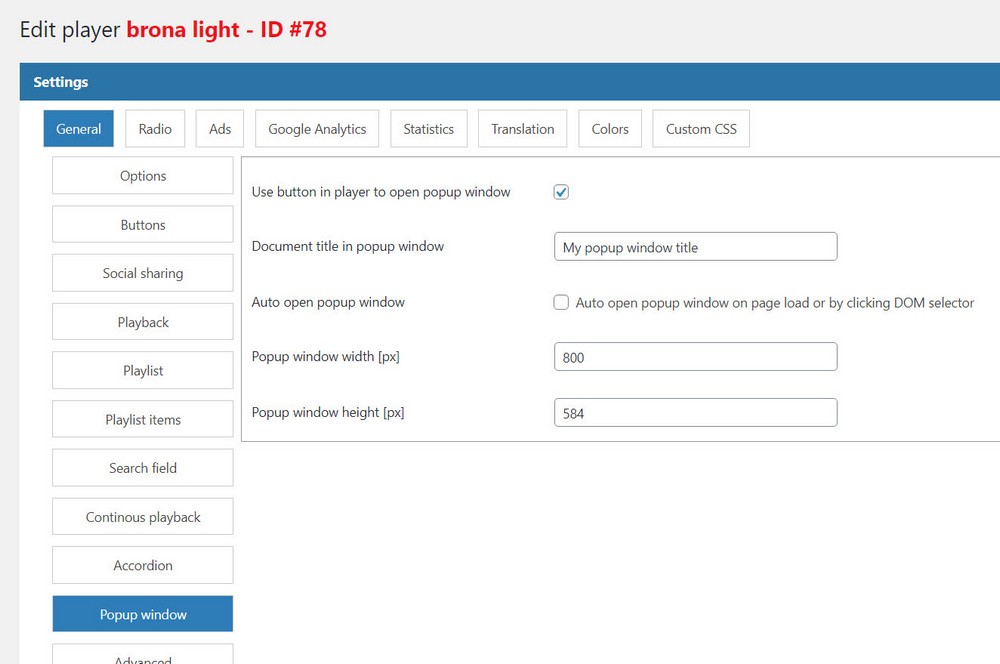
Popup window can be opened on 2 ways:
1. Manually by clicking popup button icon in player.
2. Automatically on player start.
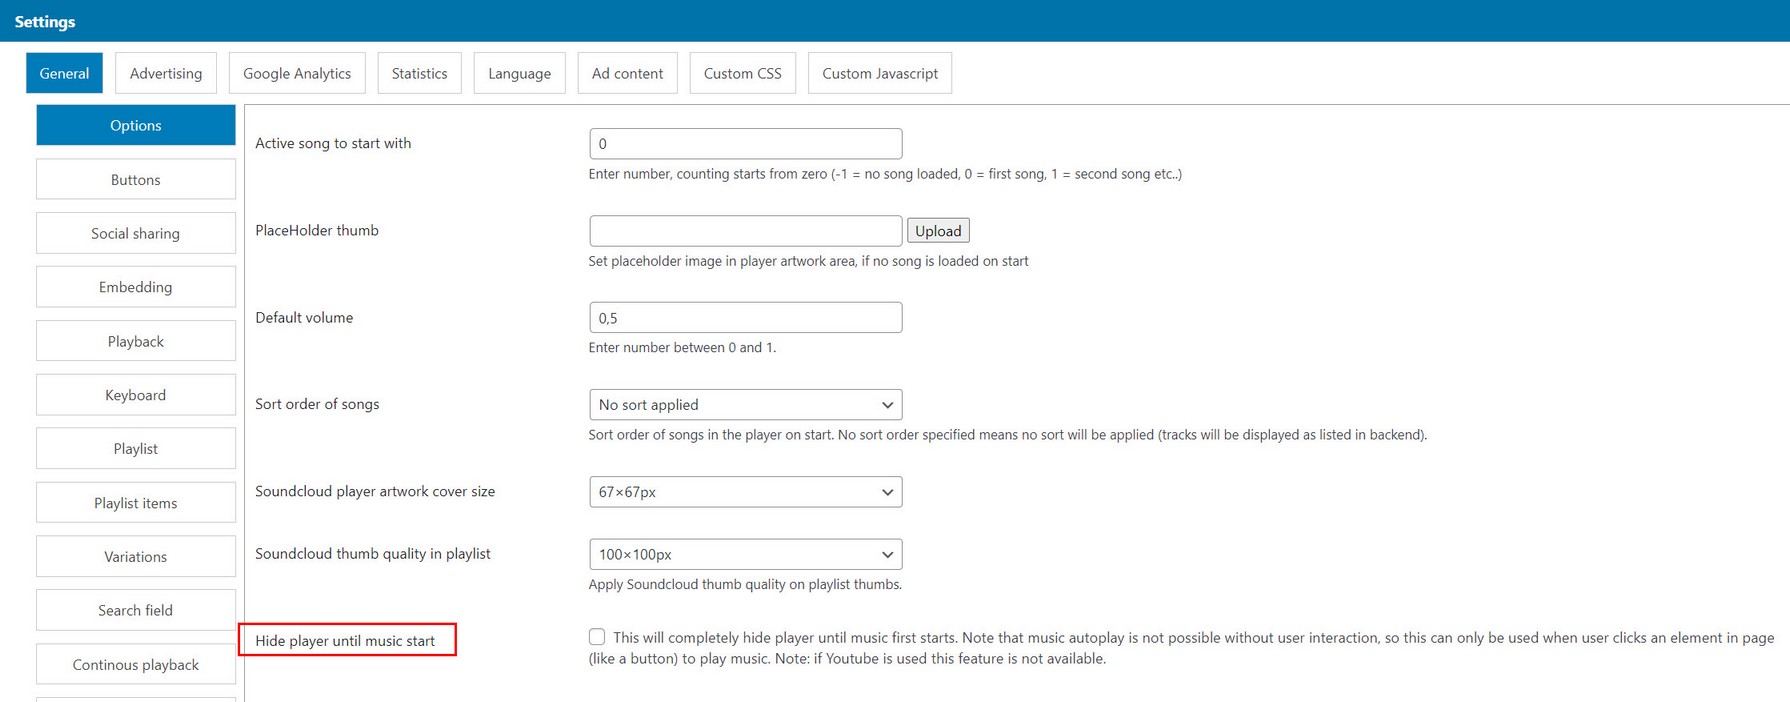
Hide player until music starts
It is possible to completely hide the player until music starts playing. Note that audio autoplay is not possible without user interaction, so this can only be used when user clicks an element in page (like a button) to play music.
This can be used for example if you have a fixed player to page bottom and you dont want it to be visible until music first starts playing.
Settings for this feature can be found in Edit Player / General / Options tab:
Global playlist options
To add an option which will be applied for every item in playlist use global playlist options.
Global playlist options can be set in Edit playlist / Playlist options / Global options tab

Note:
Options that are set in playlist global options will overwrite options that are set on each song individually.
Song download
Option for song to be downloadable can be set in Edit Playlist / Add song dialog. Download can be also set in shortcode:
Download url can be anything, not just audio.
When song has download set, download icon will appear in playlist next to song title.
Global download button
It possible to show global download buttton in the player which will be shown for every song that has download set.
Option for song to be downloadable can be set in Edit Player / General / Options tab.

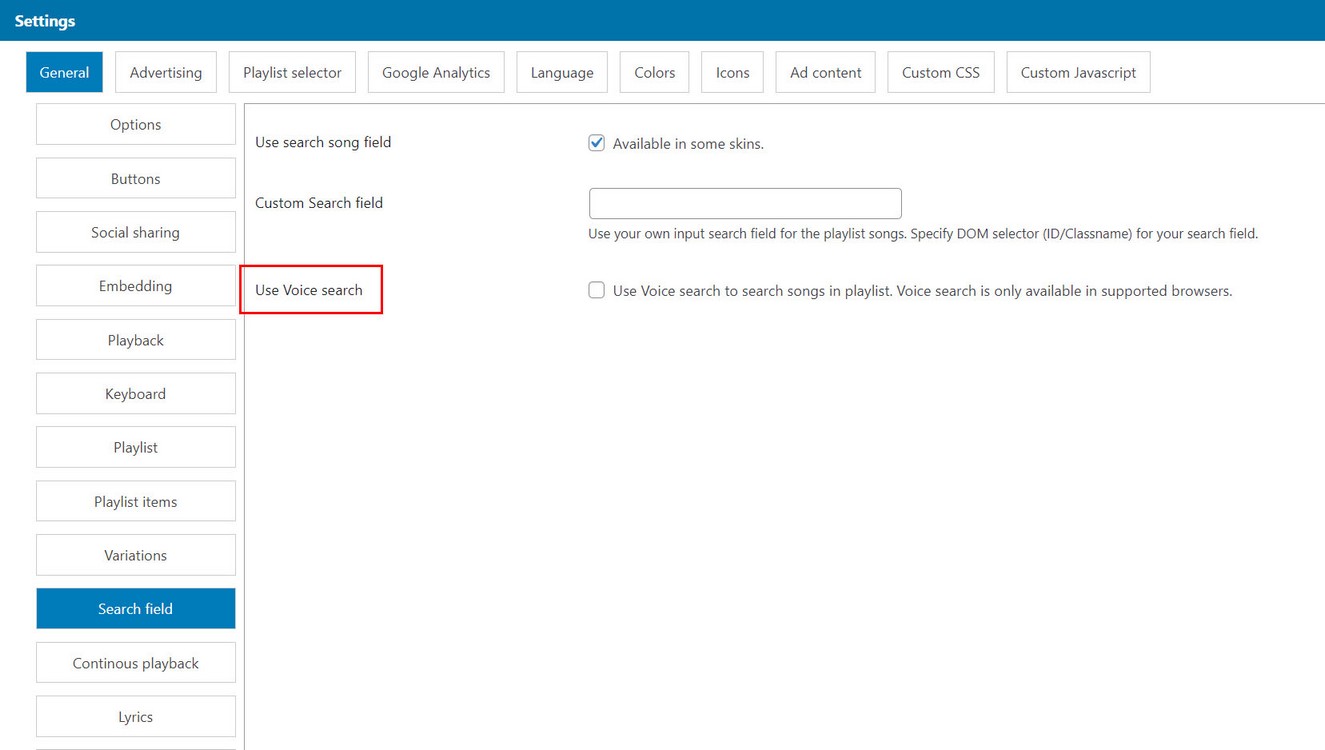
Voice search
Using Voice search to search songs in playlist
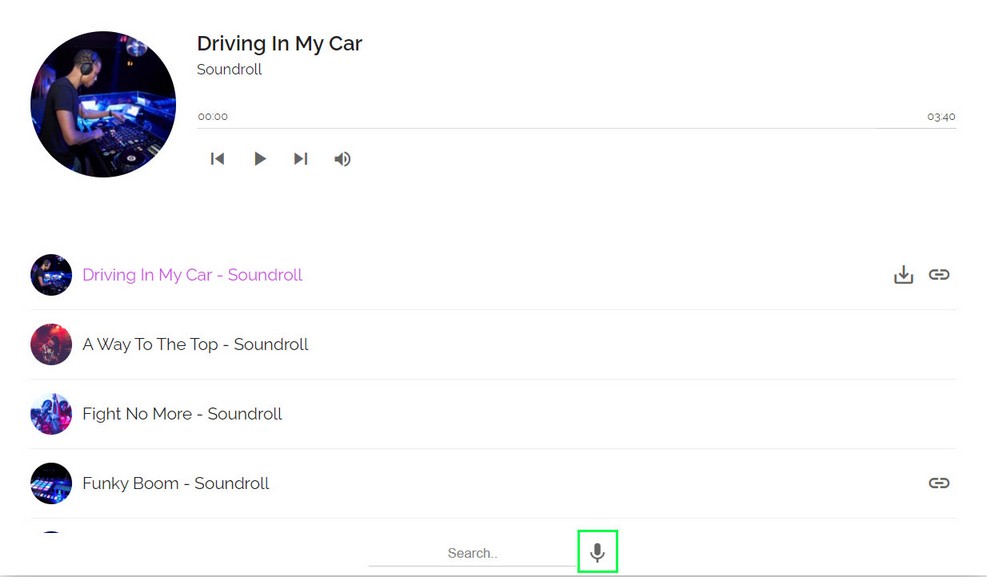
Note that voice search can only be used on supported browsers https://caniuse.com/speech-recognition
How to setup
This is controlled in Edit player / General settings / Search field tab.
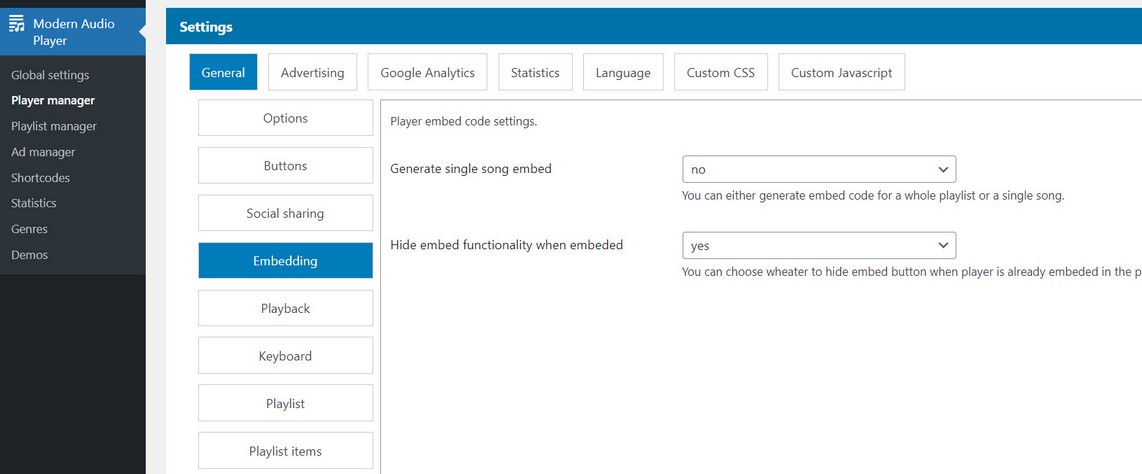
Embedding
Player can use following embedding functionality in embed screen.
Embed code
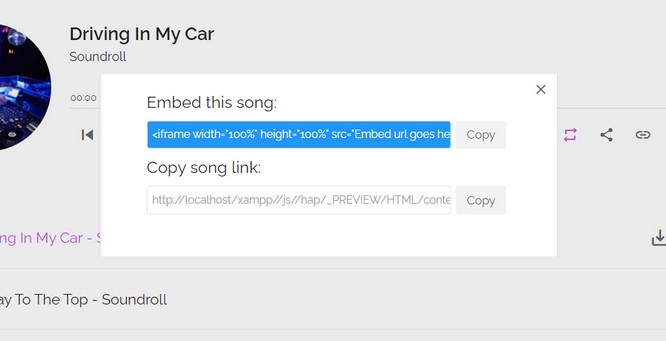
You can generate embed code for whole playlist of for a single video. This is controlled in Edit player / General settings / Embed tab:
Song url link
Url link offers direct link to video on your website.
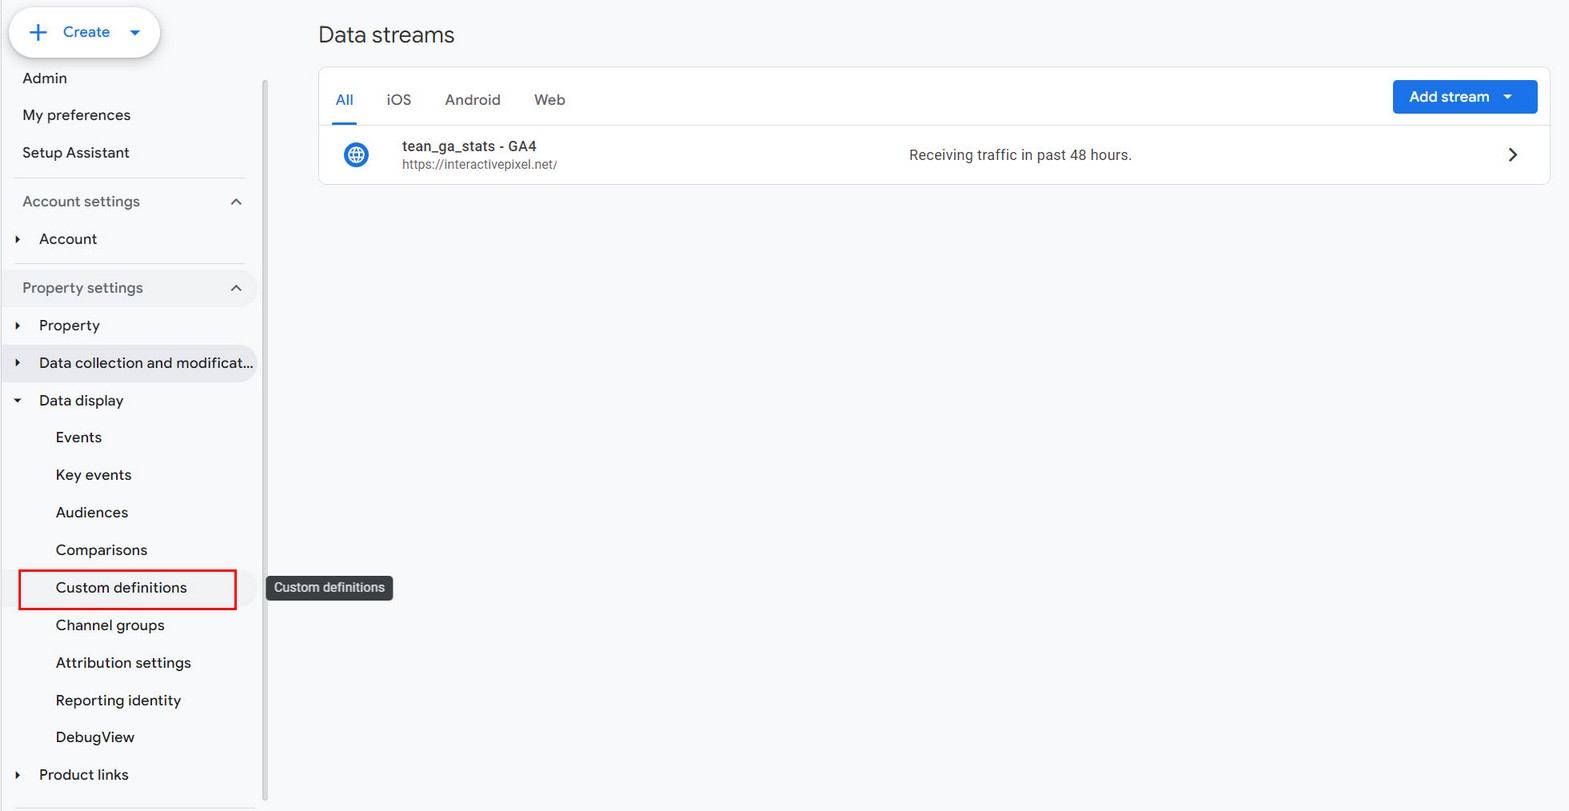
How to implement Google Analytics
Activate analytics in Edit Player / Settings / Google Analytics tab:

Setup Custom definitions
1. Sign in to your Google Analytics account
2. Go to the Admin panel by clicking the Cog Icon in the bottom left of your screen
3. Click on the property where you want to add custom dimensions
4. Click on Custom Definitions in the left menu, then click on Create Custom Dimension
5. Create following definitions
song_name
song_url
current_time
duration
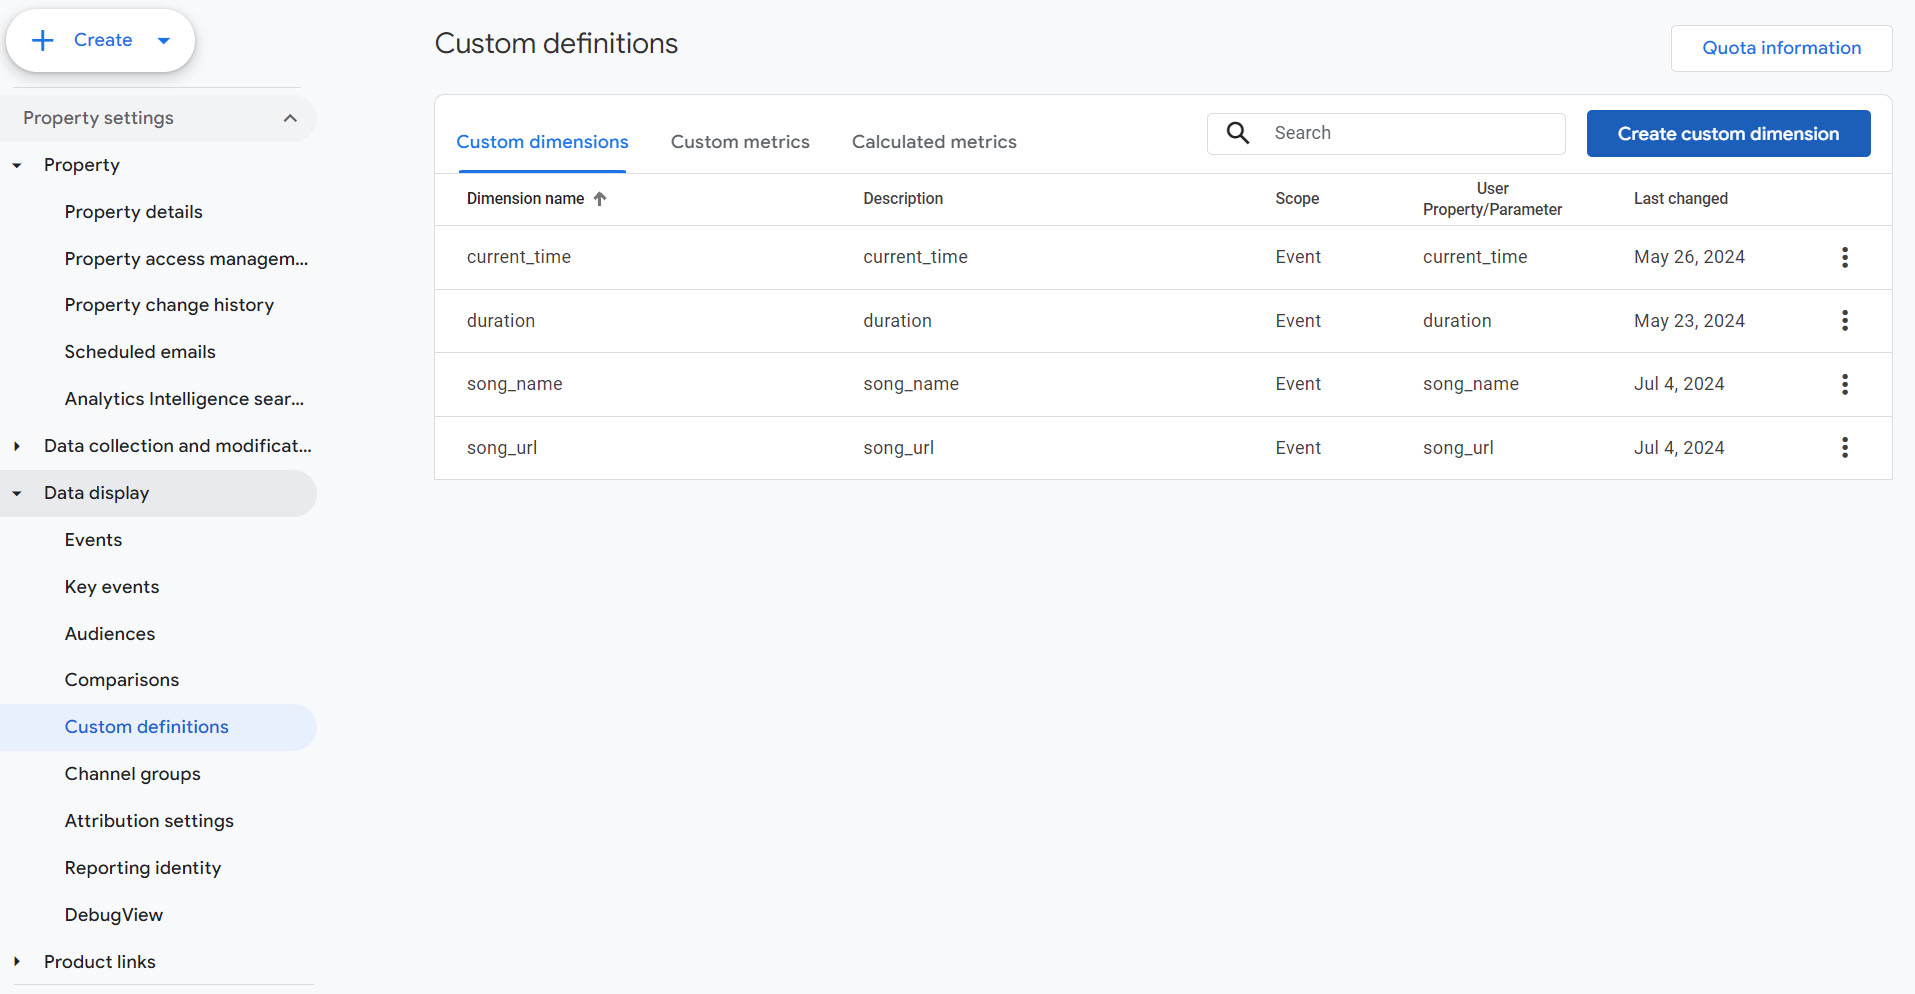
Event display
Using custom definitions, following events will be logged:
complete
play
pause
download
Event callbacks
Main song callbacks:
    playerID.addEventListener('setupDone', function(data){

        //called when plugin has been instantiated and is ready to use api, returns (instance, instanceName)

    })
    playerID.addEventListener('soundStart', function(data){

        //called on song start, returns (instance, instanceName, media)

    })
    playerID.addEventListener('soundRequest', function(data){

        //called on song request, returns (instance, instanceName, media)

    })
    playerID.addEventListener('soundPlay', function(data){

        //called on song play, returns (instance, instanceName, media)

    })
    playerID.addEventListener('soundPause', function(data){

        //called on song pause, returns (instance, instanceName, media)

    })
    playerID.addEventListener('beforeSongChange', function(data){

        //called before song end, returns (instance, instanceName, media)

    })
    playerID.addEventListener('soundEnd', function(data){

        //called on song end, returns (instance, instanceName, media)

    })
    playerID.addEventListener('soundError', function(data){

        //called on song error, returns (instance, instanceName, media, error)

    })
    playerID.addEventListener('playlistStartLoad', function(data){

        //called on playlist start load, returns (instance, instanceName)

    })
    playerID.addEventListener('playlistEndLoad', function(data){

        //called on playlist end load, returns (instance, instanceName)

    })
    playerID.addEventListener('playlistEnd', function(data){

        //called on playlist end, returns (instance, instanceName, counter)

    })
    playerID.addEventListener('clickPlaylistItem', function(data){

        //called on playlist item click, returns (instance, instanceName)

    })
    playerID.addEventListener('playlistItemDisabled', function(data){

        //called on playlist item disable, returns (instance, instanceName, item)

    })
    playerID.addEventListener('playlistItemEnabled', function(data){

        //called on playlist item enable, returns (instance, instanceName, item)

    })
    playerID.addEventListener('overPlaylistItem', function(data){

        //called on mouse over playlist item, returns (instance, instanceName)

    })
    playerID.addEventListener('outPlaylistItem', function(data){

        //called on mouse out playlist item, returns (instance, instanceName)

    })
    playerID.addEventListener('destroyPlaylist', function(data){

        //called on playlist destroy, returns (instance, instanceName)

    })
    playerID.addEventListener('createWaveform_error', function(data){

        //create waveform error, returns (instance, instanceName)

    })
    playerID.addEventListener('beforeLoginScreen', function(data){

        //before loogin screen opnes, returns (instance, instanceName, media)

    });
Ad callbacks (called when ads play):
    playerID.addEventListener('adPrePlay', function(data){

        //called when ad pre starts, returns (instance, instanceName, ad)

    })
    playerID.addEventListener('adMidPlay', function(data){

        //called when ad mid starts, returns (instance, instanceName, ad)

    })
    playerID.addEventListener('adMidEnded', function(data){

        //called when ad mid ends, returns (instance, instanceName, ad)

    })
    playerID.addEventListener('adEndPlay', function(data){

        //called when ad end starts, returns (instance, instanceName, ad)

    })
hap_playerID is constructed from hap_player + ID.
ID is generated automatically starting from 0 for every new player you place in page. For example, if you add one player in page, ID will be 0 (so it becomes hap_player0).
You can also manually add instance_id in shortcode (then the plugin will use this as ID), example (This player will have ID 1):
How to use Callbacks in wordpress text editor:
<script>
addHapEvents();
function addHapEvents(){
	if(!window.hap_playerID){
		setTimeout(addHapEvents,100);
	}else{
		hap_playerID.addEventListener('soundStart', function(data){
	        console.log('soundStart');
	    });
	}
}
</script>
How to use returned parameters:
hap_playerID.addEventListener('soundStart', function(data){
    //called on song start, returns (instance, instanceName, counter)

    console.log(data.instance);
    console.log(data.instanceName);
    console.log(data.counter);

    //get song title
    data.instance.getTitle(data.counter));

    //get song current time
    data.instance.getCurrentTime();

    //get song duration
    data.instance.getDuration();

});
API methods
Following api methods are included:
hap_playerID.playMedia(); //Play current media

hap_playerID.pauseMedia(); //Pause current media

hap_playerID.togglePlayback(); //Toggle current media (pause/play)

hap_playerID.nextMedia(); //Play next media

hap_playerID.previousMedia(); //Play previous media

/* set volume (0-1) */
----------------------------------
hap_playerID.setVolume(0); //Set volume (0)
hap_playerID.setVolume(0.5); //Set volume (0.5)
hap_playerID.setVolume(1); //Set volume (1)

hap_playerID.toggleMute(); //Toggle mute

hap_playerID.toggleRandom(); //Set random playlist playback (true/false/toggle)
hap_playerID.setLoop(); //Set loop state (playlist, single, off)

hap_playerID.setAutoPlay(boolean); //set autoplay

hap_playerID.setPlaybackRate(0.5); //Set playback rate (0.5)
hap_playerID.setPlaybackRate(1); //Set playback rate (1)
hap_playerID.setPlaybackRate(2); //Set playback rate (2)

/* seek (seconds) */
--------------------------
hap_playerID.disableSeek(boolean); //disable seekbar usage

hap_playerID.seek(0); //seek (0)
hap_playerID.seek(5); //seek (5)
hap_playerID.seek(15); //seek (15)

hap_playerID.seekBackward(value); //seek value seconds backwards
hap_playerID.seekForward(value); //seek value seconds forward


/* load media from playlist on demand */
--------------------------
//Load media (format, value, title, artist)


//by counter (counting start from zero, 0 = first media, 1 = second media...)
hap_playerID.loadMedia('counter', 0); //Load first media in playlist
hap_playerID.loadMedia('counter', 2); //Load third media

//by title
hap_playerID.loadMedia('title', 'Song title');

//by title and artist
hap_playerID.loadMedia('title-artist', 'Song title', 'Artist name');

//by media-id attribute
hap_playerID.loadMedia('id', 7); //Load media with data-media-id attribute 7
hap_playerID.loadMedia('id', 2'); //Load media with data-media-id attribute 2


/* load more */
--------------------------
hap_playerID.loadMore();// load more function, valid for Youtube playlist, Soundcloud (Soundclond is buggy and does not return next_href for pagination rather often), folder of mp3 files, Podcast

hap_playerID.setLoadMore(boolean);//toggle load more function on/off


/* load playlist on demand */
--------------------------
hap_playerID.loadPlaylist('#playlist-audio1'); //Load 'playlist-audio1'
hap_playerID.loadPlaylist('#playlist-podcast1'); //Load 'playlist-podcast1'


/* play specific audio by passing track data */
--------------------------
var track = {
    type: 'audio',
    mp3: 'PATH TO MP3',
    artist: 'ARTIST NAME',
    title: 'SONG TITLE',
    thumb: 'THUMB URL'
}
hap_playerID.inputAudio(track);


/* add track(s) to playlist */
--------------------------

//add single track
var track = {
    type: 'audio',
    mp3: 'PATH TO MP3',
    artist: 'ARTIST NAME',
    title: 'SONG TITLE',
    thumb: 'THUMB URL'
}

hap_playerID.addTrack(track, false, 0); //add track, position 0
hap_playerID.addTrack(track, true, 2); //add track, play it, position 2
hap_playerID.addTrack(track, true); //add track, play it, position end


//add multiple tracks
var track_array = [{
    type: 'audio',
    path: 'PATH TO AUDIO URL',
    artist: 'ARTIST NAME',
    title: 'SONG TITLE',
    thumb: 'THUMB URL'
},
{
    type: 'audio',
    path: 'PATH TO AUDIO URL',
    artist: 'ARTIST NAME',
    title: 'SONG TITLE',
    thumb: 'THUMB URL'
}
]]

hap_playerID.addTrack(track_array, false, 0); //add tracks, position 0
hap_playerID.addTrack(track_array, true, 2); //add tracks, play it, position 2
hap_playerID.addTrack(track_array, true); //add tracks, play it, position end


/* remove track(s) from playlist */
--------------------------
//remove track by counter (counting start from zero, 0 = first song, 1 = second song...)
hap_playerID.removeTrack('counter', 0); //remove first song
hap_playerID.removeTrack('counter', 2); //remove third song
hap_playerID.removeTrack('counter', hap_playerID.getPlaylistLength()-1); //remove last song in playlist
hap_playerID.destroyPlaylist(); //remove all tracks

//remove track by title
hap_playerID.removeTrack('title', 'A Bright And Hopeful Future'); //remove song 'A Bright And Hopeful Future'
hap_playerID.removeTrack('title', 'Be My Valentine'); //remove song 'Be My Valentine'

//remove track by media id
hap_playerID.removeTrack('id', 0); //remove track media id 0
hap_playerID.removeTrack('id', 0); //remove track media id 1


/* destroy current playing media / playlist */
--------------------------
hap_playerID.destroyMedia(); //Destroy current playing song
hap_playerID.destroyPlaylist(); //Destroy current playlist


/* sort tracks in playlist */
--------------------------
hap_playerID.sort('title-asc'); //sort playlist ascending
hap_playerID.sort('title-desc'); //sort playlist descending
hap_playerID.sort('random'); //sort playlist random

/* misc */
--------------------------

hap_playerID.getCurrMediaData();//get current song data (title, audio url..)

hap_playerID.getPlaylistData();//get whole playlist song data (title, audio url..)

hap_playerID.getCurrentTime();//get current time in seconds

hap_playerID.getDuration();//get duration in seconds

hap_playerID.destroyPlaylistScroll();//destroy playlist scroll

hap_playerID.getSetupDone();//get player ready to use api

hap_playerID.getPlaylistLoading();//get playlist is loading

hap_playerID.getPlaylistTransition();//Return playlist loading (is playlist loading)

hap_playerID.getMediaPlaying();//get media playing

hap_playerID.getCounter();//get active playlist item number starting from zero (0)

hap_playerID.getPlaylistLength();//get playlist length


/* open player in popup window */
--------------------------
hap_playerID.openPopup(); //open popup
hap_playerID is constructed from hap_player + ID.
ID is generated automatically starting from 0 for every new player you place in page. For example, if you add one player in page, ID will be 0 (so it becomes hap_player0).
You can also manually add instance_id in shortcode (then the plugin will use this as ID), example (This player will have ID 1):
How to use api methods in wordpress post?
Use following code examples in post area.
Toggle playback:
<a onclick="togglePlayback();return false;" href="#">Toggle playback </a>
 <script>
    function togglePlayback(){
        window.hap_playerID.togglePlayback(); return false;
    };
 </script>
Set volume:
<a onclick="setVolume(0.5);return false;" href="#">set volume </a>
 <script>
    function setVolume(val){
         window.hap_playerID.setVolume(val); return false;
    };
 </script>
Add track to playlist example (this will add track on the end of the current active playlist and play it):
<a onclick="addTrack();return false;" href="#">Add track</a>
<script>
    function addTrack(){
        var track = {
            type: 'audio',
            mp3: 'path/to/mp3/file',
            thumb: 'path/to/image/thumbnail',
            title: 'Song title here',
            artist: 'Song artist here'
        }
         window.hap_playerID.addTrack('data', track, true); return false;
    };
</script>
Load media by media ID. Note that this only works with single media (self hosted audio, youtube single video, soundcloud single track, hls stream). It does not work for example with soundcloud playlist, or Google drive folder.
<a data-media-id="MEDIA_ID" onclick="loadMedia(this);return false;" href="#">Load media </a>
<script type="text/javascript">
    function loadMedia(obj){
         window.hap_playerID.loadMedia('id',obj.getAttribute("data-media-id")); return false;
    };
</script>
Load playlist by playlist ID.
<a onclick="loadPlaylist('.hap-playlist-PLAYLIST_ID');return false;" href="#">Load playlist </a>
<script type="text/javascript">
    function loadPlaylist(id){
         window.hap_playerID.loadPlaylist(id); return false;
    };
</script>
You only change hap_playerID and PLAYLIST_ID in the above example, so if the player id = 3 and playlist id = 1, it would be:
<a onclick="loadPlaylist('.hap-playlist-1');return false;" href="#">Load playlist </a>
<script type="text/javascript">
    function loadPlaylist(id){
         window.hap_player3.loadPlaylist(id); return false;
    };
</script>
Load more. Load more songs into the player from pagination (the same as on total scroll). Requires "Enable Load more" option enabled in Edit media section. Works with Youtube playlist, Soundcloud (Soundcloud is buggy and does not return next_href for pagination rather often), folder of mp3 files, Podcast. You can only use load more when you have one media in playlist, for example one Podcast or one Youtube playlist!
<a onclick="loadMore();return false;" href="#">Load more </a>
<script type="text/javascript">
    function loadMore(){
         window.hap_playerID.loadMore(); return false;
    };
</script>
Add more. Add more songs into the player from database (the same as on total scroll). Requires "Retrieve more on total scroll" option enabled in Edit playlist section - under Playlist options.
<a onclick="addMore();return false;" href="#">Add more </a>
<script type="text/javascript">
    function addMore(){
         window.hap_playerID.addMore(); return false;
    };
</script>
Custom controls
Using custom button to control audio
This example will show how to add custom button in page to control audio. Same functionality can be used with image element for example.
1. Search for button widget and drag widget to page, and set button unique class name:
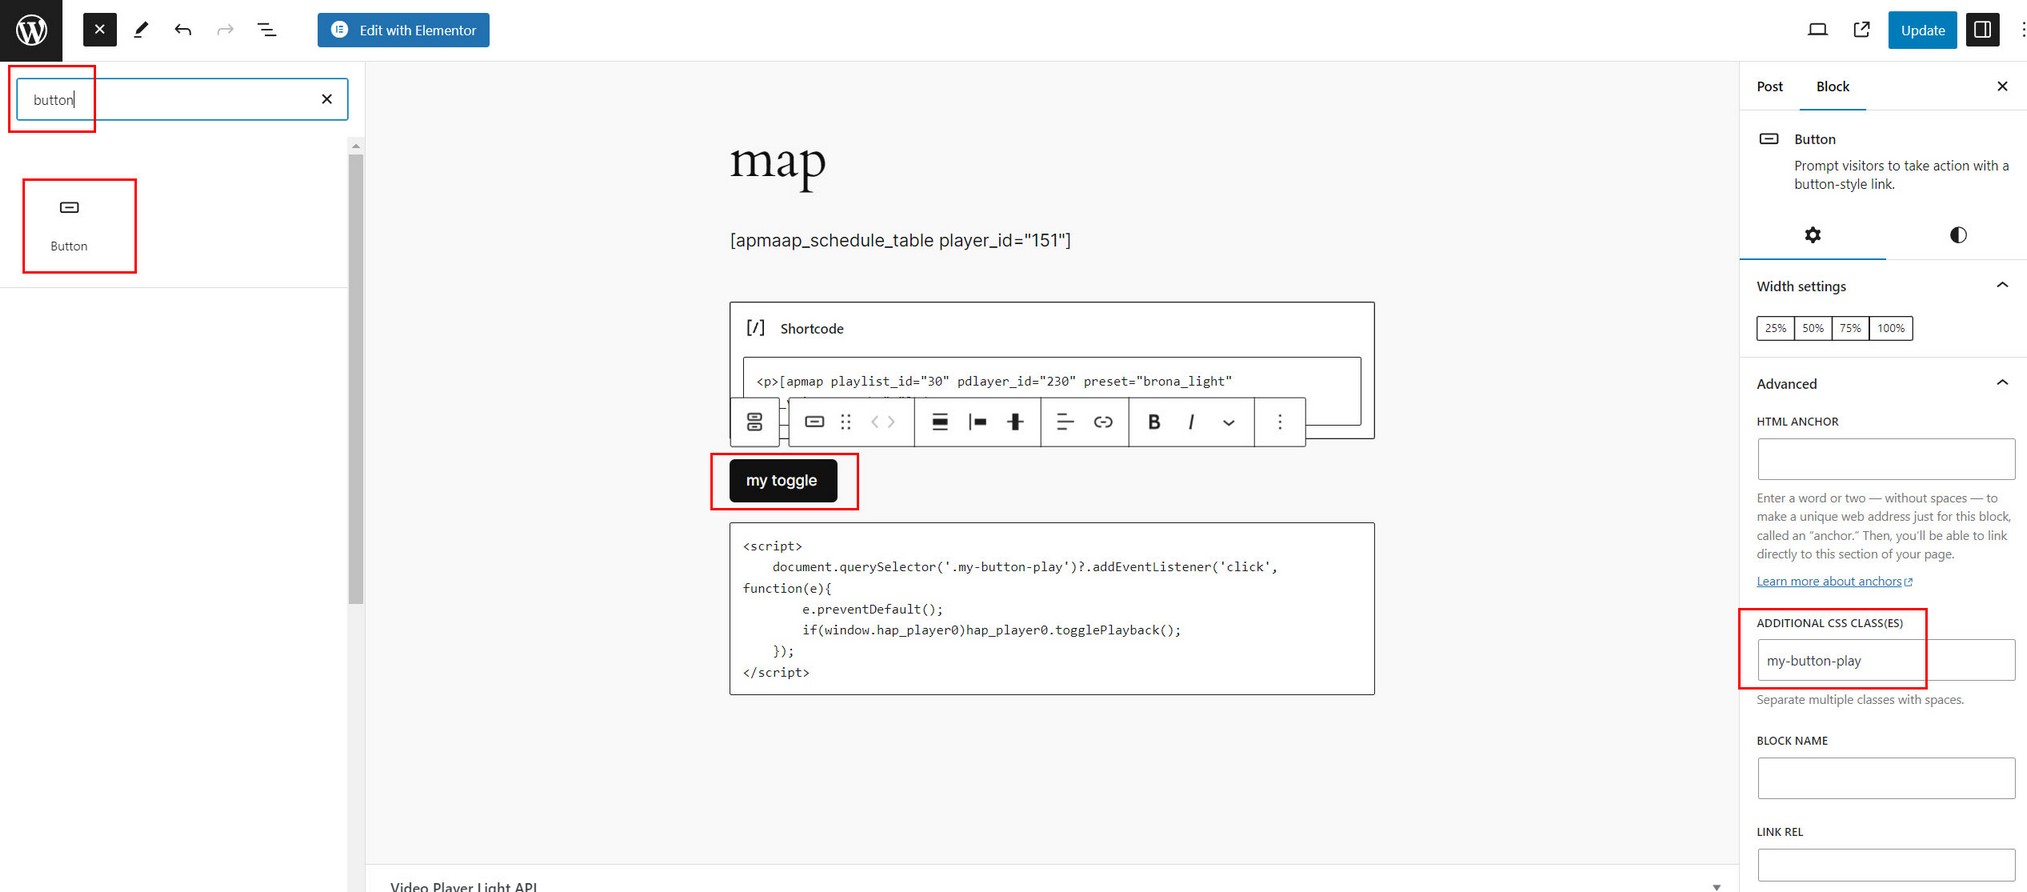
2. Search for HTML widget and drag widget to page:
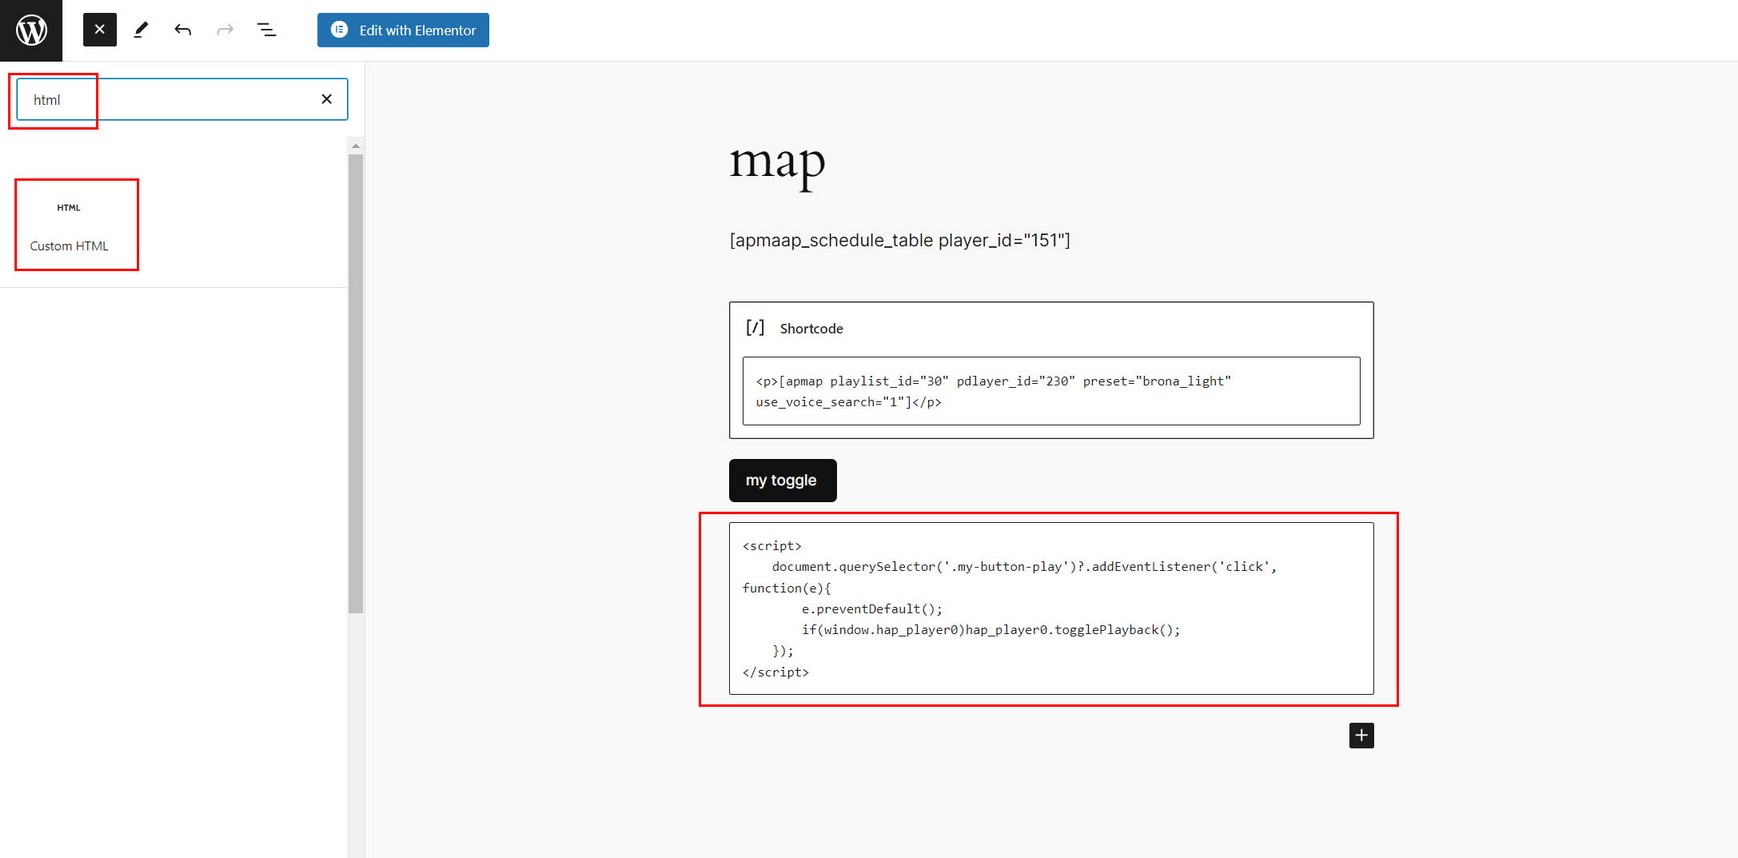
Add following code in the widget (this code will pause play song):
 <script>
    document.querySelector('.my-button-play')?.addEventListener('click', function(e){
    	e.preventDefault();
        if(window.hap_player0)hap_player0.togglePlayback();
    });
</script>
Note that button needs to be present after player shortcode and HTML widget needs to be present after button in page.
You can do the same with other API methods.
Example, restart song
 <script>
    document.querySelector('.my-button-play')?.addEventListener('click', function(e){
    	e.preventDefault();
        if(window.hap_player0)hap_player0.seek(0);
    });
</script>
Player languages
You can change player languages in Language tab:
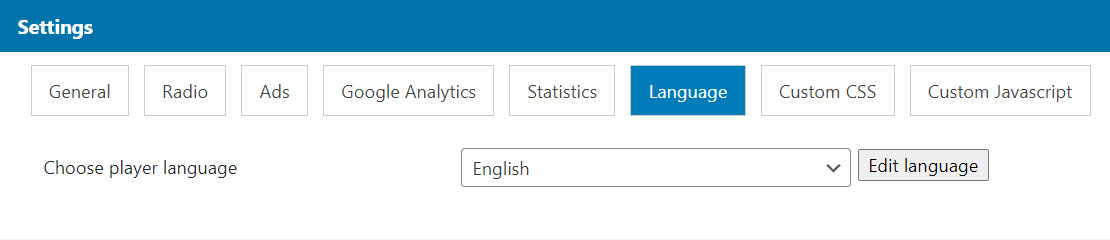
What to help us with player localization and translate the player to another language? You go follow the link and edit translation there:
https://docs.google.com/spreadsheets/d/1XbW56b3eZP2FgY-MWfnGV54xePCiXffcUfC5v4AQctY/edit?usp=sharingShortcodes in song properties
Executing shortcodes in song data (advanced usage)
When you add songs in Playlist manager / Edit Playlist / Add media dialog you can specify some fields to run Wordpress function do_shortcode with their fields values (Use shortcode).
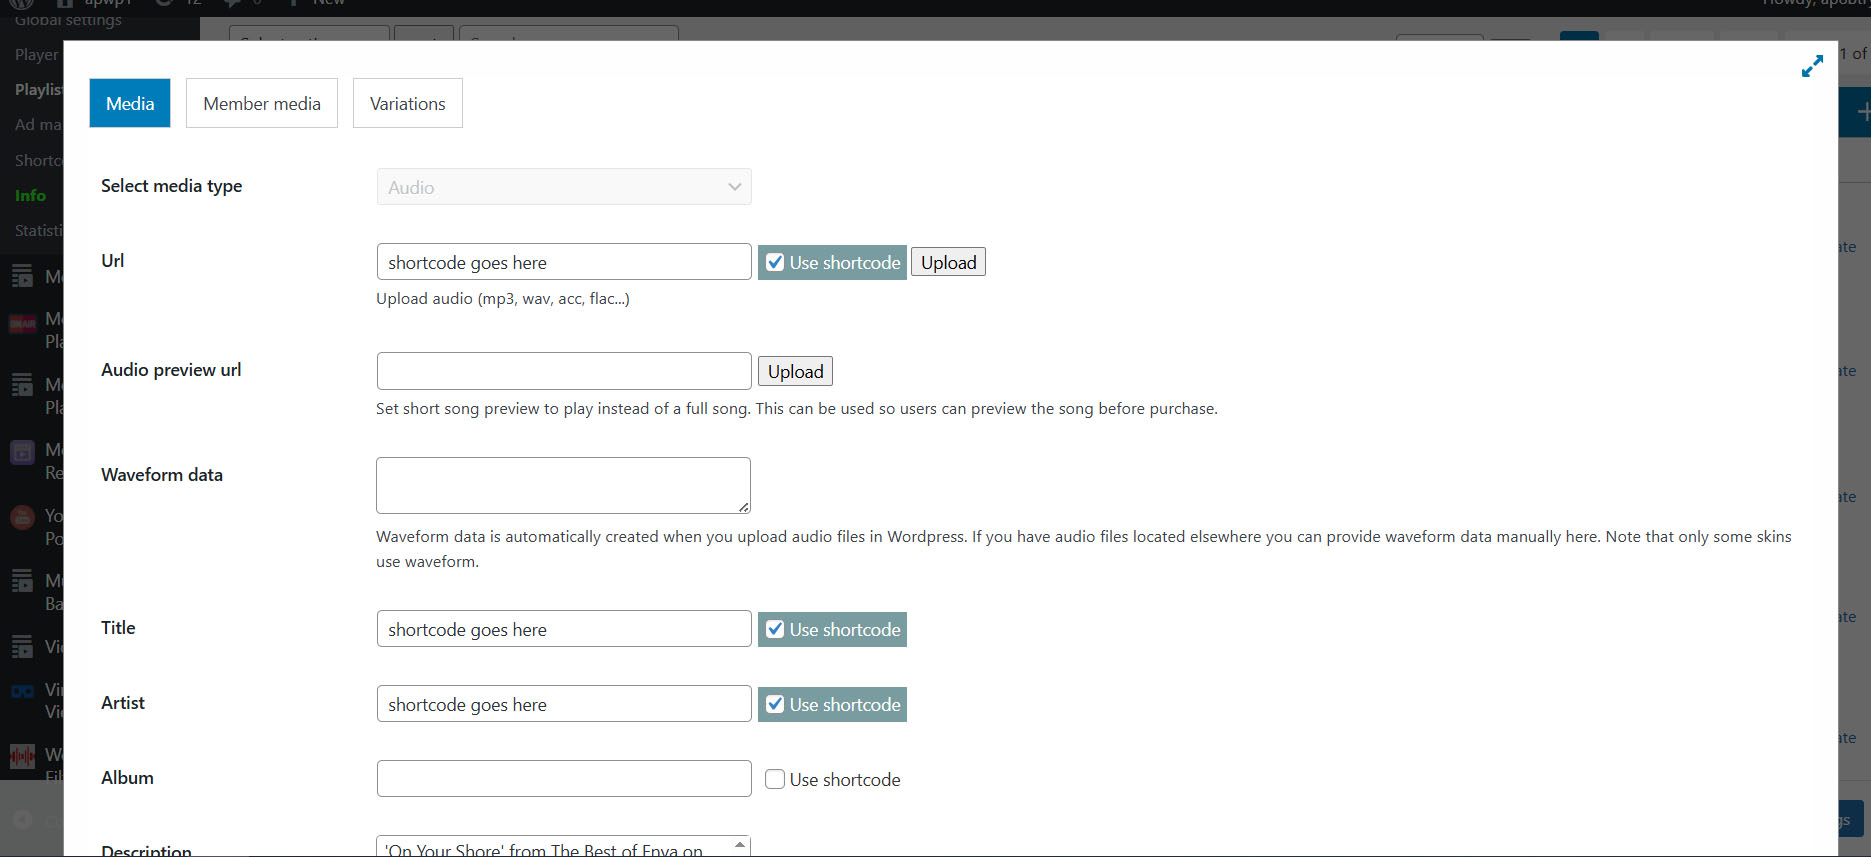
Notes
Using this feature requires playlist_ready="1" attribute in shortcode, example:
[apmap playlist_id="4" player_id="2" playlist_ready="1"]
 - applies ONLY for single audio sources (non process media, so media type audio, 'youtube_single', 'hls'). Does not apply for Podcast for example.

 - do not mix with other media types in your playlist

 - when you use this feature all songs in your playlist are processed this way
Player template
Templating system
Plugin offers the option to design your own player skin (using php, html, css).
When plugin is installed and activated it will create following folder where you can place your own template files: wp-content\uploads\map-template-dir
Example of a template file (and its css) is located in plugin package / _documentation / samples / template example directory. For test, you can copy these files into wp-content\uploads\map-template-dir and create a custom template skin in Player manager / Add Player with the same name as these files (template_custom)

How to design your own skin?
Start by copying any of the skin code from wp-content/plugins/apmap/includes/html/SOME_SKIN.php file.

Important notes when creating template:

- you have to retain classes which are already included on player buttons etc.. But you can add your own classes as well and your css.

- you need to have template php file and css file with the same name in wp-content\uploads\map-template-dir

- you have to provide css (you can start by coping css from some player skin)

- when choosing template name avoid current skin names already present (in wp-content\plugins\apmap\includes\preset_config)

- name the function inside php template file: (example)

function hap_template_{template_custom}($preset, $wrapper_id, $options){
    ....
}
To load custom template css file, use this option in Global settings (this will load all css files from this directory):
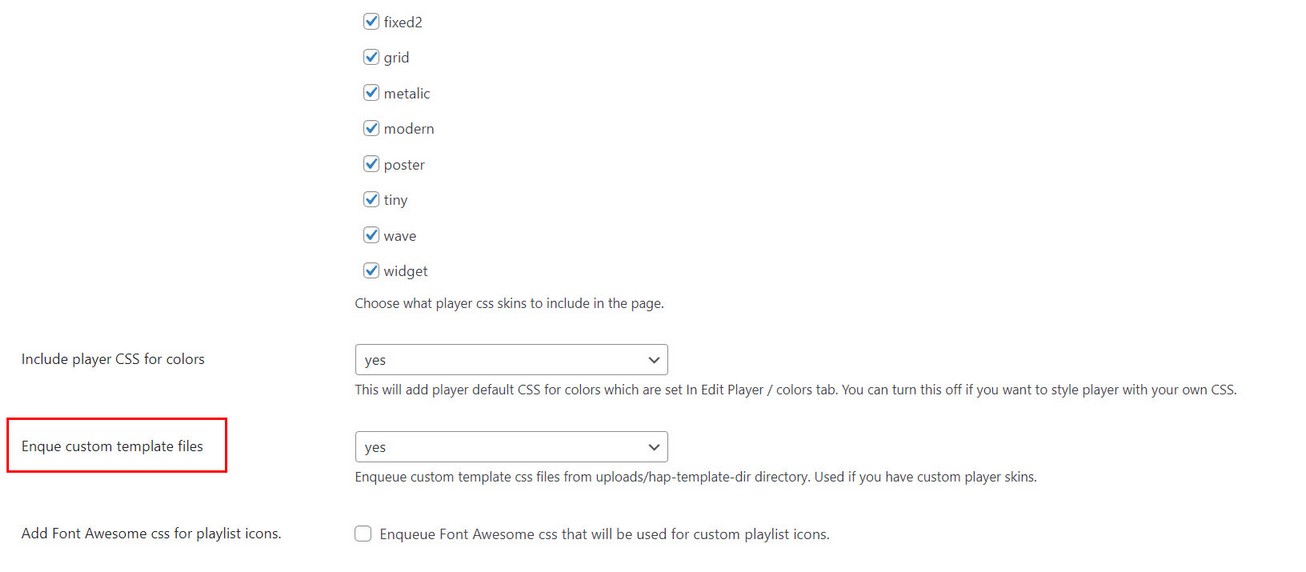
Note that when you create custom template and go to edit player, there will be no settings in Player Manager for colors, neither some other settings like icons or translation will apply because this is done directly in player HTML file (which in this example is template_custom.php)
But other main settings for audio playback are still valid.
Playlist item template
Design skin for playlist item content
Default playlist item example skin example is located in plugin package / _documentation / samples / playlist item directory.
To put this skin into use, copy pi_markup_default.php file into wp-content\uploads\map-file-dir\pi_template directory.
Then enter template name in Player manager / Edit player / General / Playlist items tab with the same name as these files (template_custom)

Inside pi_markup_default.php there are some properties wrapped in {...} which will be replaced with actual content.
	<div class="hap-playlist-item hap-playlist-item-ready" {main_props} >

		<div class="hap-playlist-item-wrap">

			<div class="hap-playlist-item-content">

				<div class="hap-playlist-thumb">
					<img class="hap-thumbimg" src="{thumb}" alt="image">
				</div>

				<div class="hap-playlist-info">

					<div class="hap-playlist-title-wrap">
						<p class="hap-playlist-title">{title}</p>{separator}<p class="hap-playlist-artist">{artist}</p>
					</div>

					<p class="hap-playlist-duration">{duration}</p>
					<p class="hap-playlist-date">{date}</p>
					<p class="hap-playlist-description">{description}</p>
					<p class="hap-playlist-album">{album}</p>

				</div>

			</div>

			<div class="hap-playlist-icons">

				<!-- only if statistics is used -->
				<div class="hap-stats">

					<div class="hap-stat-icon hap-play-count" title="Plays"><svg aria-hidden="true" focusable="false" role="img" viewBox="0 0 512 512"><path d="M256 8C119 8 8 119 8 256s111 248 248 248 248-111 248-248S393 8 256 8zm115.7 272l-176 101c-15.8 8.8-35.7-2.5-35.7-21V152c0-18.4 19.8-29.8 35.7-21l176 107c16.4 9.2 16.4 32.9 0 42z"></path></svg><span>0</span></div>

					<div class="hap-stat-icon hap-like-count" title="Likes"><svg aria-hidden="true" focusable="false" role="img" viewBox="0 0 512 512"><path d="M462.3 62.6C407.5 15.9 326 24.3 275.7 76.2L256 96.5l-19.7-20.3C186.1 24.3 104.5 15.9 49.7 62.6c-62.8 53.6-66.1 149.8-9.9 207.9l193.5 199.8c12.5 12.9 32.8 12.9 45.3 0l193.5-199.8c56.3-58.1 53-154.3-9.8-207.9z"></path></svg><span>0</span></div>

					<a href="#" class="hap-stat-icon hap-download-count" aria-label="Downloads" title="Downloads"><svg aria-hidden="true" focusable="false" role="img" viewBox="0 0 512 512"><path d="M504 256c0 137-111 248-248 248S8 393 8 256 119 8 256 8s248 111 248 248zM212 140v116h-70.9c-10.7 0-16.1 13-8.5 20.5l114.9 114.3c4.7 4.7 12.2 4.7 16.9 0l114.9-114.3c7.6-7.6 2.2-20.5-8.5-20.5H300V140c0-6.6-5.4-12-12-12h-64c-6.6 0-12 5.4-12 12z"></path></svg><span>0</span></a>

				</div>

				<!-- if playlist icons exist -->
				{playlist_icons}

			</div>

		</div>

	</div>


?>
Properties should be self explanatory:
{main_props} - required (dont modify)

{thumb} - thumbnail image url
{title} - song title
{separator} - artist tile separator
{artist} - song artist
{duration} - song duration
{date} - song created date
{description} - song description
{album} - album name

{playlist_icons} - custom playlist icons (set in Edit Playlist / Add media dialog / Additional playlist icons)
If you use custom css for playlist items, you can pass it to Player manager / Edit Player / Custom CSS tab or directly in your theme.
Domain change
How to batch rename all songs in playlist to make them usable on another domain?
Go to Edit playlist / Playlist options / Maintenance tab where you can rename all url in current playlist:

Overwrite wordpress audio player
To overwrite wordpress default audio player with this player, use these options in Settings menu:

It can overwrite single audio shortcodes like these:
It can overwrite audio playlist shortcodes like these:
Using import and export
Player, playlist and ad section can be exported as backup or to be used on another plugin installation.
Export feature requires zip php extension installed. If zip extension is not installed or enabled, Export button will not be available.
How to export?
Once you create the player in Player manager section you can export it using Export button:
If export is successful, zip file containing export will be downloaded in browser default download location.
When you want to import the player, use Import button and select this exported zip file.
Statistics addon
Statistics AddOn is available on the following link
Using Statistics AddOn
First make sure addOn is activated together with main Audio player plugin.
Also, make sure you have the latest compatible version of main Audio player plugin.
Register plugin inside Player manager / Edit player / Audio Statistics tab
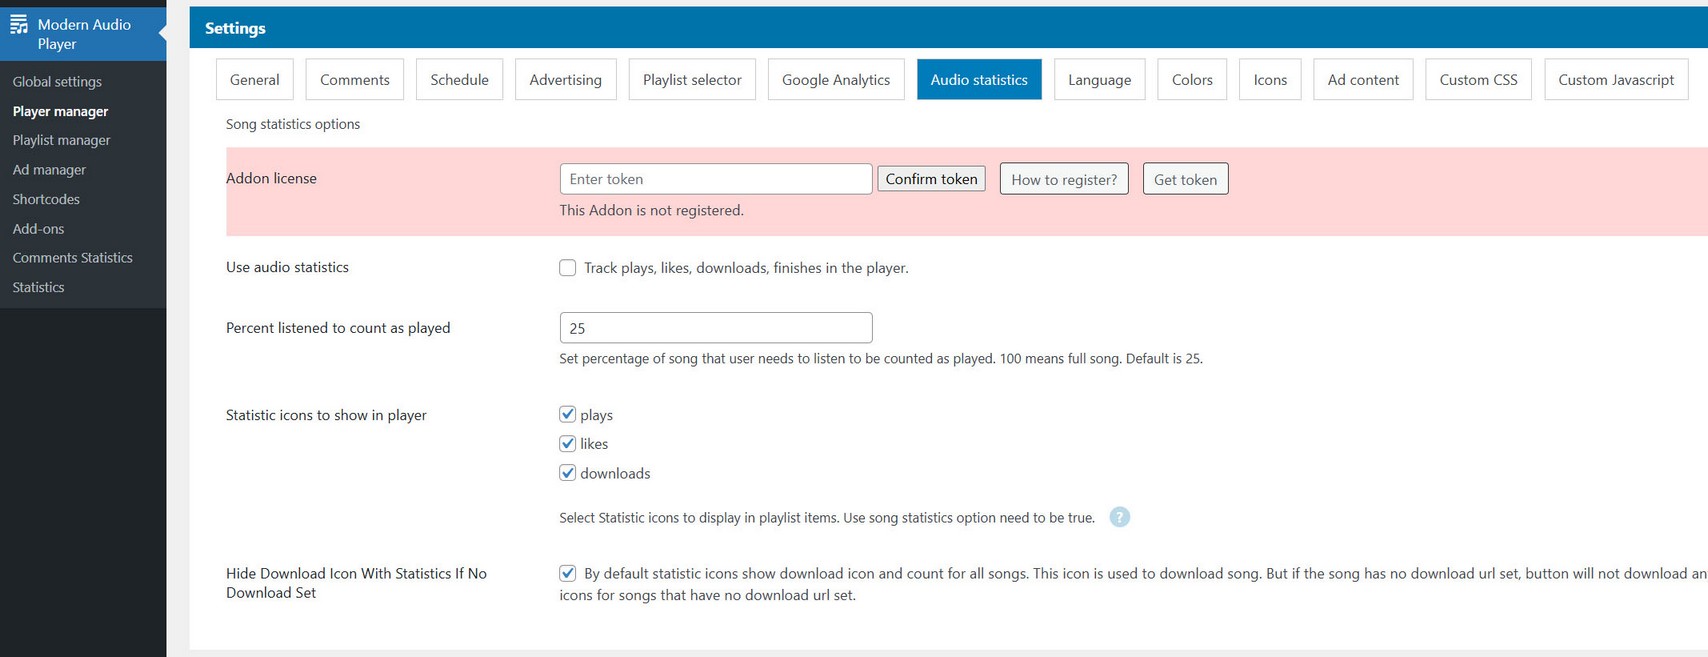
Registration is done the same way as registering main plugin.
Statistics data
Access Statistics settings in Player Manager / Edit Player / Audio Statistics tab.
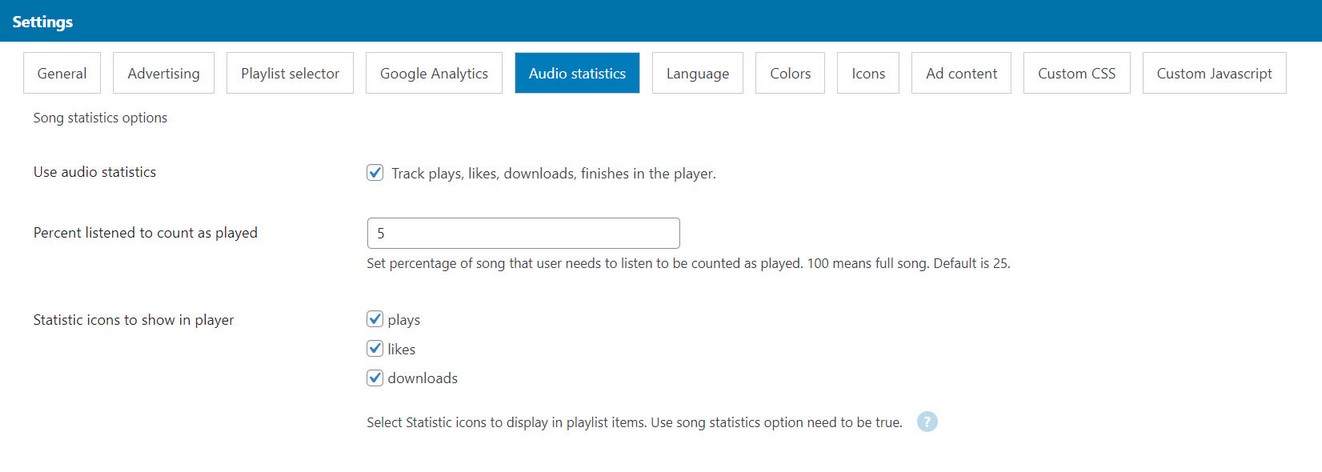
You can show data per individual playlist and per WordPress user.
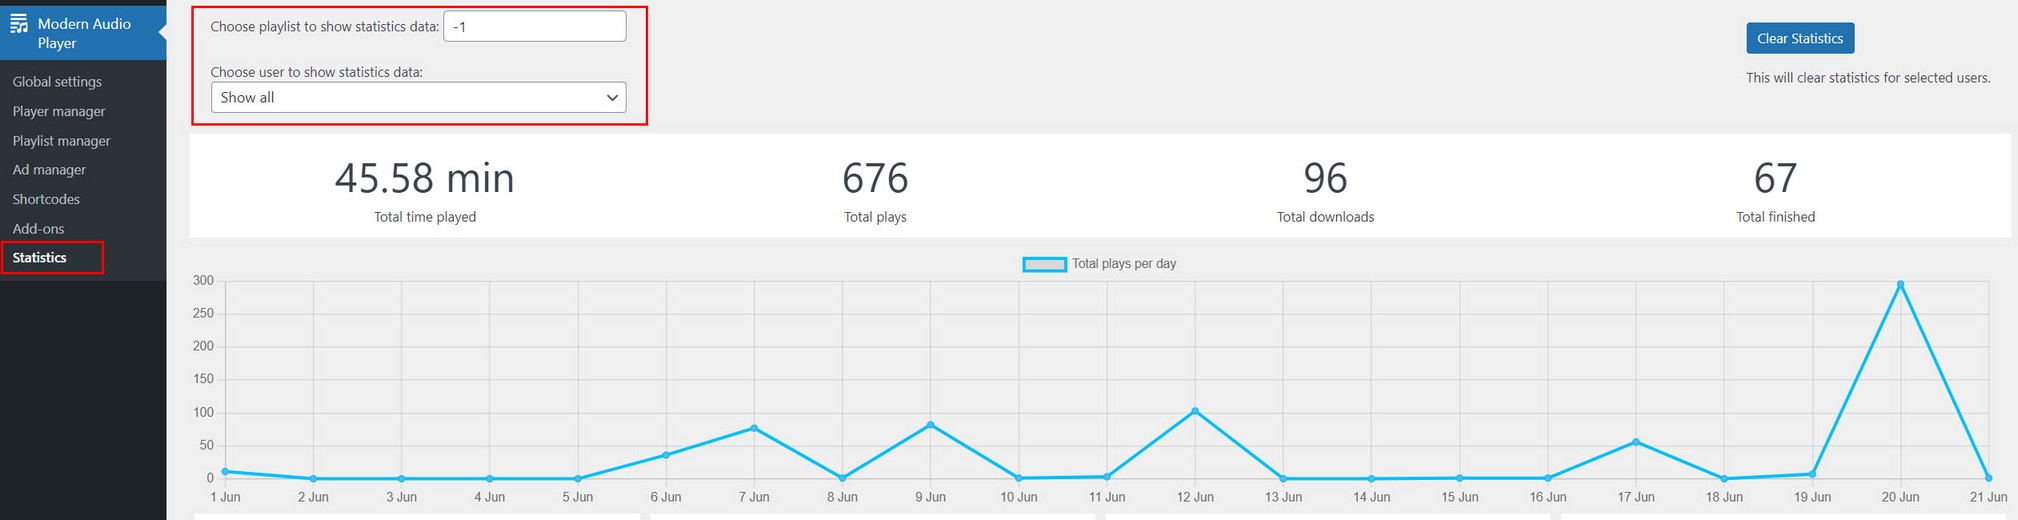
Export data
Export individual table data:
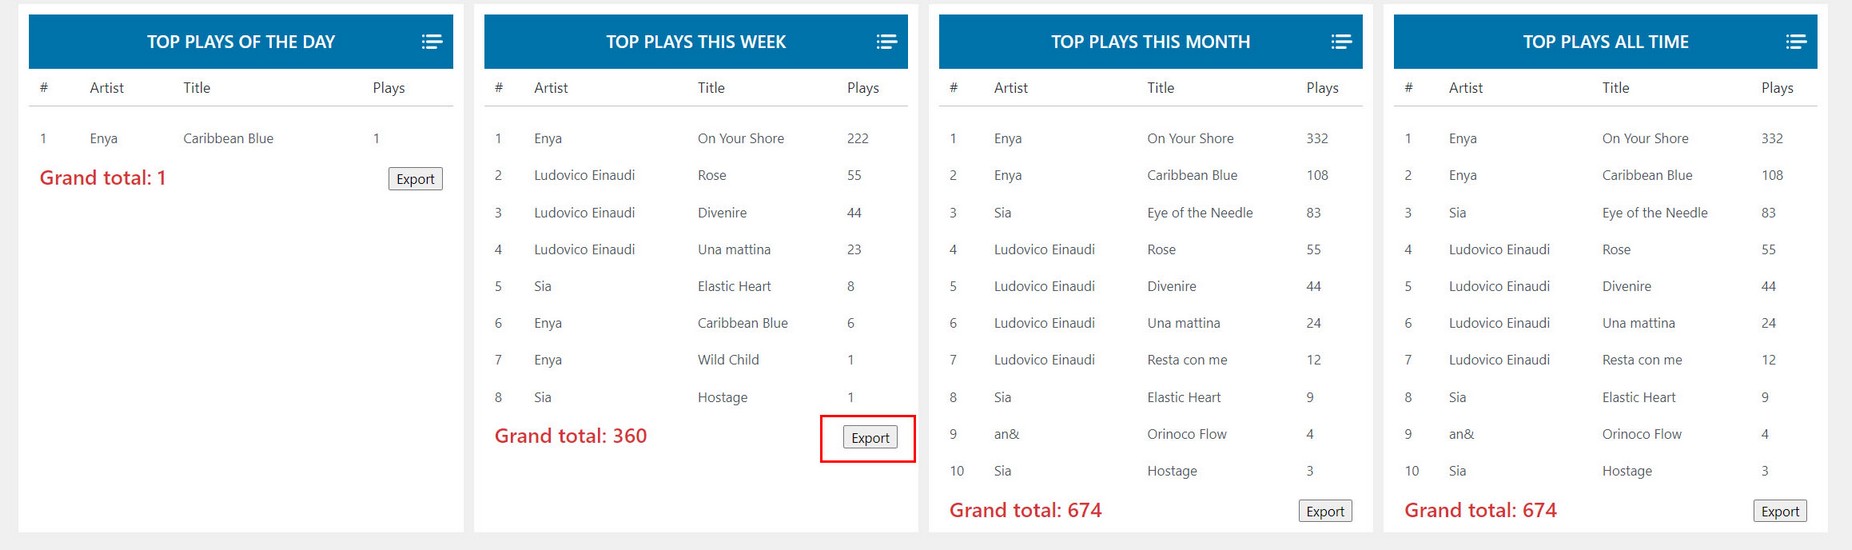
Export all song data:
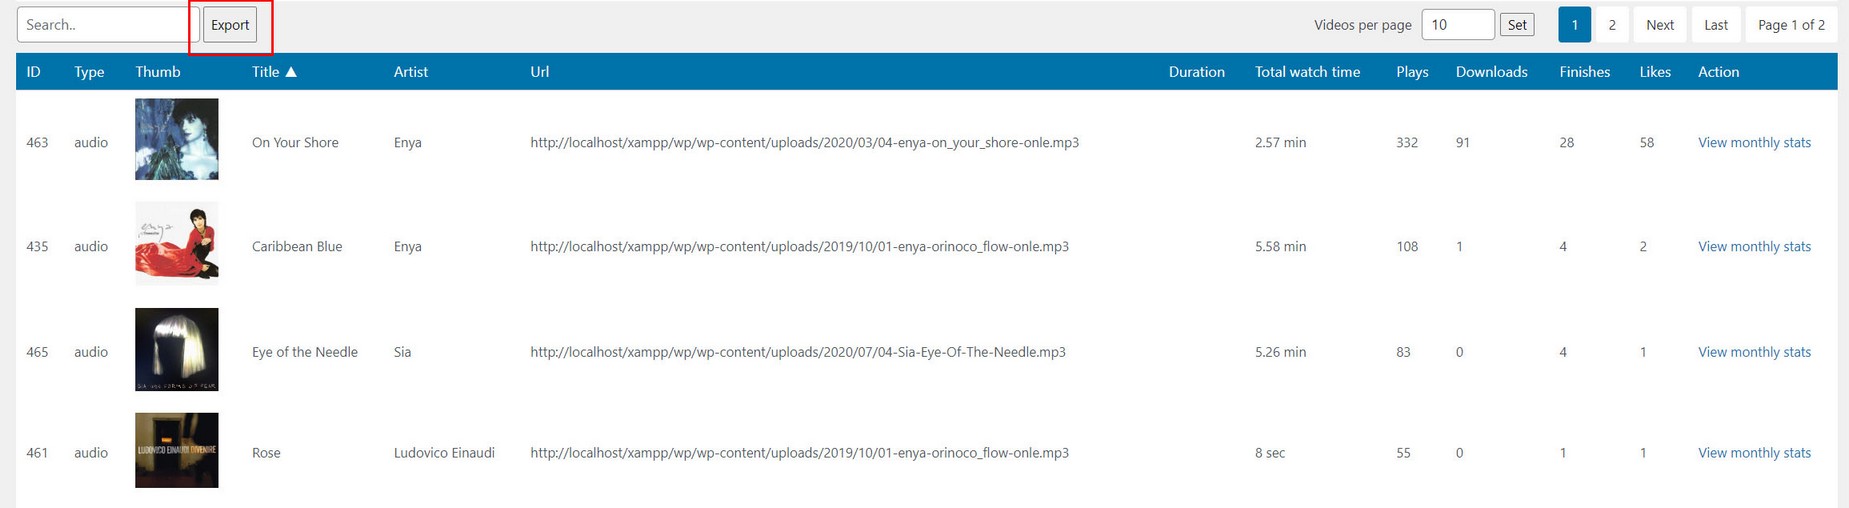
Note when using export and opening exported file, use pipe (|) sign as delimiter.
Song download
Note that when statistics icons are activated, you get a download icon (which shows the number of downloads even if song does not have download url set). Read more in Song download section.
Frontend shortcodes
Display popular songs from audio statistics (plays, downloads etc) in player on the front page
In Shortcodes menu / Statistics shortcodes tab you can generate shortcode to display in player on front page
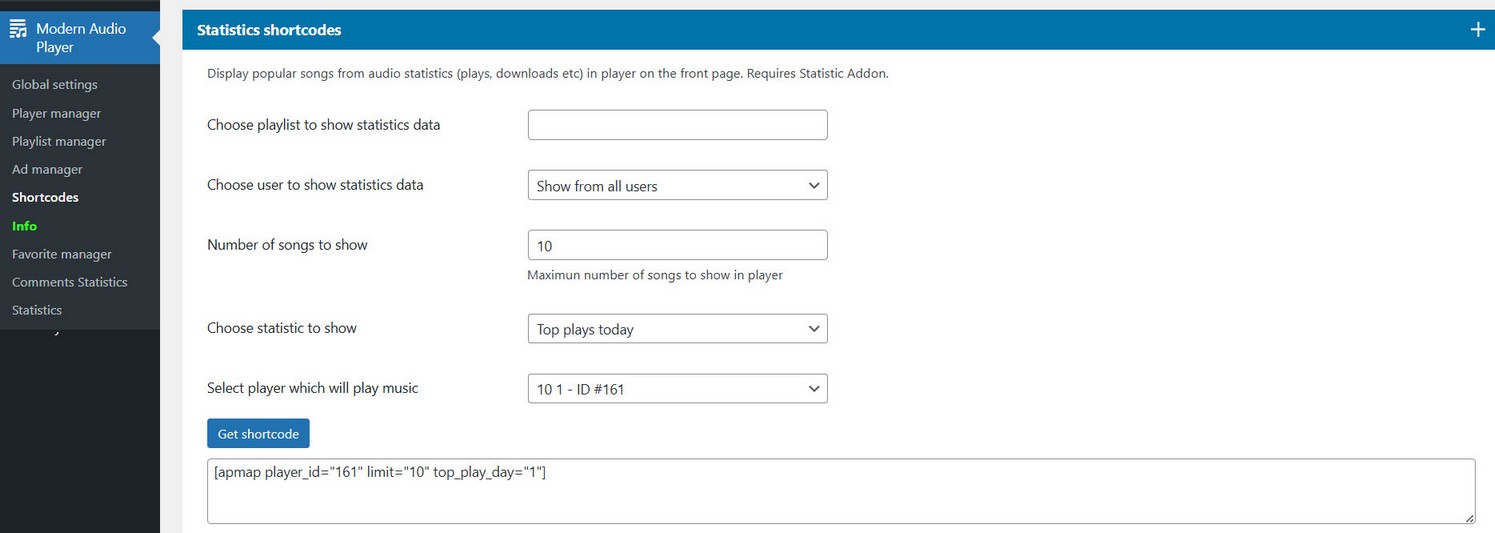
Select different statsitics data to display:

Note that if no songs are shown in player by generated shortcode, it means no songs have been logged in with current statistics.
User addon
User AddOn is available on the following link
User AddOn for Modern Audio Player WordPress plugin enables offering songs access as memebership subscription to WordPress users, collecting emails for accessing song downloads for Guest users and much more..
Activate User AddOn
First make sure addOn is activated together with main Audio Player plugin.

Also, make sure you have the latest compatible version of main Audio Player plugin.
Register plugin inside Global settings / User Addon tab
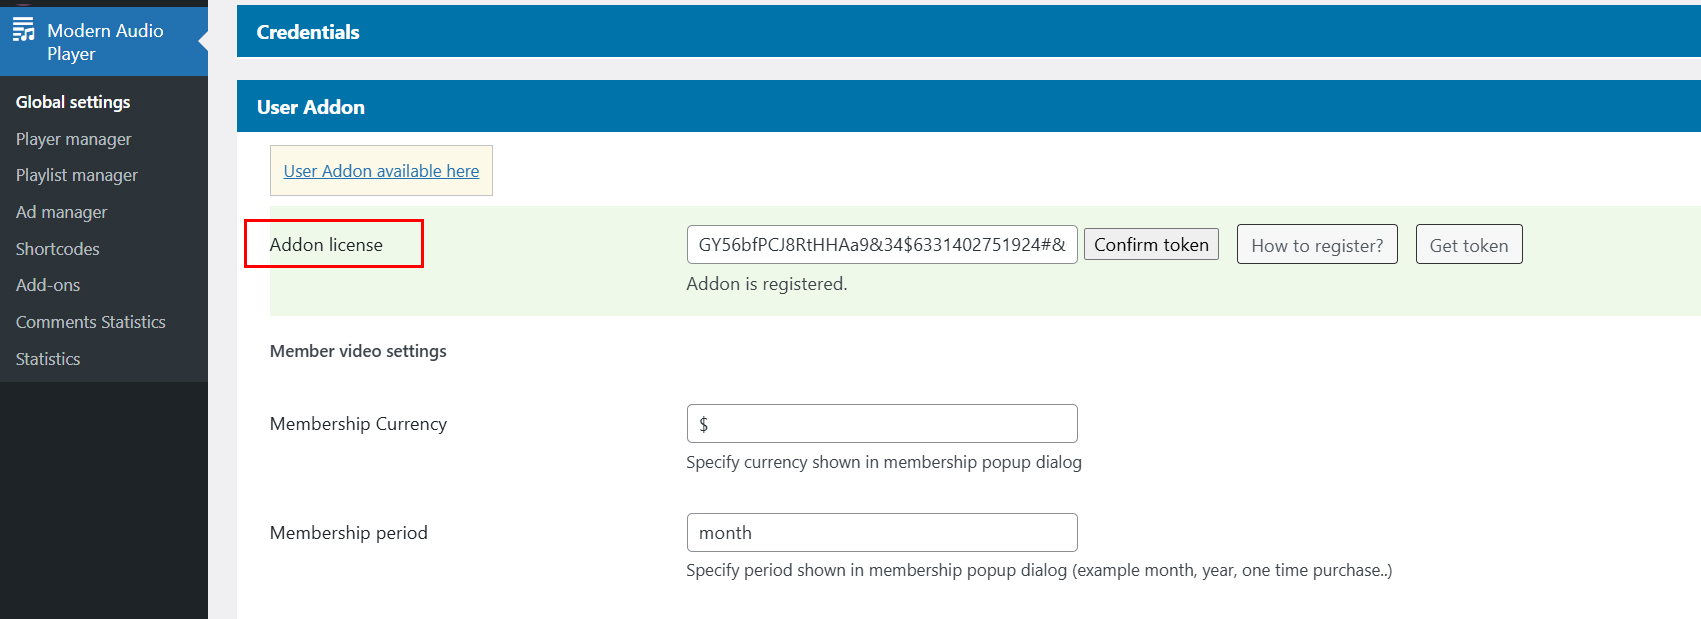
Registration is done the same way as registering main plugin.
Member only content
Member only content allows restricting access to specific songs in playlist and offering users paid memebership for viewing.
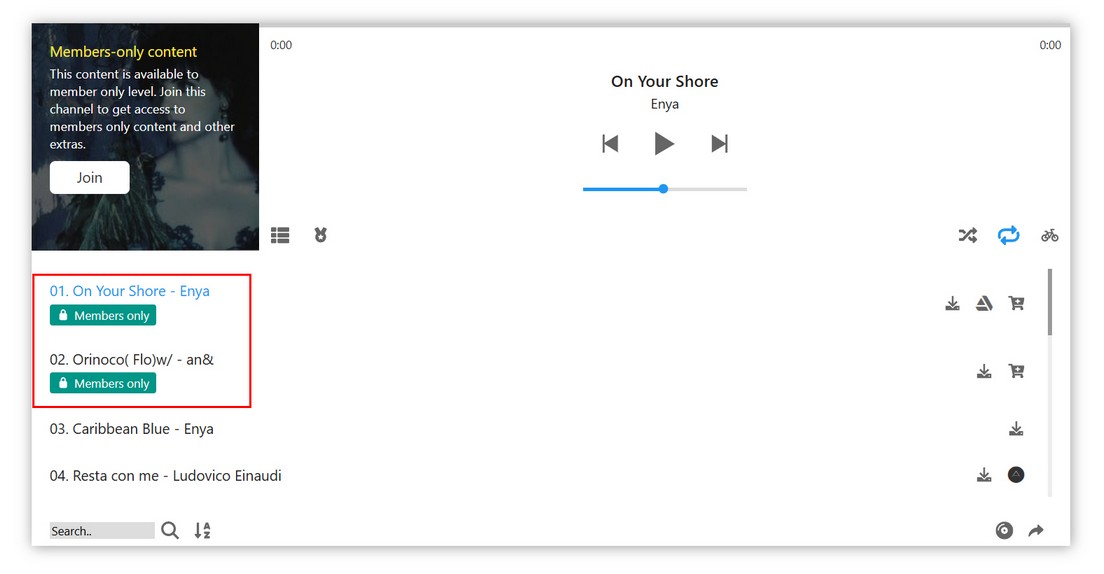

Note: this feature is NOT available with player type lightbox and layout Thumbnail Grid with lightbox (settings inside Player manager / Edit player / Style / Layout tab ).
Setting up Member only content
Global settings for Member content is located in Global settings / User Addon / Membership tab
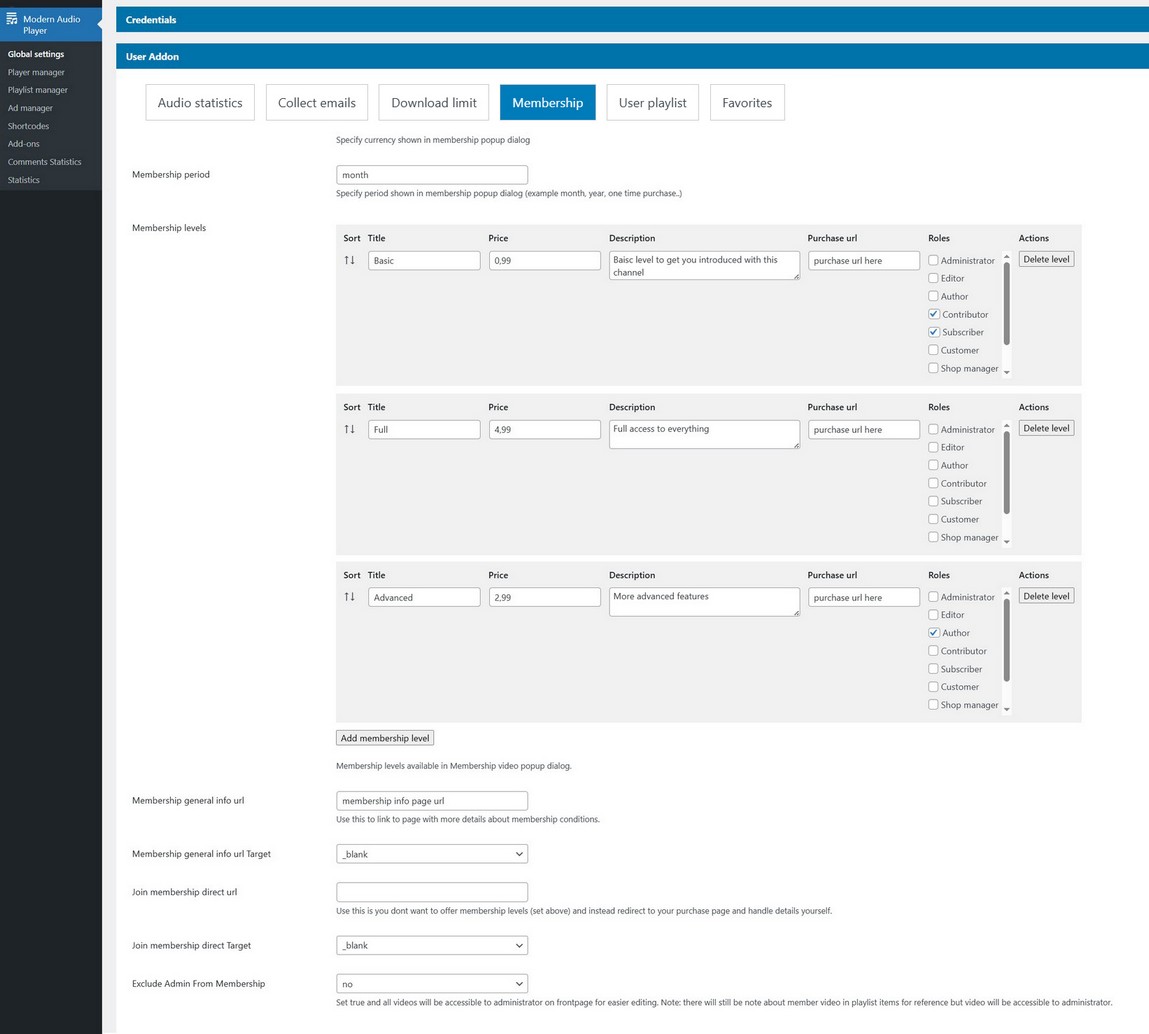
1. Create one or more membership levels and assing one or more WordPress user roles to each membership level which will have access to specific songs.
2. Inside Playlist manager/ Edit playlist assing user accessible roles to any number of videos.
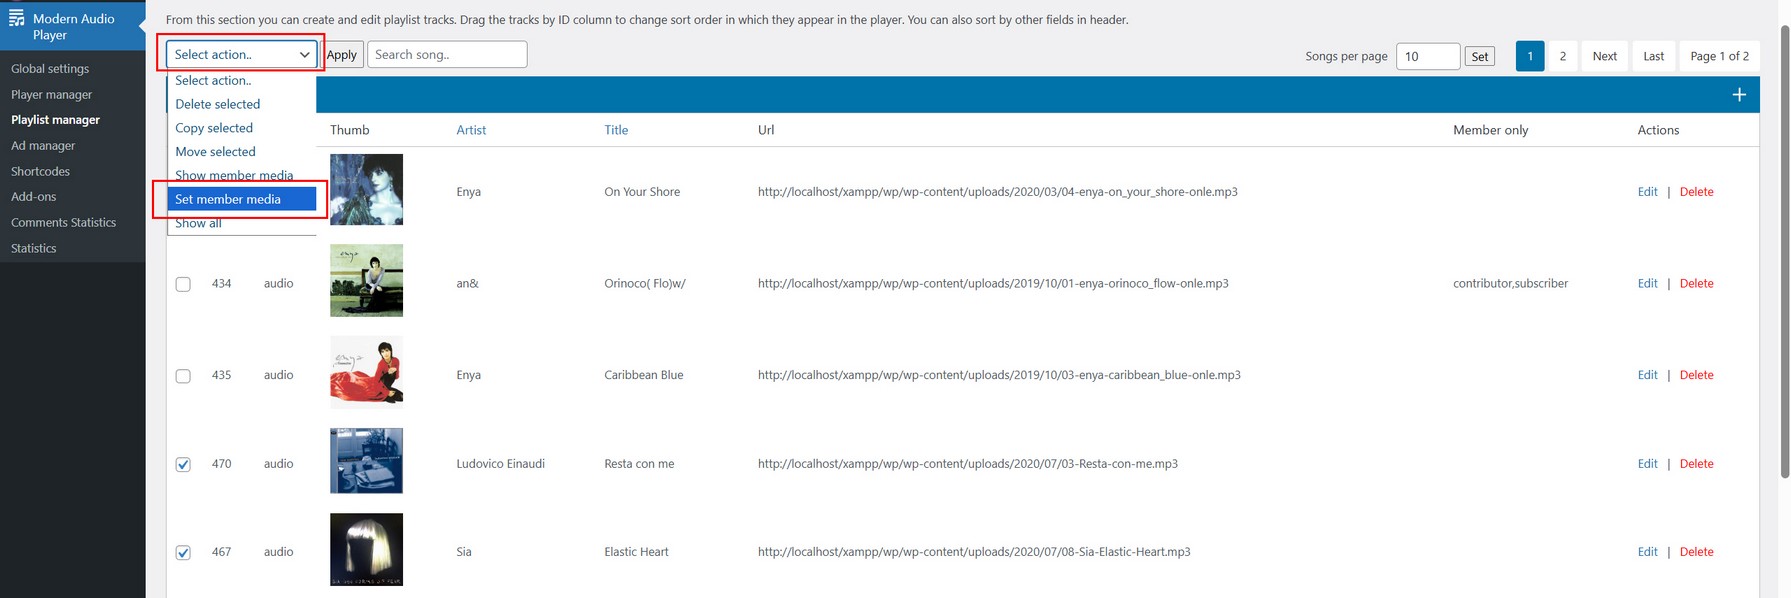
This can be done for one or more songs at a time.
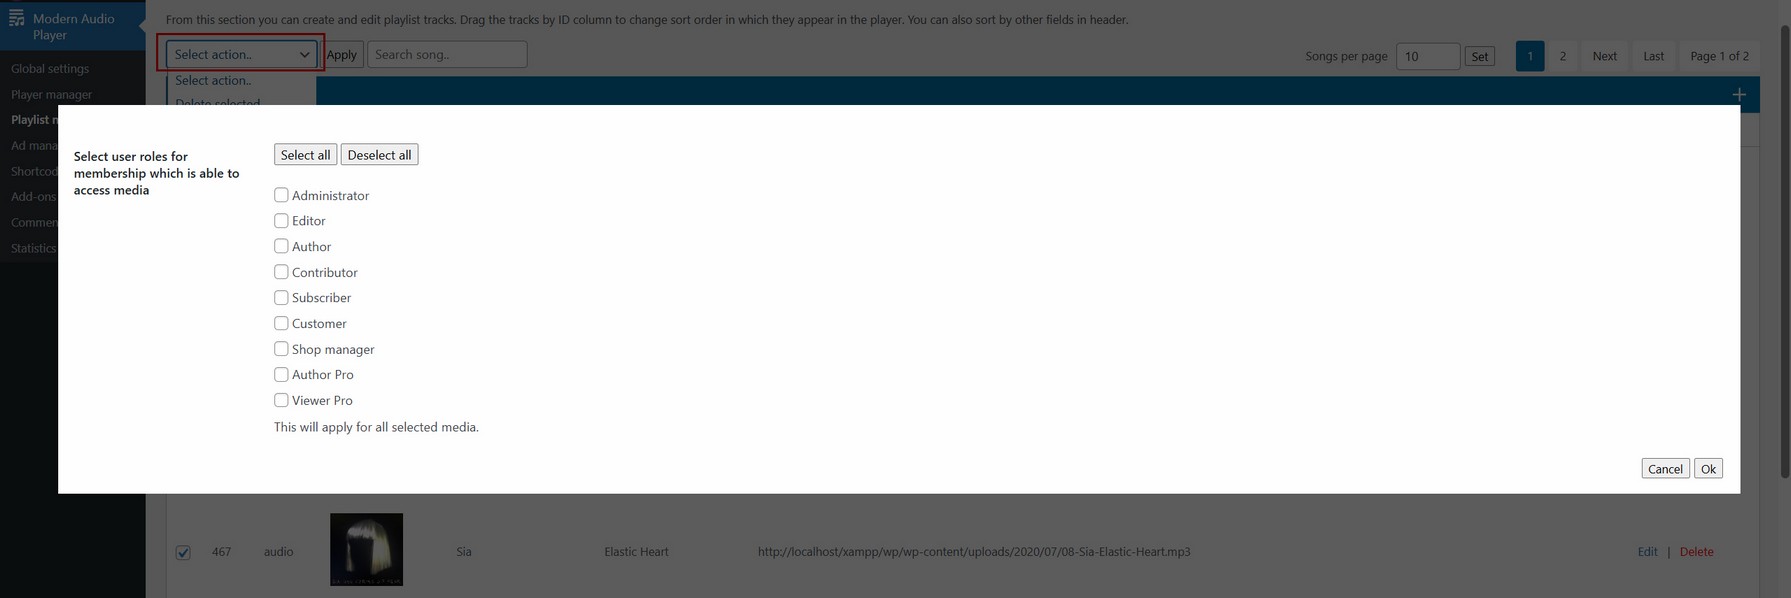
3. When user views songs on front page, depending on his user role, some songs will be restricted.
4. Clicking Join button popup dialog will open allowing user to upgrade his membership if he wants to access these songs.
5. Set up payment on your page (according to purchase url you set in Global options) and after payment complete, assign new user role to WordPress user, either by custom plugin or PHP code. After this step, user will have access to those videos.
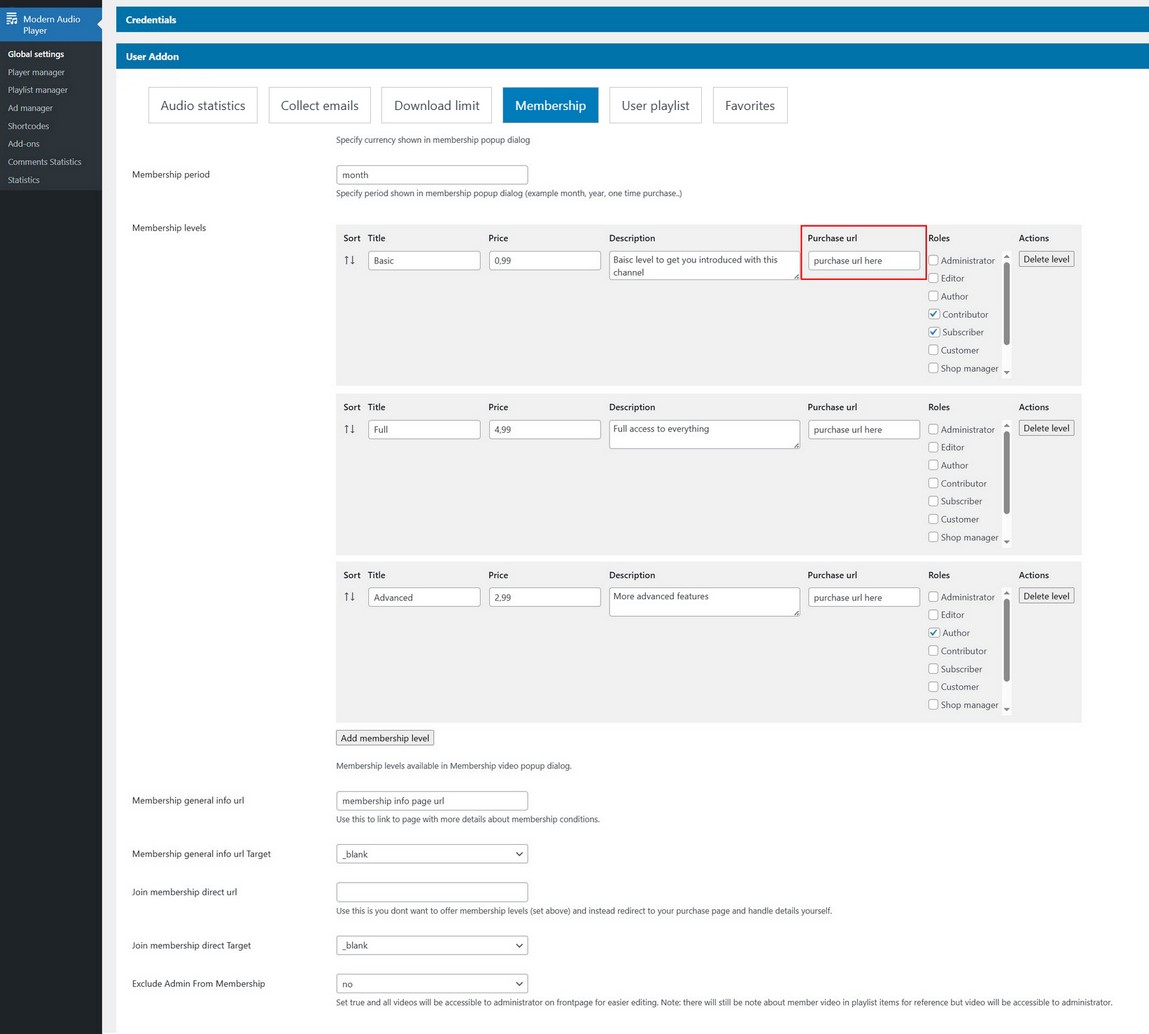
Set membership trailer
Set membership trailer for popup dialog inside Playlist manager/ Edit playlist / Playlist options.

Ask for Email to Access Download
Activate the feature for guests users (not logged in users) so they have to provide their email address to access song download in Global settings / User Addon section / Collect Email section

Users will be presented with form to input their data.

Export your Collected Email Addresses
Export the emails you have collected in CSV Format. The Start and End Date are optionals.
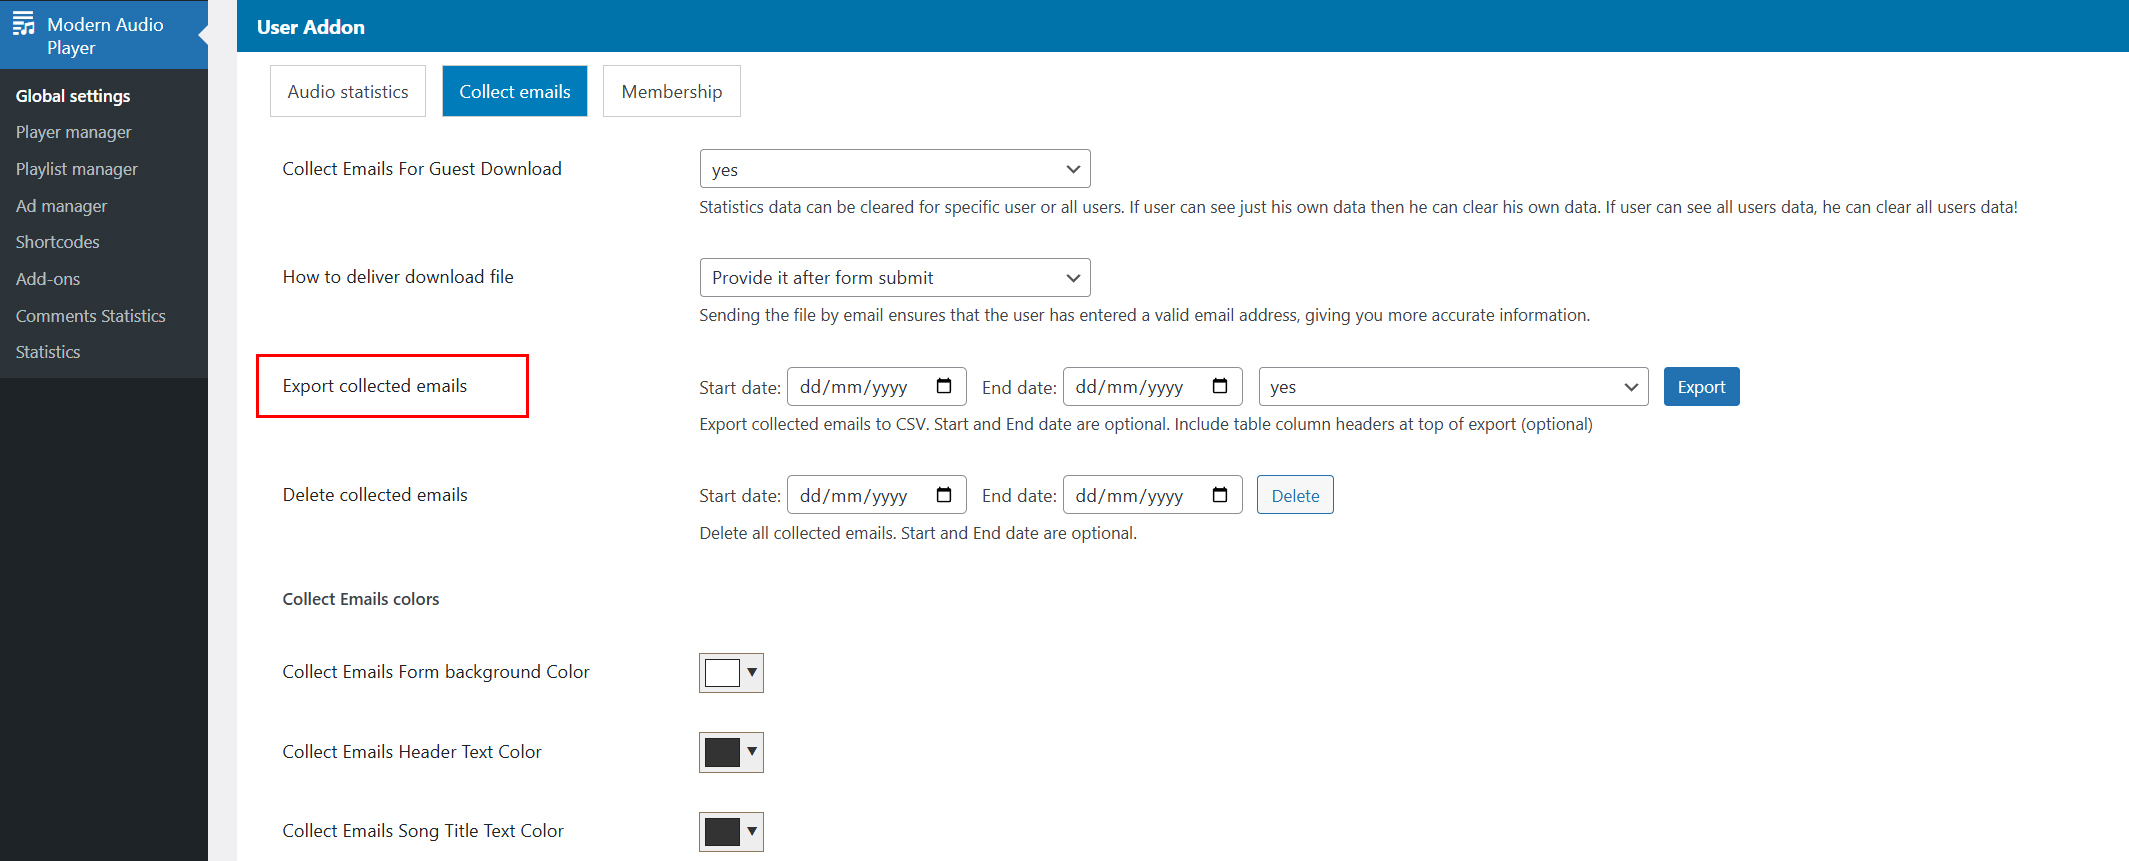
Set Song Download limits
Option to assign song daily download limits per different user Role in WordPress.
Activate and configure this feature in Global settings / User Addon section / Download limits section
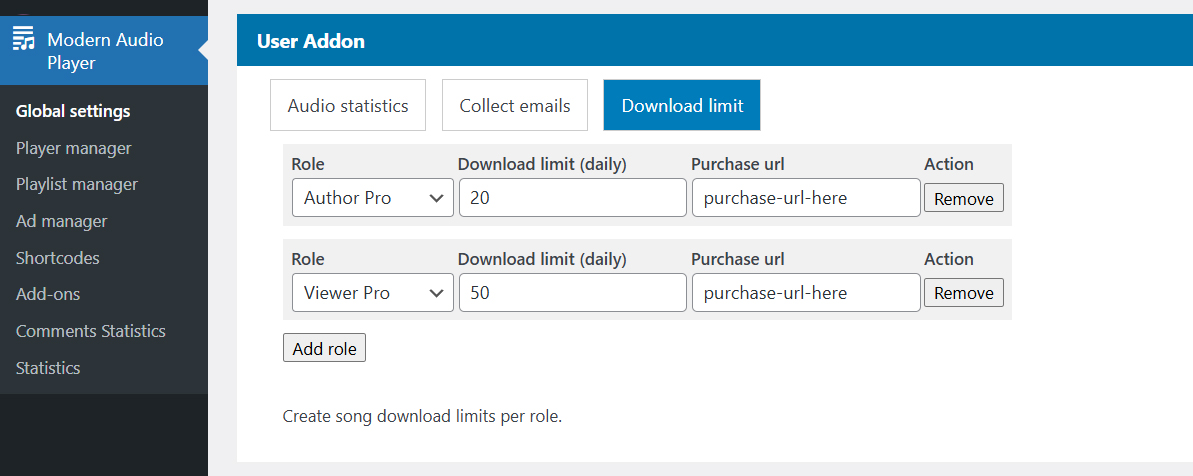
Activate download limits per player in Edit Player / General / Options tab
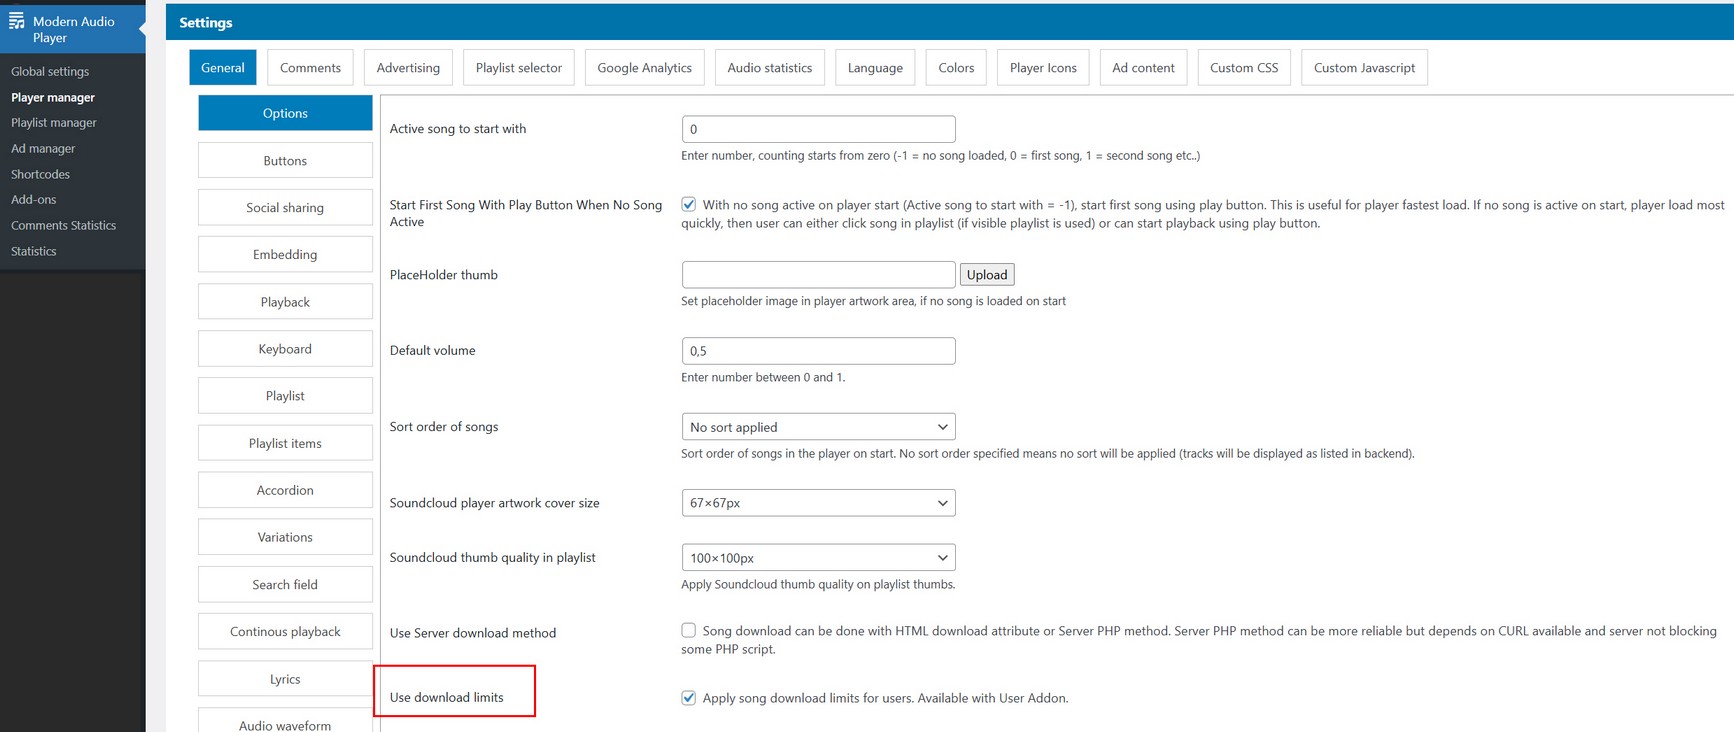
Once user reaches his daily song download limit (set per his User Role in WordPress), a popup will appear if he tries to download more:

Set up payment on your page (according to purchase url you set in Global options) and after payment complete, assign new user role to WordPress user, either by custom plugin or PHP code. After this step, user can have different download limits depending on assigned Role.
User playlist
Allowing users to create playlists
By default only admin can create playlists.
Enable other User roles to create playlists inside Global settings / User Adon / User playlists tab

User roles you set will have access to Playlist manager inside plugin menu. Some features inside Playlist manager (admin related) will be hidden from these Users and only basic features of adding songs to playlist will be available.
Link to Playlist manager
http://localhost/xampp/wp/wp-admin/admin.php?page=hap_playlist_managerAdd songs to favorites
Favorites can be enabled per Player, meaning some Players can use Favorites, while other not.
Enable Favorites inside Player manager / Edit Player / Playlist items tab
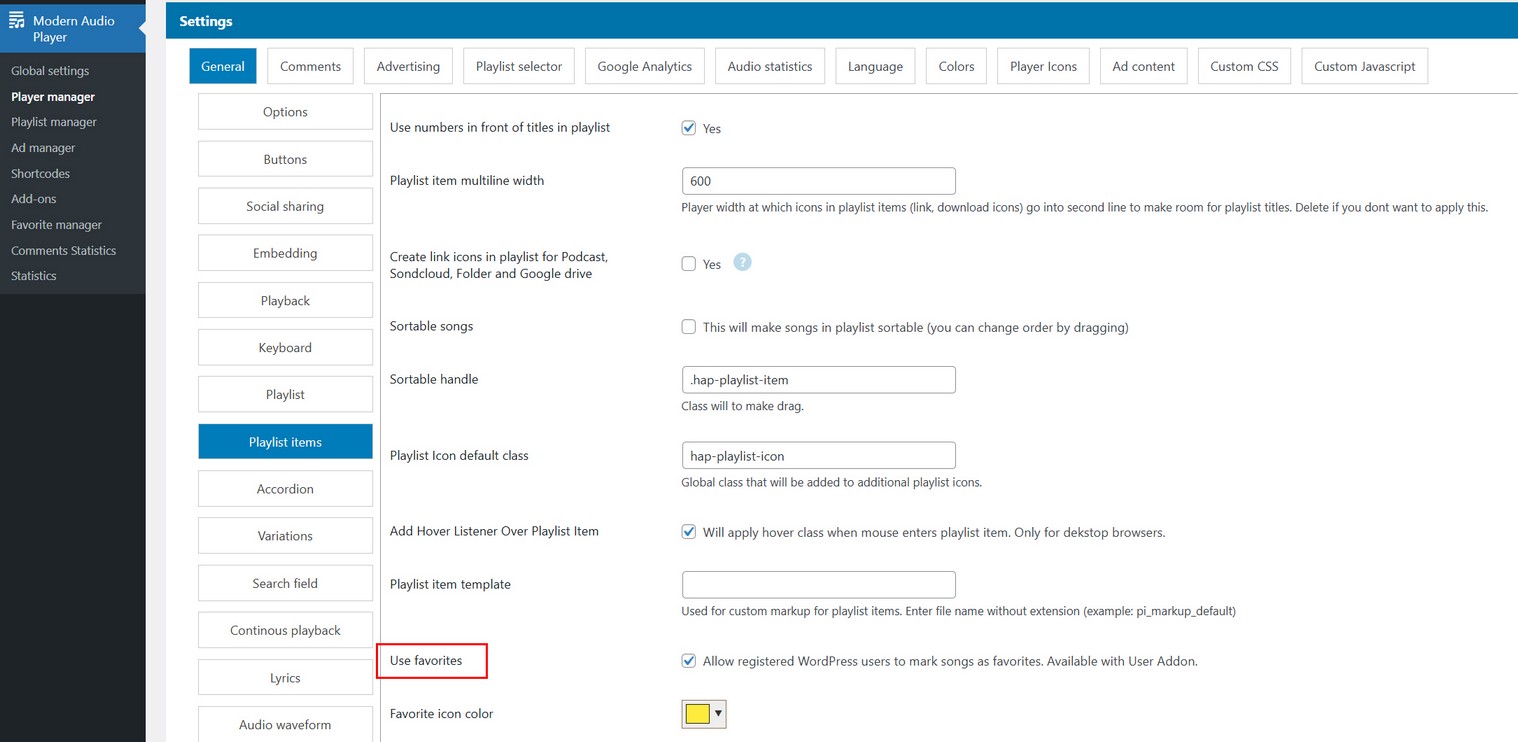
Favorite manager
Both Admin and WordPress users have access to its own menu in the plugin where they can see and manage favorites. Admin can see all favorites, while each WordPress user can see their own favorites.
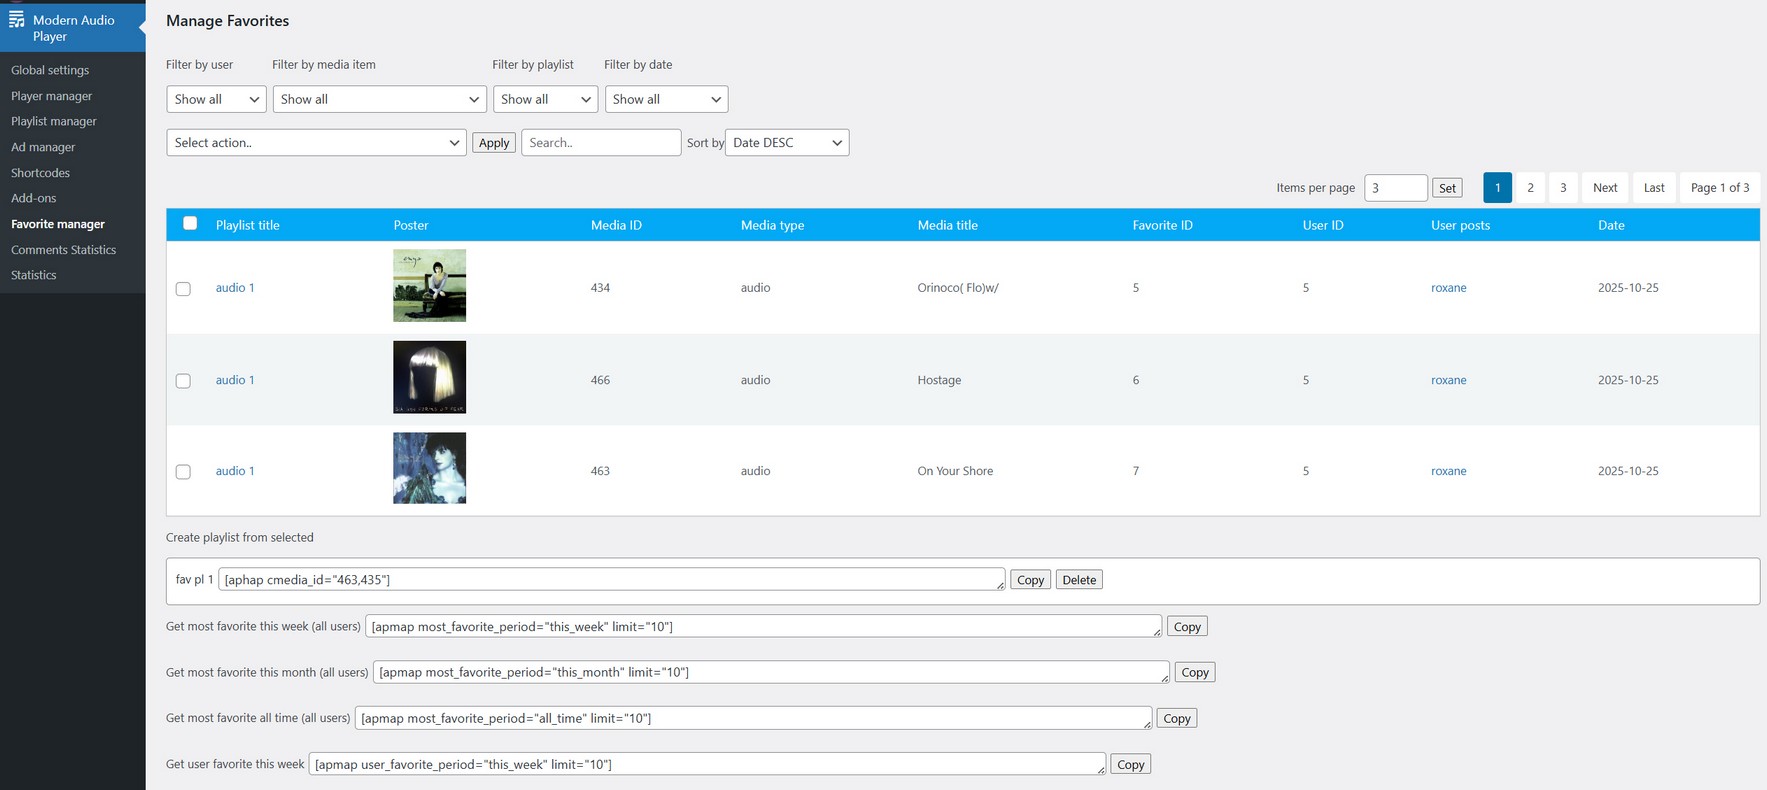
Admin can choose which User role (if any) can access Favorites in plugin menu.

Favorite shortcodes
Inside Favorite manager there are multiple default shortcodes provided that can be used to view Reel.
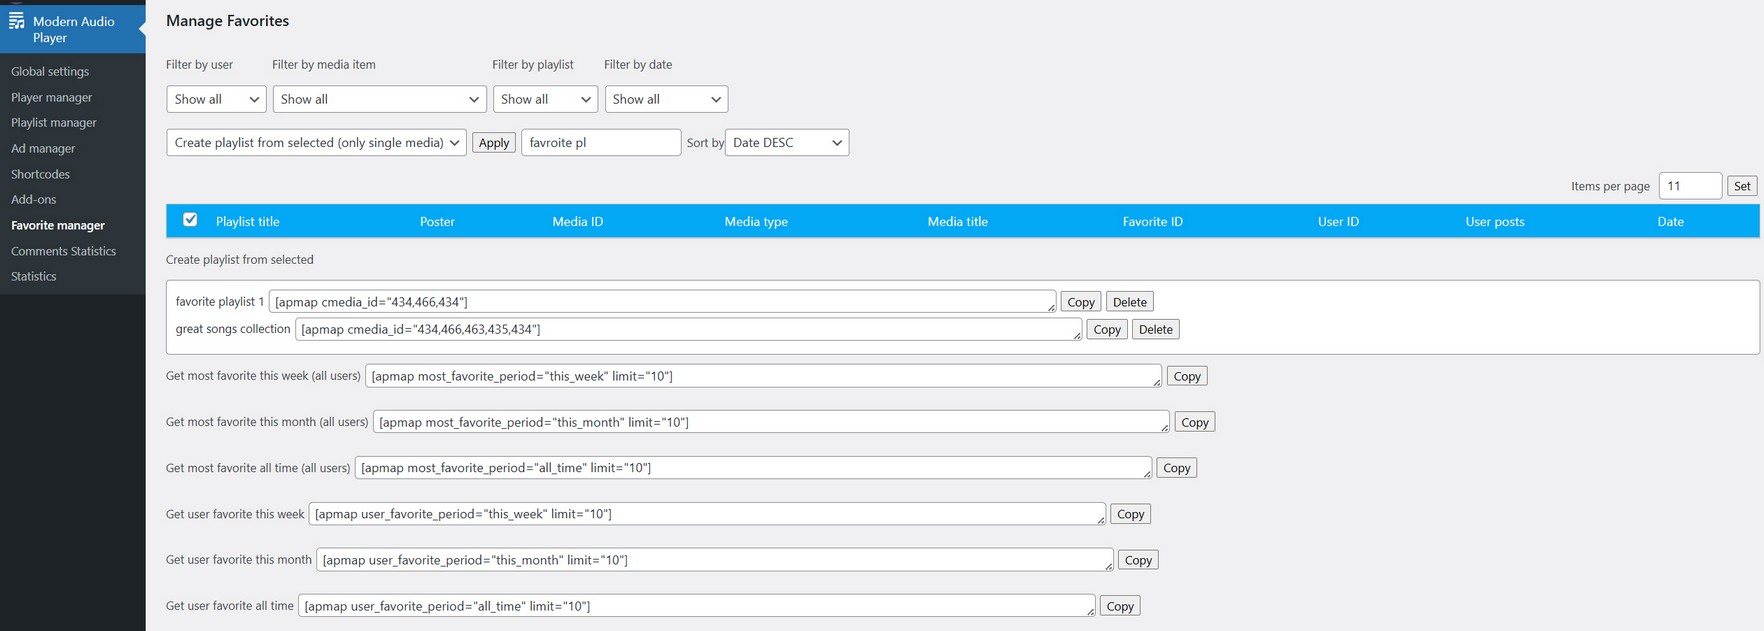
User can also create their own shortcodes from selected favorites and save them in this section.
Media addon
Media AddOn allows playback of following media inside Modern Audio Player: Youtube, Soundcloud, Vimeo, Wista, Twitch.
Media AddOn is available on the following link
Using Media AddOn
First make sure addOn is activated together with main Audio player plugin.
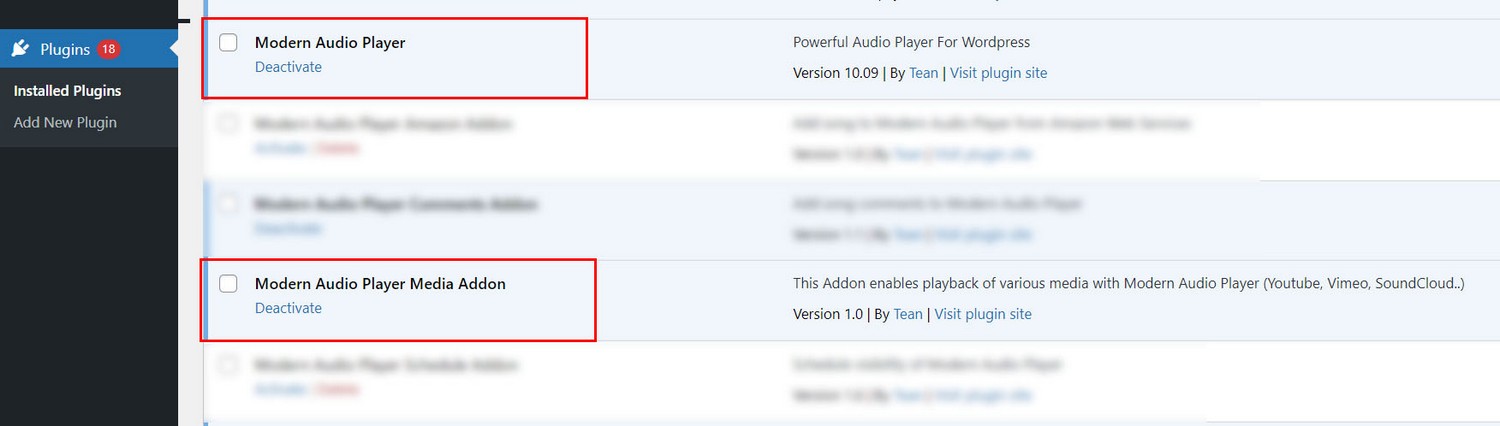
Also, make sure you have the latest compatible version of main Audio player plugin.
Register plugin inside Player manager / Edit player / General / Media Addon tab
Registration is done the same way as registering main plugin.
Notes
Some features are not fully compatible with all media types in this addon.
Playback rate is not supported for type Soundcloud abd Twitch.
Audio waveform will not work with any media type, it only works with type audio. So if you use skin with waveform seekbar, then demos waveforms can be used if exist or provide your own.
Youtube
Using Youtube with API key
Go here for the API key: https://console.developers.google.com and create new project, enable YouTube Data API, go to Credentials, create API key.
Tutorial on how to create Youtube API key: Get youtube api key
Youtube API key needs to be entered in Global settings menu:
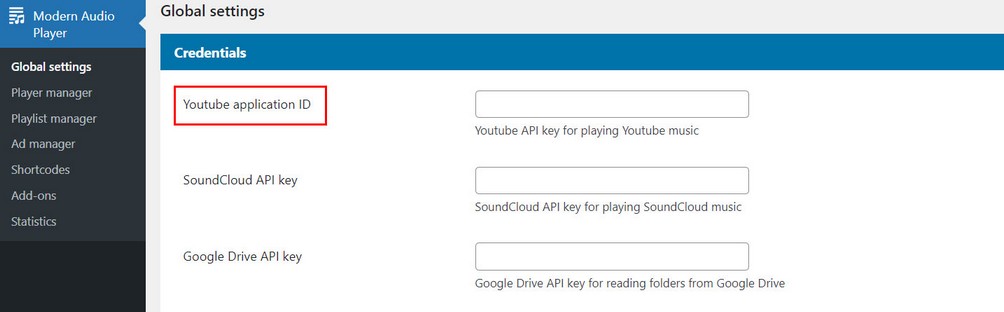
Supported format when APi key is used are Youtube single videos and playlist.
To add youtube inside the playlist, go to Playlist manager / Edit playlist / Add Song dialog and choose:
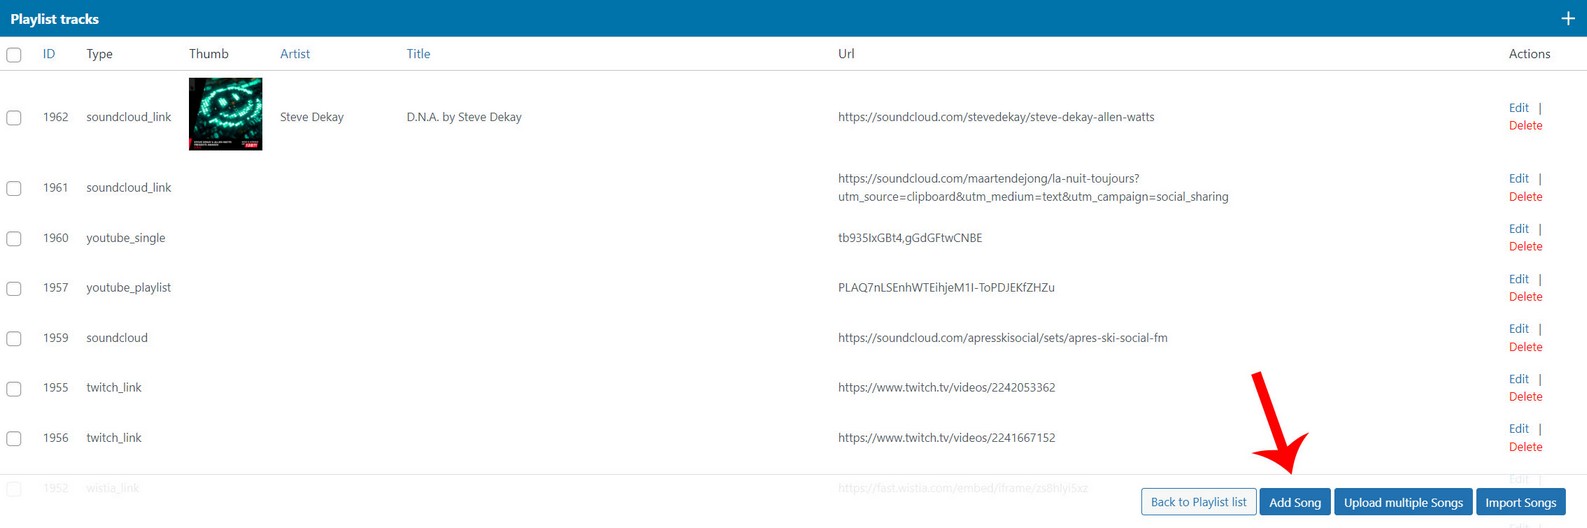

Examples:
Youtube single videos (one or more video IDs separated by comma):
lWA2pjMjpBs,ZQ2nCGawrSY,tg00YEETFzg
Youtube playlist (enter just the PL part in admin):
PLAQ7nLSEnhWTEihjeM1I-ToPDJEKfZHZu
Using Youtube without API key
You can play Youtube single videos and playlist inside the player without API key in following formats:
Youtube single video:
https://www.youtube.com/watch?v=qXQY5ooEGi0
Youtube playlist:
https://www.youtube.com/playlist?list=PLAQ7nLSEnhWTEihjeM1I-ToPDJEKfZHZu
To add Youtube inside the playlist, go to Playlist manager / Edit playlist / Add Song dialog and choose:

Note that using this method without API key, its not possible to retrieve indvidual songs inside Youtube. So if you provide link above ( https://www.youtube.com/playlist?list=PLAQ7nLSEnhWTEihjeM1I-ToPDJEKfZHZu ) player will play this playlist, but will not show individual songs listed inside the playlist!
Using Youtube without API key
You can play Youtube single videos and playlist inside the player without API key in following formats:
Youtube single video:
https://www.youtube.com/watch?v=qXQY5ooEGi0
Youtube playlist:
https://www.youtube.com/playlist?list=PLAQ7nLSEnhWTEihjeM1I-ToPDJEKfZHZu
To add Youtube inside the playlist, go to Playlist manager / Edit playlist / Add Song dialog and choose:
Soundcloud
Soundcloud can be used with or without API key.
Using Soundcloud with API key
Register here: http://soundcloud.com/you/apps/new and enter Client ID|Client secret in Global settings menu:

You can also enter multiple keys separated by comma: Client ID|Client secret,Client ID|Client secret. Keys will be used at random on each player start.
To add Soundcloud inside the playlist, go to Playlist manager / Edit playlist / Add Song dialog and choose:
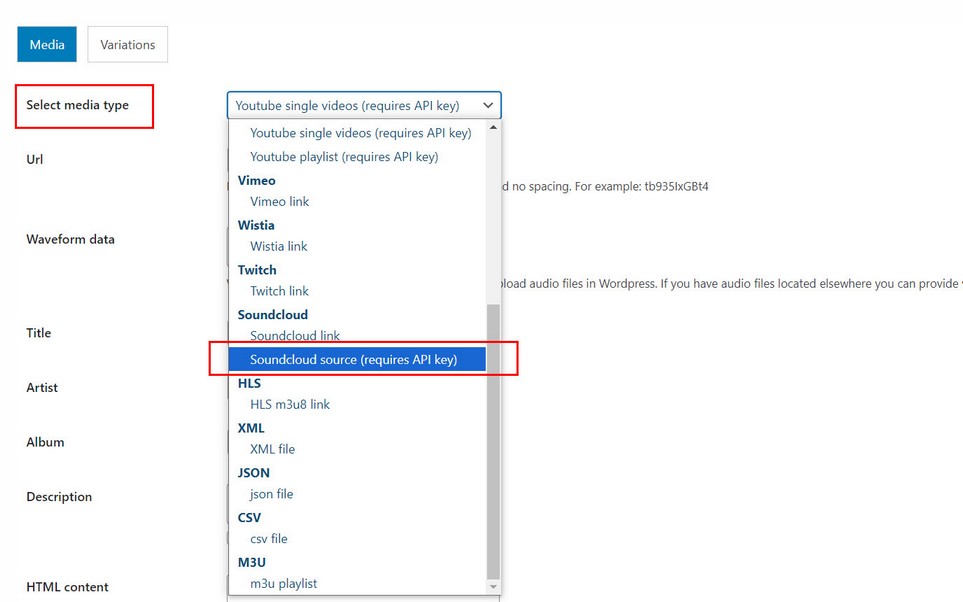
Supported Soundcloud examples:
single track:
http://soundcloud.com/trance/trance-single-138-bpm-anvil
playlist/set:
https://soundcloud.com/simps1988/sets/mainstage-music-a-state-of
Using Soundcloud without API key
You can play Soundcloud songs inside the player without API key in following formats:
single track:
http://soundcloud.com/trance/trance-single-138-bpm-anvil
playlist/set:
https://soundcloud.com/simps1988/sets/mainstage-music-a-state-of
To add Soundcloud inside the playlist, go to Playlist manager / Edit playlist / Add Song dialog and choose:
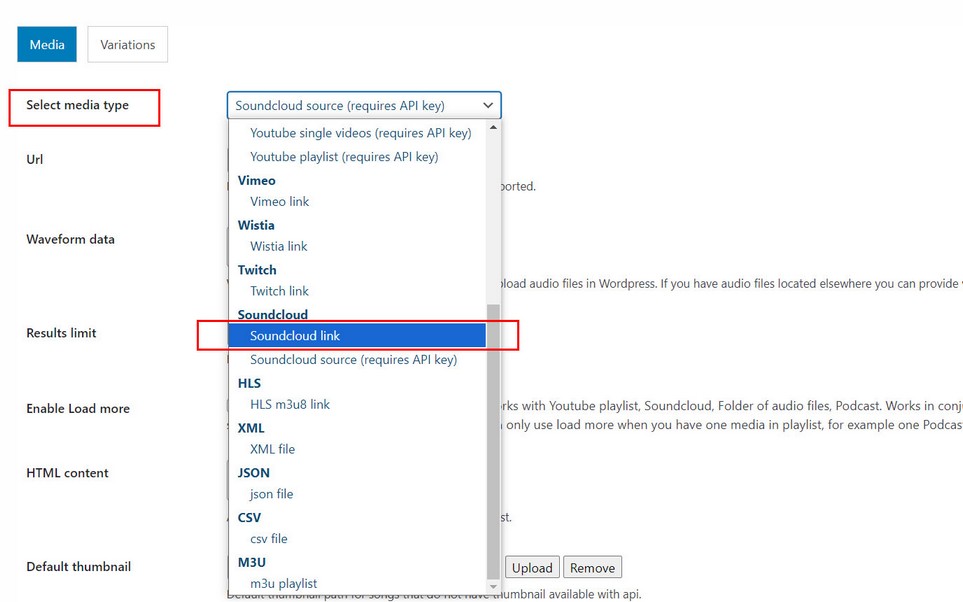
Note that using this method without API key, its not possible to retrieve indvidual songs inside Soundcloud set for example. So if you provide link above ( https://soundcloud.com/apresskisocial/sets/apres-ski-social-fm ) player will play this playlist, but will not show individual songs listed inside the playlist!
Vimeo
Using Vimeo
Supported Vimeo examples:
single track:
album / showcase:
https://vimeo.com/album/3498469/embed
If there is an option to auto advance Autoplay next video in showcase (when current video ends) choose this option with embed url!
Other formats may be supported like the showcase link above.
To add Vimeo inside the playlist, go to Playlist manager / Edit playlist / Add Song dialog and choose:
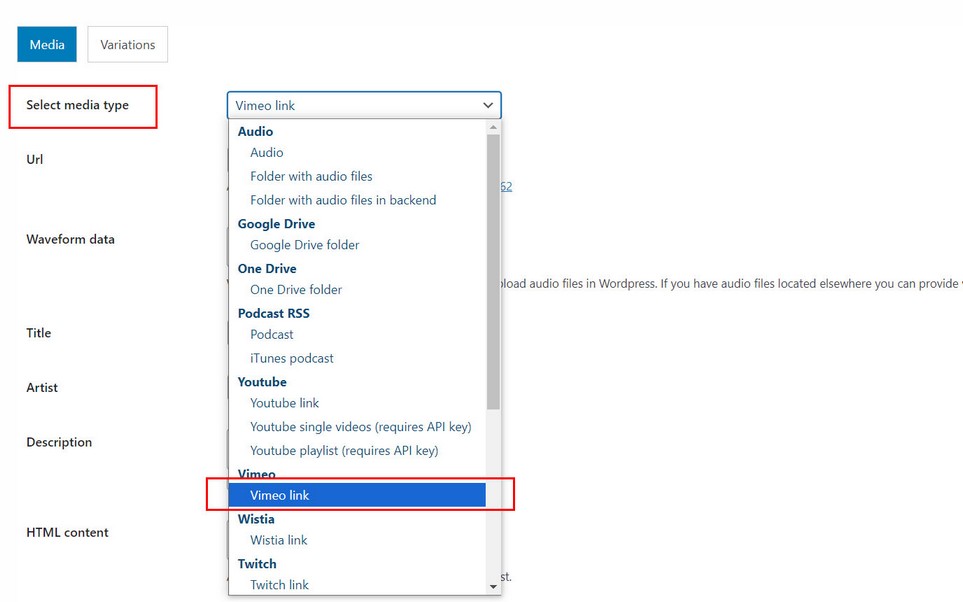
Wistia
Using Wistia
Supported Wistia examples:
single track:
https://fast.wistia.com/embed/iframe/zs8hlyi5xz
To add Wistia inside the playlist, go to Playlist manager / Edit playlist / Add Song dialog and choose:

Twitch
Using Twitch
Supported Twitch examples:
single track:
https://www.twitch.tv/videos/2197353298
To add Twitch inside the playlist, go to Playlist manager / Edit playlist / Add Song dialog and choose:
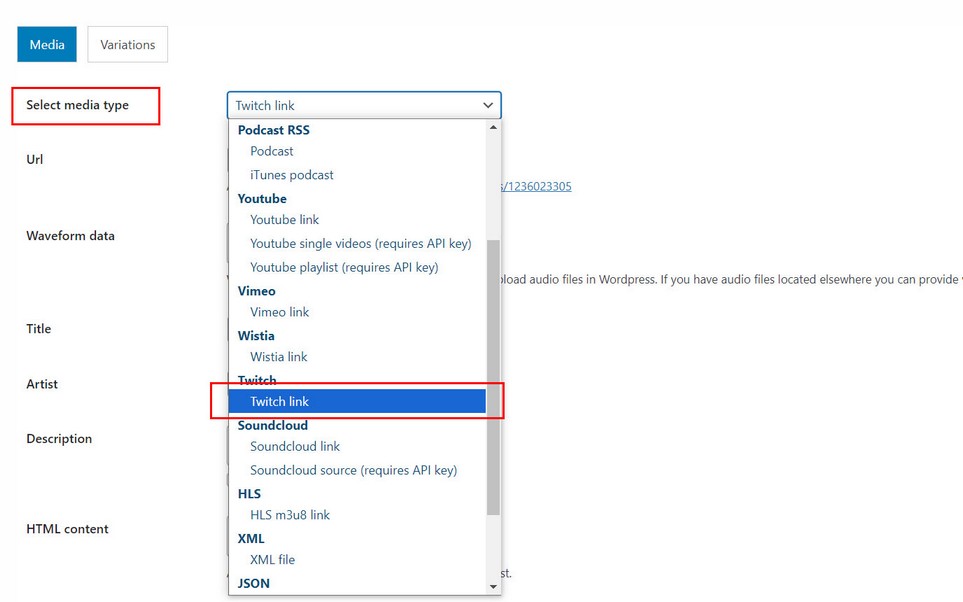
Schedule addon
Schedule AddOn is available on the following link
Using Schedule AddOn
First make sure addOn is activated together with main Audio player plugin.

Also, make sure you have the latest version of main Audio player plugin.
Register plugin inside Player manager / Edit player / Schedule tab

Registration is done the same way as registering main plugin.
Access schedule settings in Player Manager / Edit Player / Schedule tab. Most important settings include setting your timezone and locale language (your region language).

Adding schedules to player
You can add schedule to player in any timeframe or in general.

Which opens add schedule modal window
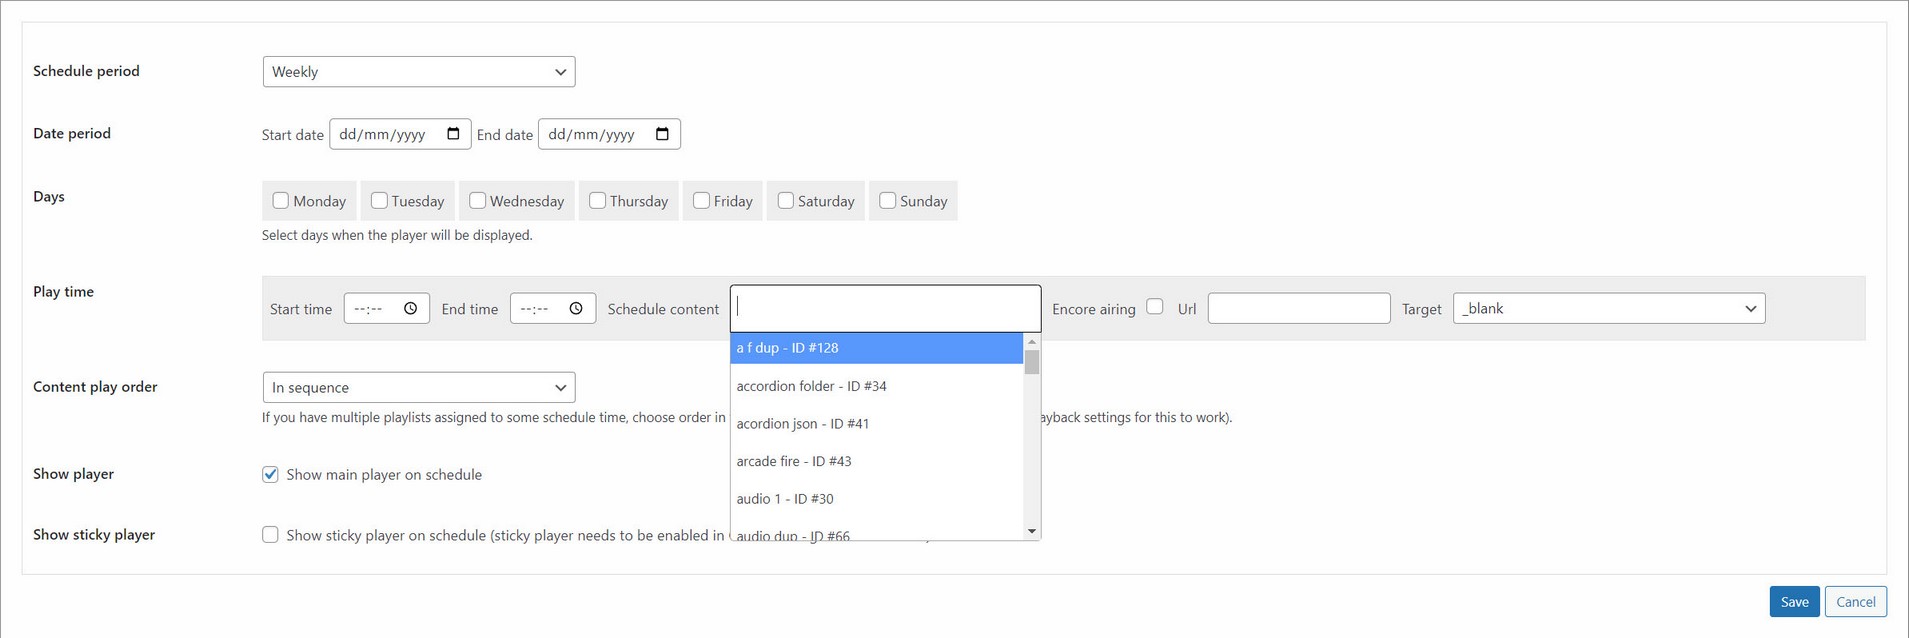
Sometimes some schedule you create may overlap with another schedule in which case you may get a warning. Having mutiple schedules for the same date and time period will not neccessarily cause an error in the player, but only first schedule will actually be shown (played) in the player.
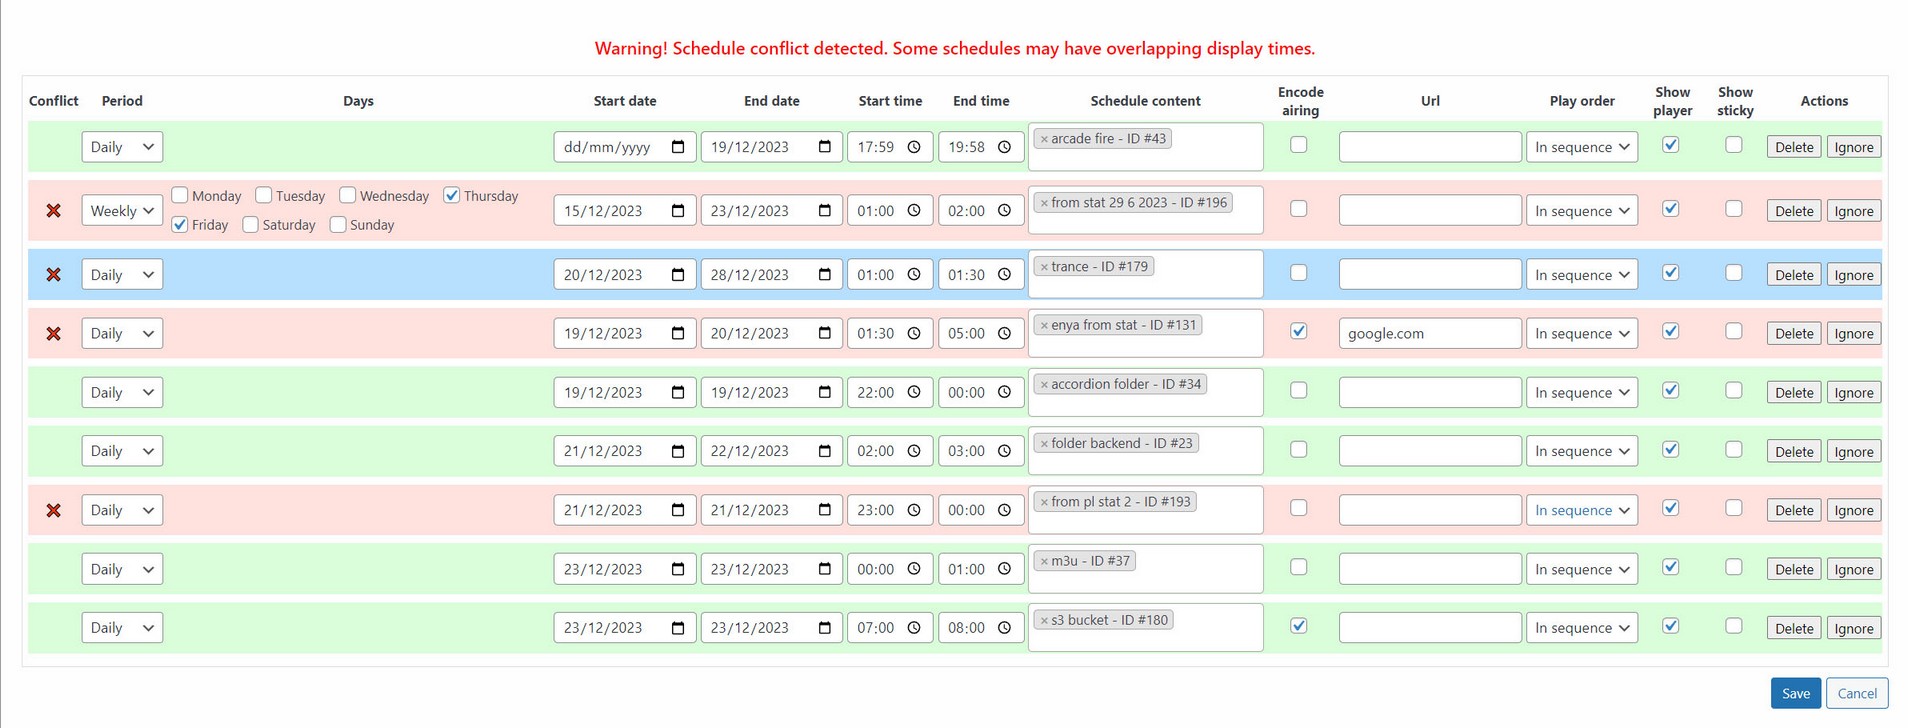
Once you set up a schedule it is ready to be displayed in the player on the front page. Schedule requires a player shortcode to exist in the page. For example:
[apmap player_id="X"]
Note that playlist_id in shortcode is not required for player with schedule set, because player will play what is set on schedule, not what is set with playlist_id
When the schedule is set on the player, if the schedule is not active at any given time, player will not be displayed. So if you add a schedule to a player, expect a player to be hidden until the schedule becomes active.
Show schedule calendar in the front page
Aside from setting schedule on the player, you can also display schedule calendar in the page using the following shortcode.
[apmap_schedule_table player_id="X" calendar_type="week"]

calendar_type= week / month
This will display the same calendar which is shown in the schedule tab. This calendar is shown all the time and its not related the the player itself (except for showing player schedule times).
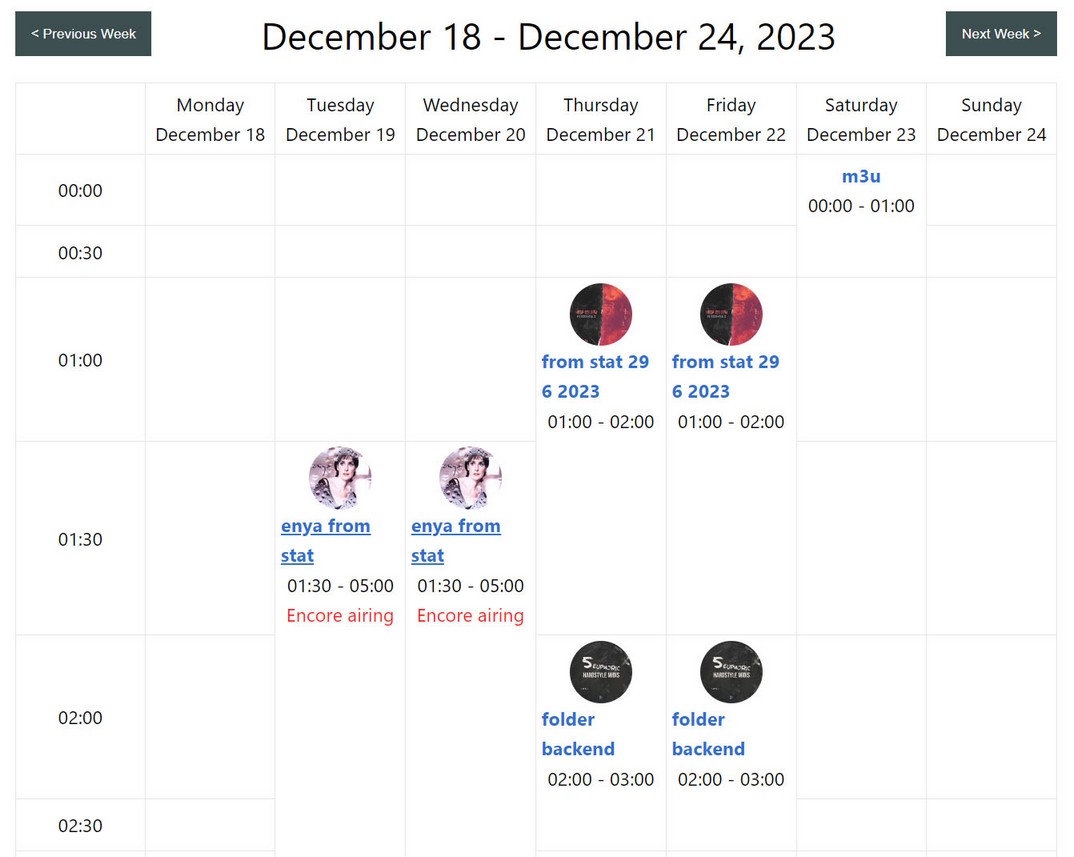
Comments addon
Comments AddOn is available on the following link.
Intro
Comments enables users adding comments to songs. Comment functionality can be enabled per player. Configure who can post comments (registered / unregistered users / specific user roles..). Detailed comment statistics (most commented songs, users who posted the most comments etc) is available in plugin menu.
Note that comment functionality is not available in all player skins (for example skin with circle seekbar or some small skins not containing seekbar).
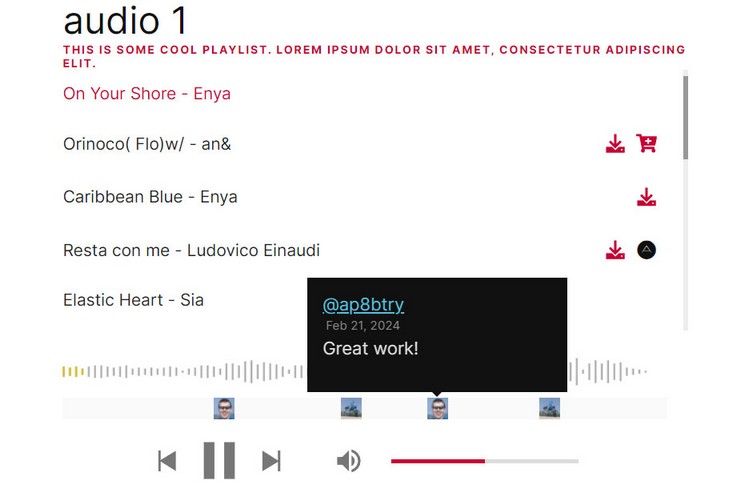
Using Comments AddOn
First make sure addOn is activated together with main Audio player plugin.
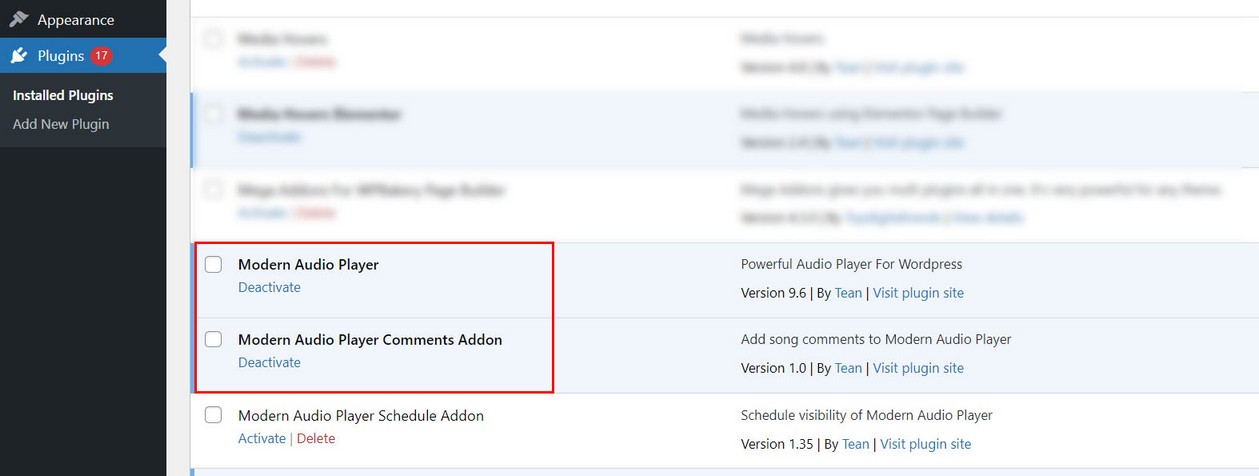
Also, make sure you have the latest version of main Audio player plugin.
Register plugin inside Player manager / Edit player / Comments tab

Registration is done the same way as registering main plugin.
Access comments settings in Player Manager / Edit Player / Comments tab.
General settings
Activate comment functionality here.
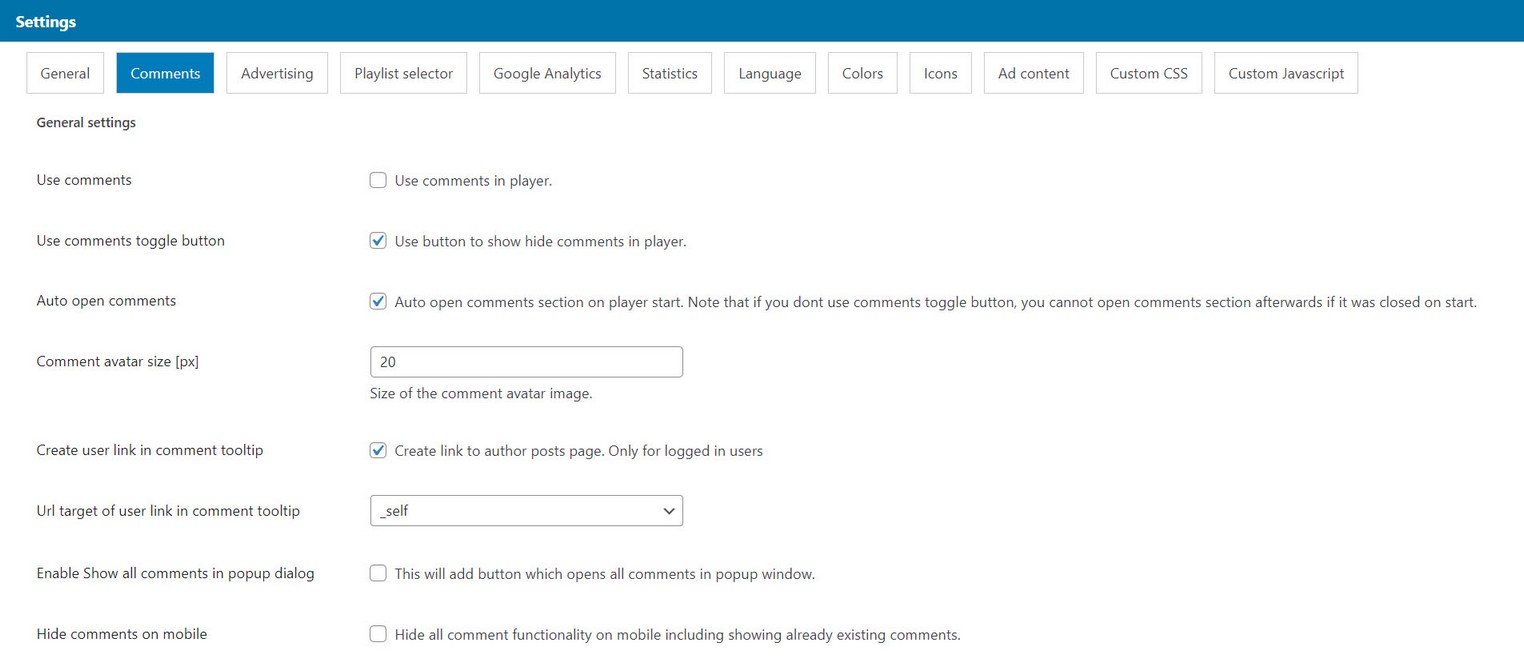
Access settings
Configure who can comment

Translation settings
Translate comment related
![]()
Notes
Comments are not supported in embed (when player is embedded).
Manage comments in Songs
You can view song comments per playlist inside Playlist manager / Edit playlist / Edit song / Comments tab:

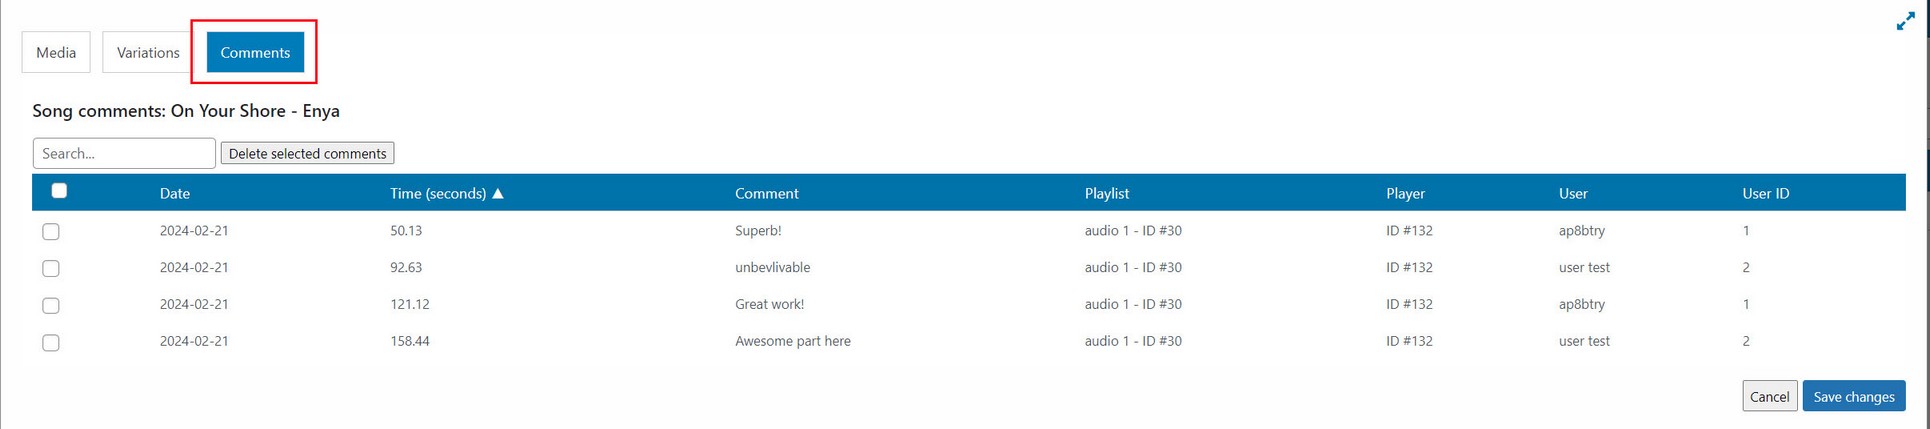
From there you can also delete song comments.
If you want to delete all comments for this playlist, you can do it in Playlist manager / Edit playlist / Playlist options / Maintenance tab:
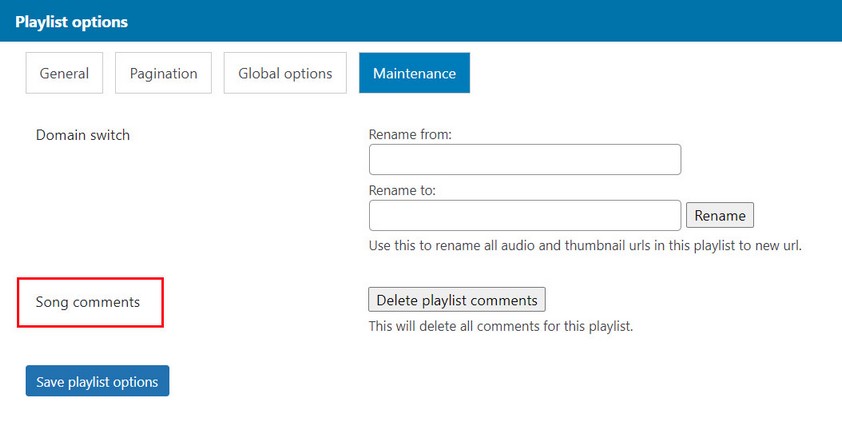
Anonymous comments
If you are using direct shortcode where you dont have playlist defined like so:
[apmap preset="epic" use_song_comments="1"][apmap_audio type="audio" path="AUDIO_URL" title="SONG_TITLE" artist="SONG_ARTIST"][apmap_audio type="audio" path="AUDIO_URL" title="SONG_TITLE" artist="SONG_ARTIST"][/apmap]
Then you cannot view comments in backend because they are not conected to any playlist. You can still view comments in Song statistics. If you want to delete such song comments, you can do it in Song statistics section.
Note that such usage of comments is not encouraged, because each comment does not have a unique song reference so you cannot really query a database to retrieve comments for specific songs.
Comments statistics
Access comments settings in Comment statistics plugin menu.

Accordion from folder
Accordion AddOn is available on the following link
Player can display songs and playlists as accordion list. This allows you to group similar songs and albums inside quick access list. Accordion can be created from folder of audio files, from JSON file or from playlists inside Playlist manager.
Accordion from directory of songs
To read audio files from folders in "accordion mode", there has to be one PARENT-FOLDER which contains other folders with audio files, but it does not contain audio files itself.
Example:
PARENT-FOLDER
   - folder-example1 (contains audio files)
   - folder-example2 (contains audio files)
   - folder-example3 (contains audio files)
   ....
Each "folder-example" if going to be one accordion item. "folder-example" can be named anyhow.
Plugin creates map-file-dir folder inside WordPress uploads directory which will be used for reading audio files.
Place that folder (PARENT-FOLDER) in wp-content/uploads/map-file-dir directory.
Create new playlist inside Playlist manager, go to add Song and choose Folder with audio files in accordion mode. Then enter folder name in Url field. Optionally, choose option to read ID3 tags from audio files.

Supported formats are mp3, wav, aac, flac.
Note: If audio files take long time to load when ID3 option is used, check size of album artwork in your ID3 tags. If artwork size is too large, you may need to reduce size of your album artwork in ID3 tags to speed up folder load when ID3 tags are used!
Accordion from JSON file
Accordion from JSON file
To read audio files from JSON file in "accordion mode" provide data in json/txt file, example is located in documentation/json directory in plugin package.
You can use absolute or relative urls for audio in JSON file.
If you use relative urls you can prefix media URLs with Prefix media url playlist option in Edit playlist section. For example, you have this in json file:
[
    {"parent":"Soundroll",
    "children":[
            "Artist - Song name.mp3",
            "Artist - Song name2.mp3",
        ]
    },
]
And you have folder named "my_audio" located in WordPress uploads directory (where your audio files are located), then you prefix with url, so all media from "my_audio" folder will have this url prepended.
Add this as prefix media url:
http://www.some-domain.com/some-folder/wp-content/uploads/map-file-dir/my_audio/Full audio url will be constructed like this:
http://www.some-domain.com/some-folder/wp-content/uploads/map-file-dir/my_audio/ + parent (folder) + / + children (audio filename)
Then this will become:
http://www.some-domain.com/some-folder/wp-content/uploads/map-file-dir/my_audio/Soundroll/Artist - Song name.mp3
Alternatively you can provide full audio url in json (and not use prefix url), for example:
[
    {"parent":"Artist",
    "children":[
            "http://www.some-domain.com/some-folder/Soundroll/Artist - Song name.mp3",
            "http://www.some-domain.com/some-folder/Soundroll/Artist - Song name2.mp3",
        ]
    },
]
Create new playlist inside Playlist manager, go to add Song and choose Json with audio files in accordion mode. Then upload your JSON file. Optionally, choose option to read ID3 tags from audio files.

Supported formats are mp3, wav, aac, flac.
Note: If audio files take long time to load when ID3 option is used, check size of album artwork in your ID3 tags. If artwork size is too large, you may need to reduce size of your album artwork in ID3 tags to speed up folder load when ID3 tags are used!
Accordion from Playlist manager
Accordion from playlists inside Playlist manager
Any playlist from Playlist manager can be loaded in accordion mode. Note supported are only single media (audio, HLS format). For example podcast media is NOT supported in accordion mode. Not supported audio files from plalyist will be skipped when accordion is created (if your playlist contains mixed media inside).
To load exisiting playlists in accordion mode, go to Shortcode manager, Accordion Playlist section, choose playlists and player to use and generate shortcode.

Accordion settings
Accordion settings
Additional accordion settings are available in Player manager / General / Accordion tab

Accordion CSS
To style accordion header use example CSS:
.hap-accordion-item-header{
    background: #e91e63;
    color: #fff;
}
.hap-accordion-item-description{
    color: #555;
}
.hap-accordion-item-header:hover{
    background: #f6407d;
}
Troubleshooting
Adding songs from Wordpress Media library never completes
If adding songs from Wordpress Media library never completes (and preloader just keeps spinning) its most likely related to waveform creation.
When songs are added from Media library, plugin automatically creates waveform for each songs, which takes time and browser resourses.
Read more about audio wavefrom creation
You can turn this option off in plugin Global settings.
Autoplay
Autoplay is disabled since recent browser changes and requires user interaction with the page before (like a click or keypress) to start playback: https://developers.google.com/web/updates/2017/09/autoplay-policy-changesVolume on mobile
Volume cannot control the on Apple IOS with javascript, you have to use the physical button on the actual phone: Volume Control in JavaScript
PHP zip extension not installed or enabled! Export player and playlist feature cannot be used.
Player and playlist export feature requires PHP zip extension enabled.
If you get this message in settings, check in cpanel on the server if you can enable zip php extension.
Plugin does not work as expected
If the plugin does not work as expected, try the following tests to see if it makes a difference and what could be causing an issue:
1. Update to latest plugin files available on Codecanyon
2. Switch to default Wordpress theme
3. Check for errors in browser developer console (Chrome F12 key, Console tab)
4. Try to deactivate any 3rd party plugins (the ones that not come with Wordpress)
5. If you still have issues after you have done all changes above, you can send a message at http://codecanyon.net/user/Tean#contact , provide your PURCHASE CODE, provide a link to your live page, and a temporary user and password for your wordpress admin panel so we can have a look.
Contact
How to contact us?
If you have any questions after purchase, send a message at http://codecanyon.net/user/Tean#contact, and provide your PURCHASE CODE.
Social sharing
Using Share feature
Sharing can use using default method or browser native share method (where supported).
This is controlled in Edit player / General settings / Social sharing tab.
Default method uses social sharing icons (Facebook, Twitter etc). Native share does not require these icons.
If both default and native share are used, player will first try to use native share, then if this is not supported, will fallback to default share.